• Skip to primary navigation
  • Skip to main content
  • Skip to primary sidebar
  • Skip to footer

Looking for something?

Get in touch

  • Email
  • Facebook
  • Instagram
  • Pinterest
  • Twitter
  • YouTube

Vivat Veritas

Custom Wedding Dress & Kimono Upcycled Clothes | オーダーメイドウェディングドレス&着物ドレス

  • Home
  • About
    • Press
    • Collaborations
  • Blog
  • Bridal
    • Lovely Words
    • Price List
  • Sewing Class
  • Kimono Dress
    • MADE-TO-ORDER BUSTIERS
  • Contact
  • Location
  • 日本語
/ Tutorial / Tutorial | How to Make a Poncho Top

Tutorial | How to Make a Poncho Top

May 10, 2011 By Chie

Hi! As I promised, here is the tutorial on how to make a poncho top from a rectangle fabric! 

how to make a poncho top diagram

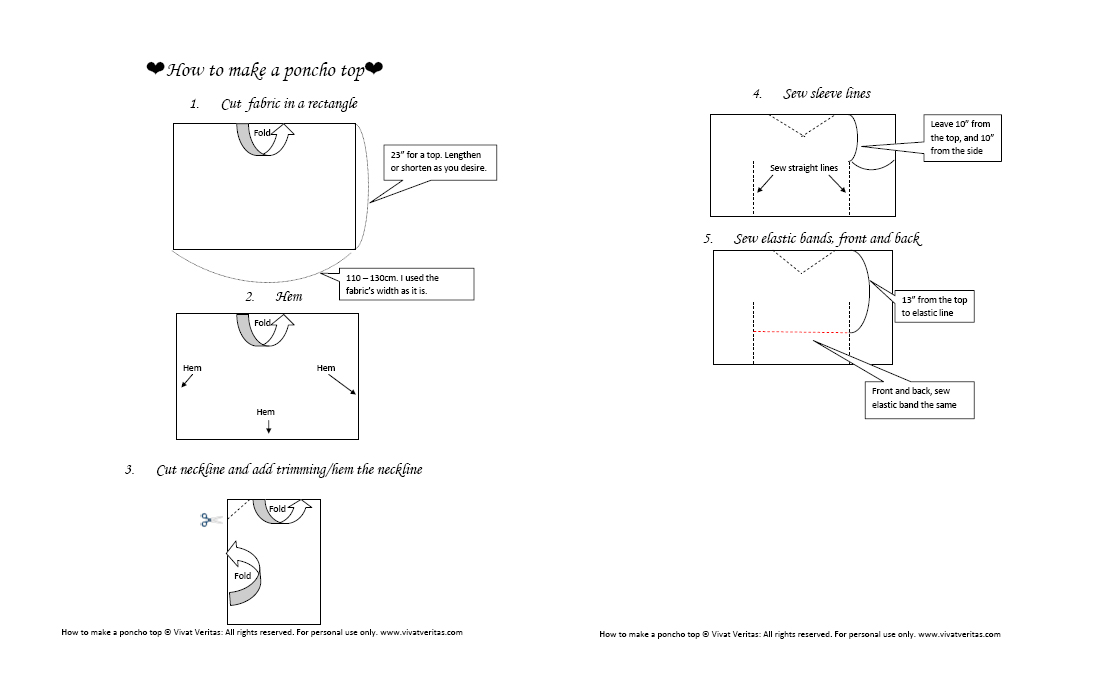
I made some diagrams to show how to cut the fabric and where to sew. You can click the image above to enlarge.

Material needed:
❤ 1-2 yards or fabric, depending on the length of the top/dress. I recommend fabrics that flows well, and avoid stiff fabrics, such as denim, 100% cotton, linen or wool. I used very light weight polyester fabrics for my top and dress. I recommend light weight poly or rayon blend. Fabric that drapes well would work well.
❤ Thread
❤ Elastic band. This is what you use to cinch the waist part. Cut two pieces of elastic bands, in length that’s half of your waist. For instance, if your waist measurement is 28″ around, cut two 14″ elastic bands.

If you have any questions, please leave a comment! I will try to answer as much as I can.
Hope you enjoy this and please do share some photos if you make one! (Instagram: @vivatveritas)

View More

Did you like this tutorial?

Check out my other tutorial on how to make a sack dress!

Related Posts

  • Tutorial | MN1003 Wrap Around Maternity Top VariationTutorial | MN1003 Wrap Around Maternity Top Variation
  • Sewing BurdaStyle Coat 116 Part 2
  • handmade red showstopper dressHow to Make Spaghetti Straps

Filed Under: Tutorial Tagged With: creation, top, tutorial

Reader Interactions

Previous: Little girl’s sun dress
Next: Moving!

Comments

  1. Paunnet says

    May 10, 2011 at 9:37 am

    Thanks, Chie!

  2. Ai says

    May 10, 2011 at 1:10 pm

    thank you so much chie for sharing your talent:-D

  3. brittany says

    May 10, 2011 at 2:25 pm

    Oh my gosh, thank you thank you. I'm making it!

    Kiss
    You Are My Favorite

  4. Sahina says

    June 22, 2011 at 4:13 pm

    Lovely! Thank you so much for the pattern – I’ll definitely be trying it 🙂

  5. G says

    June 23, 2011 at 11:16 pm

    could you explain the folds through out the process? im a bit confused.
    Thank you!

    • Chie says

      June 24, 2011 at 10:58 am

      hi G, sorry for not understanding your question, but could you explain your question again? im not exactly sure what you are asking..thank u!

  6. Nia says

    July 15, 2011 at 9:39 pm

    Whats with the fold part, i don’t understand

  7. mekuo says

    August 5, 2011 at 2:53 am

    Hi 🙂 I think the question asked by “G” was referring to the draping of the sleeves. I understand your diagram (Great job, by the way) but i had to ask to be sure: are you sewing down two separate pieces of elastic to the front and back of the garment or do the two pieceshave to meet at the sides (underneath each sleeve)?

    • Chie says

      August 8, 2011 at 10:12 am

      hi mekuo,

      elastic bands are sewn on two separate pieces: both front and back. but leave the sleeve part without elastic band. the sleeves are separated from a bodice with just one simple seam as the diagram shows. so the elastic needs to be sewn between the two sleeve seam lines. hope this makes sense! im not all that great at explaining things..please ask if you have any other questions!!

  8. Julie says

    August 17, 2011 at 2:55 am

    Hi, I was wondering about the elastic. Should we sew the elastic band on such that they meet at the sleeve lines? To create a full circle?

    • Chie says

      August 17, 2011 at 11:12 am

      yes! but i used two separate elastic bands, one for front and one for back. i think it’s easier than trying to install one long elastic band.
      one person who tried this tutorial added a belt loop, instead of elastic band. i think it’s a fantastic idea and might be easier than installing an elastic band. just a thought!

      • Julie says

        August 18, 2011 at 7:40 pm

        Okay! Thanks so much for the quick reply! I really love your site 🙂

  9. Ria says

    August 29, 2011 at 12:11 am

    that is awesome i will try to make 1… thnx

  10. Allison says

    December 22, 2011 at 4:44 pm

    This looks like such a fun, easy, versatile piece! I’m anxious to try. I was wondering how long of fabric you used for the dress version? Thank you!

    Allison

    • Chie says

      December 22, 2011 at 6:08 pm

      Hi Allison, I think I use about 1.5m of fabric for the dress version. Hope this helps:)

  11. Kyla says

    March 13, 2012 at 10:31 am

    I don’t understands the folds either – what are you folding and to where?

    • beal says

      April 4, 2012 at 11:43 am

      The fabric is folded in half initially (see fold line at the top in the first & second graphics). Basically, this is how you will wear the shirt when it’s complete. Just imagine your head is coming out in the middle of the top fold.

      Then the fabric is folded in quarters (now the fold is at the top and the side in the third graphic). This allows you to create the neckline with one cut instead of two. If it were still folded in half, you’d have to make a V-shaped cut–cutting twice. By folding it in quarters (left to right), you make only one diagonal cut.

      The last two images have the fold at the top again.

  12. Jessica says

    May 8, 2012 at 3:55 pm

    This is all to be sewn right-side of the fabric OUT, correct? If you did it traditionally, the fabric would get all bunched up at the sides, and not flowy, right?

    • Chie says

      May 8, 2012 at 6:44 pm

      Hi Jessica, Yes, the side seams (the straight lines) should be sewn with wrong sides of the fabric facing each other, and sewn from the out side. Sorry for the lack of explanation!

  13. Jess says

    August 22, 2012 at 8:12 am

    Hey, I love this! for the picture that’s shown, how much fabric did you use? thanks xxx

    • Chie says

      August 26, 2012 at 5:01 pm

      Hi Jess,

      I think I used about 1 meter of fabric:)

  14. Lily says

    January 4, 2013 at 2:59 pm

    Hi chie! It looks so beautiful! How much fabric would I use for a 10-12 little kid shirt? I love this and really want to make this I’m always doing artsy things so do u no?

    • Chie says

      January 4, 2013 at 8:09 pm

      Hi Lily, the width of the fabric should be your child’s shoulder to shoulder measurement multiplied by 2. The length should be however long the top should be (from top of the shoulder to shirt hem) multiplied by 2. I hope this helps!

  15. Mona says

    January 14, 2013 at 1:40 pm

    Hello!
    Thanks a lot for your teaching.
    Be happy and merry!

    • Chie says

      January 14, 2013 at 3:43 pm

      No problem!

  16. Paula says

    February 21, 2013 at 3:16 am

    Awesome poncho! Thank you very much!

  17. Debbie says

    June 26, 2013 at 9:01 am

    Can you give a quick explanation on how to finish the neckline? Was it done with a facing, bias tape, etc? Thanks!

    • Chie says

      June 27, 2013 at 8:14 pm

      Hi Debbie, sorry the tutorial is not so through. I wrote it a while ago and there are few things that I would do differently. I would cut the shoulder seams apart, instead of on big square, finish the neckline either by bias stripes or facing (if you use sheer fabric like I did, bias strips work better) and sew the shoulder seams together. I hope this makes sense. Let me know if you have any other questions!

  18. Kelsee says

    July 17, 2013 at 9:50 pm

    When you cut out the neck hole, what were the measurements you used? I’m worried that I’ll cut it out, then realize the neck hole is too big.

  19. Yami_Hanako says

    August 17, 2013 at 8:33 pm

    Hey! I really love your work, you are an artist!

    So, I’m going to try this poncho top soon, I’m going to do it a little longer because I want it to be a dress.

    I want it to look like 1920’s style so I have been thinking of adding a lace detail like you did with the Minnie t-shirt but I can’t find a lace anywhere, how did you get it? from another t-shirt? do you think it will look good?

    Thanks!

Trackbacks

  1. iCandy Guest Post – Fun in the Sun{dress} says:
    July 3, 2011 at 12:09 pm

    […] This dress is really easy as you can make it out of two rectangle fabrics. I love easy projects using rectangles, and if you are interested, check out my other tutorials for reversible paper bag skirt and poncho top […]

  2. Tutorials says:
    January 19, 2012 at 6:50 pm

    […] Tutorial: How to make a poncho top Grab My Buttons!

    […]

  3. DIY: Poncho Top « High Fashion Magazine says:
    May 11, 2012 at 10:52 am

    […] An easy-to-wear and even easier-to-make Poncho top, made from a rectangular piece of fabric! Follow the picto-gram and the few instructions below! (DIY from Vivat Veritas) […]

  4. Sewing ideas | All the world is a stage says:
    June 1, 2013 at 8:41 am

    […] This is a pattern for a top, but she also advises that you can use the same pattern to make a dress (which is what i intend to do). I just need to find the perfect fabric. To see the pattern, visit the Vivat Veritas blog […]

  5. Easy Ways to Make Cute Ponchos | For Women says:
    February 21, 2014 at 5:58 pm

    […] Make a cute poncho top out of a rectangle fabric – easy peasy, even for beginners. And the final result is so great – this is a project totally worth trying. Check the tutorial at vivatveritas.com […]

  6. Floral Blog says:
    January 17, 2017 at 6:52 pm

    Lily Lace Up Poncho

    […] e tutorial is not so through. I wrote it a while ago and there are few things th […]

Primary Sidebar

JOIN MY EMAIL LIST

You can read a sample newsletter here, including my latest edition.

Recent Posts

  • Seplumo Nihonbashi POP UP
  • Coaster Aobadai X VIVAT VERITAS POP UP
  • RiE MORRiS 1st Album 「On My Mind」 Release Party
  • BLACK FRIDAY Coupon Code 
  • Kinko Town, Kagoshima – Ao no Craft Marche

Categories

Follow me

  • Email
  • Facebook
  • Instagram
  • Pinterest
  • Twitter
  • YouTube

♥ Blog Archives

  • Etsy
  • Creema

Footer

ABOUT ME

My name is Chie. I design and make custom wedding dresses in Tokyo, Japan. Read More…

GET UPDATES!

Get monthly updates including new items in the shop, favorite links and more!

CONTACT

Feel free to send a message if you have any comment:

chie@vivatveritas.com

LET´S GET IN TOUCH

  • Email
  • Facebook
  • Instagram
  • Pinterest
  • Twitter
  • YouTube
「GOOD DAY PARK!」🌱
横浜赤レンガで開催された環境保護をテーマにしたイベントで、@riemorrisvibes に衣装提供しました👗
彼女の明るさにぴったりのライムグリーン&松の木柄の着物リメイクセットアップを制作しました✨ 

Provided an outfit for @riemorrisvibes at the eco-themed event held at Yokohama Red Brick Warehouse! 
Created a vibrant lime green kimono remake set-up with pine tree patterns to match her bright energy. ✨ 

#KimonoRemake #Sustainable
#GoodDayPark #GreenroomFestival #みなとみらい #着物リメイク #サステナブル
黒留袖のリメイクは私が大好きなもののひとつです🥹👌
黒地を背景にした鮮やかな柄はクリムトのアートを思い出させます🎨
こちらは華やかな花柄が映えるジャンプスーツにしました✨ 

✔ 一重仕立てで通気性抜群、夏も快適 
✔共布ベルト&丸バックルで愛らしいアクセント
✔アクセサリーが映える エレガントなVネック
✔ カシュクール風トップス

Upcycling a black tomesode kimono is one of my favorite things! 🥹👌 
The vibrant patterns against the black backdrop remind me of Klimt’s art. 🎨 

✔ Lightweight single-layer fabric, breezy for summer 
✔ Charming fabric belt & round buckle accent 
✔ Elegant V-neck, perfect for showcasing accessories 
✔ Kashkool-style top for a refined look 

Big thanks to @pepamoricet (model) and @carolinemarchante (photographer) 💕

#KimonoRemake #SustainableFashion #BlackTomesode
#着物リメイク #サステナブルファッション #黒留袖
Behind the lens, beyond the glam ✨📸 Sneak pee Behind the lens, beyond the glam ✨📸
Sneak peek at the magic in motion🌸

撮影の舞台裏📸✨

Model @jasineoftherose
Flower @hanasakie
Make up and hair @hmua_mami
Jewelry @catwalk_bijoux
Photographer @casa_mari_portrait

#撮影裏側 #BTS #FashionShoot #CreativeProcess #StyleInTheMaking
壺柄×無地オレンジのリバーシブル帯 壺柄×無地オレンジのリバーシブル帯ビスチェ🎴
表情がガラッと変わるツーウェイデザイン。
カジュアルにもドレッシーにも映える一着✨
後ろは編み上げリボンでサイズ調整も◎

Reversible bustier made from an obi with a unique tsubo (jar) motif on one side and solid orange on the other🎨
Elegant curve neckline + lace-up back = perfect fit.
From parties to street style — one piece, endless looks✨

Model @1.yve.1
Photographer @capturetokyo
Make up artist @mami_hmua

#帯リメイク #ビスチェコーデ  #帯ファッション
#KimonoBustier  #JapaneseStyle #TwoWayOutfit #ModernKimono
かのこ柄の赤いウォッシャブル着物から、ミディ丈のワンピースを仕立てました👘✂️
クラシカルなカシュクールデザインのフロントと、背中がまるく開いたバックシャンなシルエットがポイント。
ジャケットやカーデを羽織れば、普段使いにもぴったりです🧥✨
Vネック、ウエストのタック、すっきりIライン、ふんわりパフスリーブ…
シンプルだけど、細部までこだわった一枚です🌸

Made this midi dress from a washable kanoko-patterned red kimono👘✨
From the front, it looks like a classic cache-coeur dress — but turn around, and there's a chic, round cut-out in the back.
Layer it with a jacket or cardigan for an easy everyday look🧥🌿
Features a V-neckline, subtle tucks at the waist, a clean I-line silhouette, and puff sleeves with an open back for a modern twist🌸

Photographer @shirapyonphoto
Model @myon_y
Make up and hair @kaori0048

#HandmadeDress #CacheCoeurStyle #ModernKimono #UpcycledFashion 
#着物リメイク #カシュクールワンピース #和モダンファッション #ハンドメイド服 #kimonoremake
思い出の帯が毎日活躍するアイテムに🎒 
タンスで眠っていた帯が、A4サイズやPCも入る大容量リュックに生まれ変わりました。
シンプルなコーデのアクセントになる和モダンなステイトメントピース✨ 
内ポケット付きで機能性も◎ 
ストラップのメタルはゴールドorシルバーから選べます。 

📏サイズ:高さ40cm 幅30cm マチ5cm 

A cherished obi transformed into a daily essential 🎒✨ 
This upcycled backpack, made from an obi, fits A4 documents or a laptop with ease. Features an inner pocket for functionality, with strap metal options in gold or silver. 

📏 Size: H 40cm, W 30cm, D 5cm 

#ObiBag #Upcycled #SustainableFashion
#帯バッグ #アップサイクル #和モダン #サステナブル
華やかなレッドに、ゴールドの紅葉柄が映えるビスチェ ✨

帯をリメイクた特別な一点。
柔らかなカーブのネックラインが、女性らしくエレガントな雰囲気を引き立てます。

パーティーや特別なイベントで視線を集めるのはもちろん、
海外旅行で日本の美しさをさりげなくアピールできるのも嬉しいポイント🇯🇵✨

1枚で主役級の存在感。

シャツの上に重ねてベスト風に、カーディガンのインナーに、
冬ならタートルネックニットに重ねても素敵なコーディネートが楽しめます。
合わせ方次第で、全く違う表情に変わるのが魅力です。

✔️ 洗濯不可なので、夏よりも秋冬に大活躍の予感🍂
✔️ 後ろはリボンを通して編み上げるデザインで、後ろ姿まで可愛い🎀

パーティーコーデにも、カジュアルにデニムで外しても◎
オリジナルなスタイリングを楽しんでみてください💫

A stunning bustier featuring a bold red base with delicate gold maple leaf patterns.
This one-of-a-kind piece is crafted from upcycled obi fabric, adding a unique touch of Japanese tradition.

The soft, curved neckline creates a feminine, elegant silhouette.

Perfect for parties and special events, it’s sure to turn heads wherever you go.
It’s also a great way to subtly showcase Japanese culture during your travels abroad 🇯🇵✨

This piece makes a statement on its own, but you can also layer it for different vibes:
— Over a shirt for a vest-style look
— As an inner piece under a cardigan
— Or layered over a turtleneck sweater in winter for a chic seasonal outfit.

✔️ Note: Not washable, so it’s especially suited for autumn and winter 🍂
✔️ The back features a lace-up design with ribbon details—gorgeous from every angle 🎀

Dress it up for a party or dress it down with jeans for an effortlessly stylish look.
Enjoy styling this unique piece your own way 💫

Photographer @shirapyonphoto
Model @myon_y
Make up and hair @kaori0048

#帯リメイク
#和モダンファッション
#ObiRemake
#OneOfAKindStyle
#StatementPiece
Kimono Remake Jumpsuit 👖 A soft cream base ador Kimono Remake Jumpsuit 👖
A soft cream base adorned with delicate floral patterns gives this piece a refined and elegant look.
The waist tie cinches in to flatter your figure—and yes, it has pockets! (I absolutely love pockets 🤗)

着物リメイクジャンプスーツ👖

淡いクリーム地に花模様が散りばめられた一枚は、華やかで上品な存在感。
ウエストのリボンできゅっと絞ってスタイルアップできます。
そしてもちろん、ポケット付き!ポケット大好きなんです🤗

Model @naka_kanar 
Make up and hair @cocojpn5 
Photographer @tashaadelina 

#着物リメイク #一点もの #ジャンプスーツ
#KimonoRemake #UpcycledFashion #oneofakind
Follow me on Instagram

Copyright © 2025 · vivien theme by Lovely Confetti DMCA.com Protection Status

Copyright © 2025 Vivat Veritas