Transform Megan Nielsen Wrap Around Maternity Top to a Dress
I’m 35 week pregnant this week! I can’t believe how fast my whole pregnancy has gone. I only have 5 more weeks (or less) before baby Kiko will be born. By the way, I plan to avoid the subject of earthquakes and the nuclear power plant situation in this blog. I’m not a news reporter (although my major in college was Broadcast Journalism..I’m such a bad writer!) and constantly dwelling on the whole situation makes me really nervous. So back to the good stuff, sewing and fashion, and the bright side of life here in Japan.
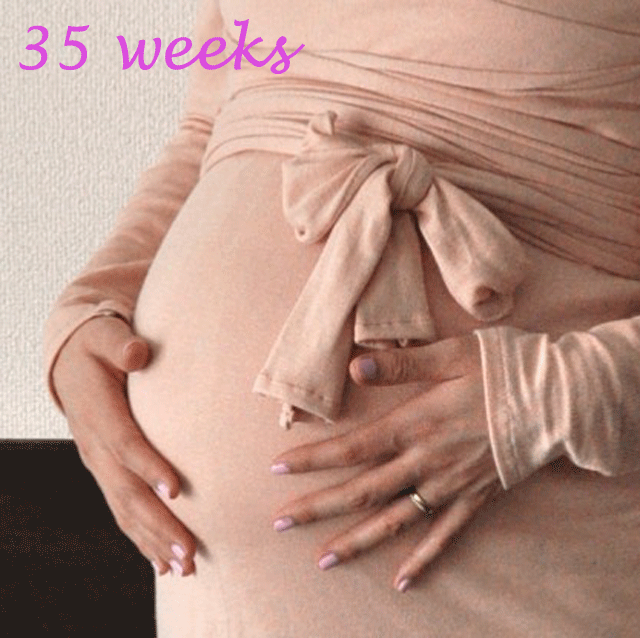
This week, I finally made myself the Meg Nielsen Maternity top variation. The original top looks like this. I think the top is great for the third trimester pregnant body. So, I decided to do a Chie remix of the dress for a couple of reasons. First I do not have jeans that fit me comfortably any longer so I needed to find a way to cover my bottom half. Also I wanted to make it a bit dressier because I planned on wearing this on my baby shower, which had to be canceled….because of the earthquake (I guess I couldn’t completely avoid the topic). So using Meg’s pattern, I made some alteration and turned it into a dress.
I used two-way stretch jersey in peach color. After finding out that I’m pregnant with a baby girl, I find myself wearing more pink – Not sure why, but I want to feel girly in pink and peach and all that pretty colors of Spring.
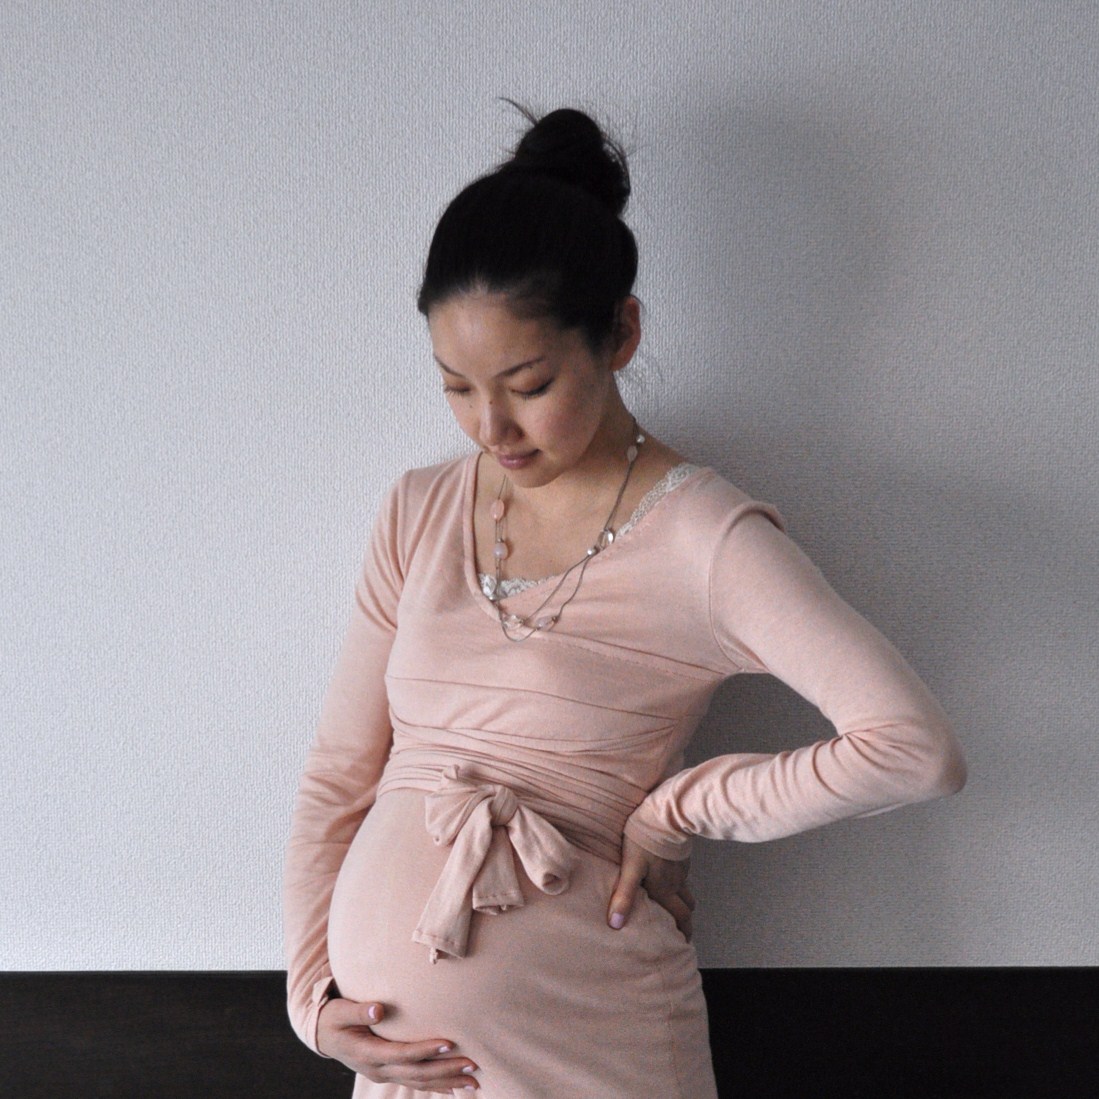


I love how the dress turned out, and I’ve already worn it once. It’s so comfortable! I think the criss cross front might work well for nursing as well.
When I wore this dress, Andy made a confession – he said one of the most unflattering pieces of clothing I own is a pair of black opaque tights. I was shocked. That’s my uniform! Since I barely wear pants, I wear black opaque tights almost every day. I had no idea he thought they were ugly. So I decided to switch to half sheer gray tights to pair with my new dress.
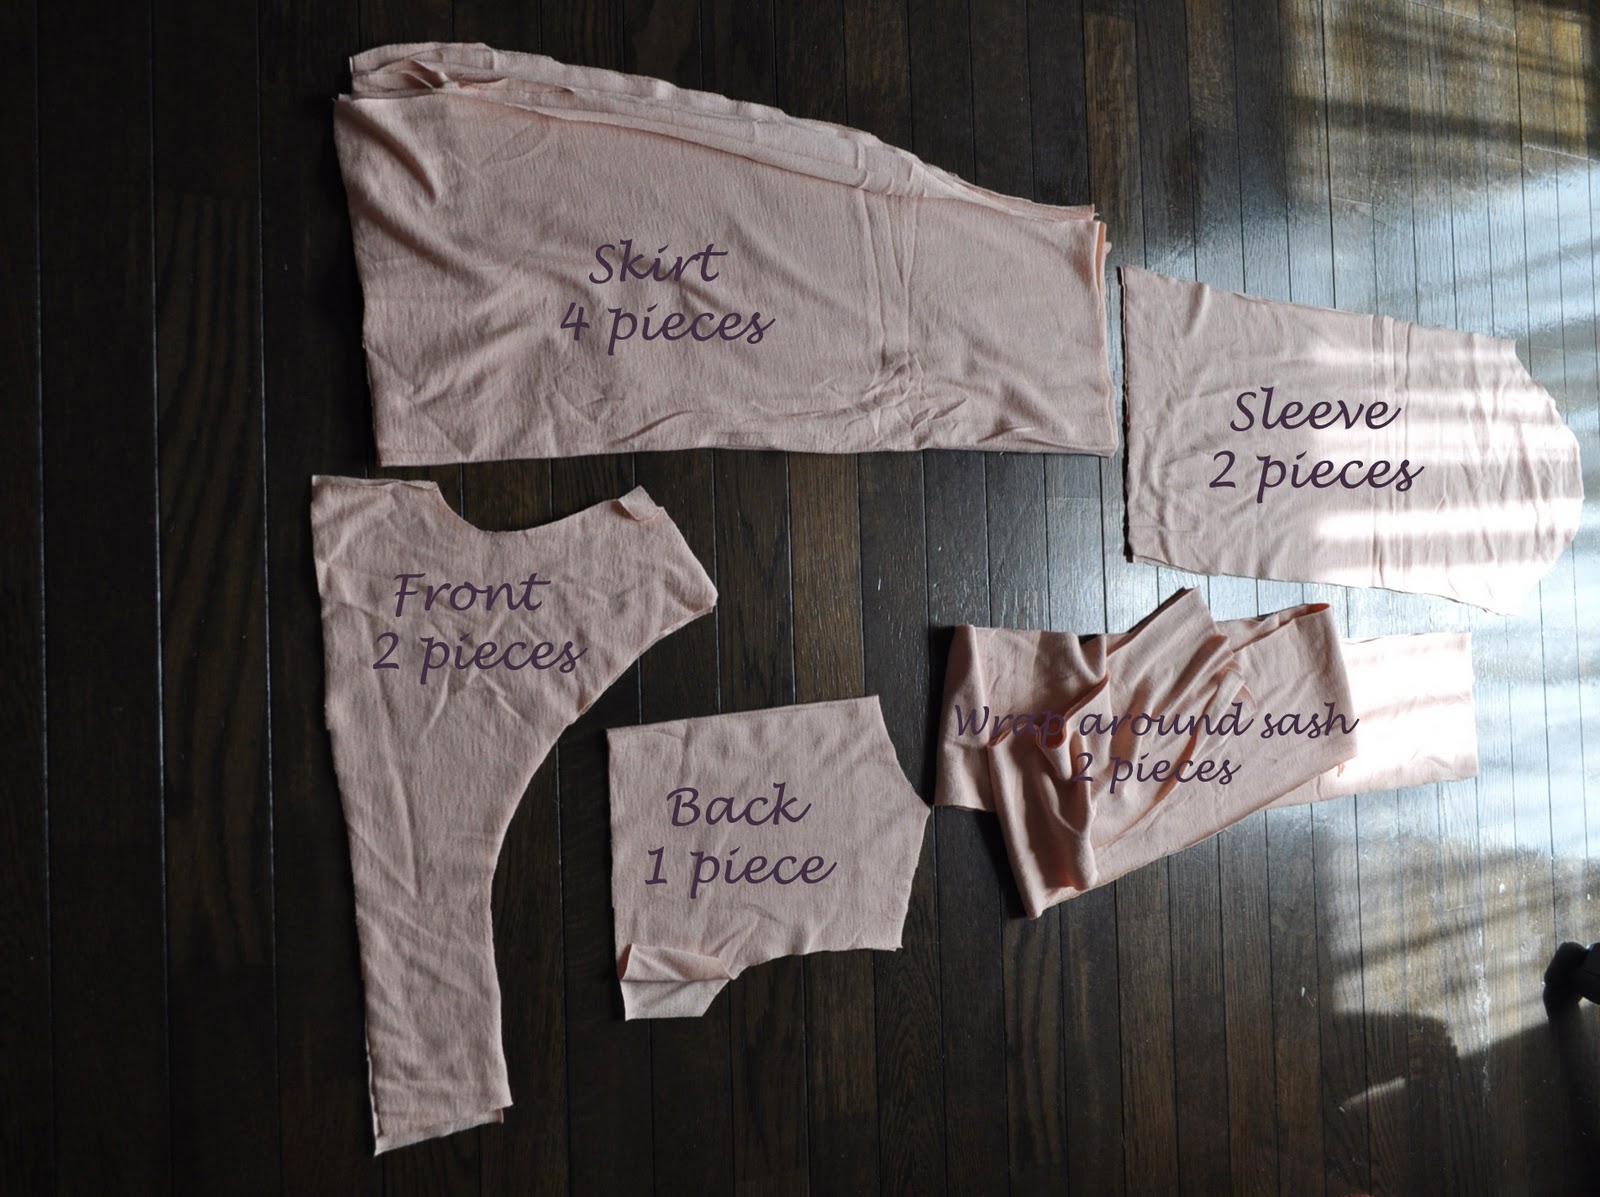
Here is a tutorial on how I turned Megan Nielson wrap around maternity top into a maternity dress!
There are 3 pattern pieces to her original top: Front, Back and Sleeves.
1. Alteration on front pattern piece:

2. Alteration on back pattern piece:


4. In addition to front, back and sleeve pattern pieces, you will need to draft an I-line skirt pattern yourself.
I used the pattern I drafted for the front cross dress from my Spring collection, and added 3 inches to the top to give it a high-waisted look. Perhaps you can try this tutorial to draft your I line skirt pattern, and omit the darts, because if you use stretchy fabric, you won’t need darts.
I cut 4 pieces for the skirt: 2 for front and 2 for back. The reason for this is to layer (or line) the skirt because the fabric I used was rather thin, and I was afraid that it might be sheer.

I would love to see your version of the dress! I think this is a great addition to a wardrobe even if you are not pregnant. I’m already planning on making another one for myself…but only if I can finish the 12+ custom orders I have to waiting before Kiko comes!
Want more post like this?
Get it in your inbox, once a month. Check out my previous newsletters to see if you would like one.
 Sewing BurdaStyle Coat 116 Part 2
 News! (Personal!)
Casey says
I love your remix of this pattern! I've been eying it since I found her site originally, since it looks like it'd be the perfect piece to have on hand (whenever I get to the point of having a baby ;). Plus the light peach is such a beautiful color on you!
♥ Casey
Feel What's Real says
so sweet photos 🙂
kisses,Marilena
nette says
You look so beautiful and this color is just like it has been made especially for you. 🙂
hana.k says
I love this wrap dress! And the color is lovely on you 🙂 wow only five weeks left!! She is going to be sooo cute!
Emily says
Gorgeous! I love your version.
redsilvia says
You look beautiful in that dress! And the color is perfect for you, that must be why you're drawn to it.
I think Andy just thinks you're so beautiful that he wants to see every part of you, and must have been missing you're seeing your lovely legs 😉 How's he feel about leggings? Those are easy to make…
emmalemma says
Very pretty. You make being pregnant look so elegant!
Paunnet says
You look so sweet, this colour is really cute.
I if had to give up black opaque tights I'd be devasted (ok, no, but it would be sad), so I feel for you 🙂
Carolina says
you are GORGEOUS!! and what a lovely top you made ^.^ your secret garden collection..i want it all, I am not kidding <3 jejeje
greetings & good vibes from Canada
LoveMakesTheGirl says
Hi Chie! I'm sure you hear this all the time, but you make a very lovely and stylish pregnant lady 🙂 The dress looks beautiful on you!
About the tights…I never wear jeans, so tights (typically black) are part of my uniform too. Maybe John doesn't like them either…? Yikes! But he and I don't always see eye to eye when it comes to my style. The other day he made a negative comment about my beloved yellow cardigan. I was shocked too!
Anyway, the gray tights are a good compromise! Take care of yourself and baby Sophia!
It's a Hoot! says
I wish I had known how to make maternity clothes when I was pregnant only 8 short weeks ago! This dress is fantastic and you're just the most adorable pregnant woman I've ever seen.
oonaballoona says
you look just gorgeous. if ever i get pregnant, i'm making thirty of these and calling it a nine months.
isn't it shattering when your man reveals something like that? i have a "go-to" outfit that i KNOW looks and fits perfect… that is until ruggy finally told me (after many wears) it was an absolute bust.
Ai says
i always love wrap dress and yours looks more stunning coz of teh color.
That is a good idea Chie not to talk more about the tragedy, it will not be good of your pregnancy. take care and enjoy your pregnant days, u will miz that moment when baby is still inside u.
Naoko says
Chie, you look so beautiful!!!
petiterepublic says
i LOVE it! 😀 love the pink and the fit, you look so pretty and radiant in it! those stockings are good choices too, our hubbies have similar taste in that regard!
Kayla says
wow this looks so nice, you did such an awesome job!
carlyjcais says
Chie-
I am so glad you are okay after the disasters in Japan! My mother and cousin, and all my husband's family, and so many of our friends, are there and it was devastating to be stuck here in the U.S. and unable to help.
I hope that all your friends and loved ones are okay!
I donated money to the Red Cross and Save the Children, and then decided to donate socks. There is an organization called Socks for Japan, based in Sano, that is asking for new socks from all over the world, with a care letter included, in order to provide some measure of comfort to all the survivors. The socks are going to be delivered directly to the people in the survivor camps. Their website is http://jasonkelly.com/helpjapan if you wanted to check it out, or felt moved to perhaps send something.
You look lovely in your dress and thank you for sharing the pattern!
xoxox
Carly
miamoonlove says
It's beautiful, & u look amazing!
I want one too!! 🙂
sarah says
your dress is so cute you look really stylish in it and those grey tights go really well together.
fashbrickroad.blogspot.com/
lin3arossa says
5 weeks or less could also turn into 5 weeks or more. Believe me, my daughter was fashionably late at 42 weeks. That being said, I love your dress!
35 weeks pregnant says
I think it looks smart, classy and it's reasonable to demand. And, I am surely can say that that you feel happy and comfortable.
Photo Booth Girl says
I was hoping that you would explain how you altered the pattern! Thank you! This is absolutely gorgeous.
vivatveritas says
>photobooth girl
the pattern modification is explained in the post:) let me know if you have any questions!
chie
A Jennuine Life says
I'm hosting a Maternity/Nursing/Postpartum competition on my site – http://www.ajennuinelife.blogspot.com called Mother to Be, Being, Been. I'd love it if you entered a project!
Katrine says
This is beautiful! And you look so lovely in it. Your dress almost makes me feel like I was pregnant! haha
Chandrika says
I’m going to make this dress for my friend, can you please tell me how long you made your sash as the original pattern says 9ft and I’m guessing you didn’t need as much as that. Thank you and I’m looking forward to making your creation.
Chie says
Hi Chandrika, I actually kept the length of the sash as it is on the pattern. It was quite long, but I thought it would be better to keep it long so I can wrap it around the belly. In retrospect, it wasn’t all that necessary and I should have shorten the length, because it looked like a giant octopus when I wash it and it took forever to dry. If I were to make it again, I would keep the sash short, perhaps long enough to wrap it around the belly once and tie. Hope this helps:)
Chandrika says
Thank you.
Chandrika says
Sorry one more question, how wide is your sash? Thank you
Aubrey says
Hi Chie!
I’m wondering how you attached the pices so that both sash pieces could wrap around? Seems like with the original pattern one would get trapped inside the dress?
Am I missing something? Making this for myself. 🙂 Love the alternative you’ve created. 🙂
Chie says
Hi Aubrey, I sandwitched the sash with front and back pieces at side and sewed them all together with one seam. Hope this makes sense! Good luck making the dress and let me know when you are done! I’d love to see 🙂
Aubrey says
Totally makes sense! Did you sandwich on both sides or just one? I will take a picture when it’s done. 🙂
Chie says
I sandwiched on both sides:)
Maki says
You are the most beautiful pregnant woman I’ve ever seen! I don’t know how you managed to do that! I want to do something similar with the pattern for my version of the shirt, too!
Did you leave this as a “true” wrap or make it into a “faux” wrap by sewing both sides together? When you put it on, does it go over your head or do you actually wrap it?
Chie says
Hi Maki! Thank you for your comment! I made this a faux wrap and sewed the side together:)
Amelia says
Hi, I love this pattern! I was hoping to try it myself but the links you put up say the page is no longer available. Do you have any way of up dating the pattern that you used? THank you so much. I love your work!!
Chie says
Hi Amelia, it seems like it is only available through MN stocklist. Checkout this post here http://megannielsen.com/collections/sewing-patterns/products/wrapped-maternity-top-sewing-pattern
Hope this helps!
Adriann says
The pattern is now available thru Simplicity- the only maternity patterns they have in the current book (Feb 2014)