• Skip to primary navigation
  • Skip to main content
  • Skip to primary sidebar
  • Skip to footer

Looking for something?

Get in touch

  • Email
  • Facebook
  • Instagram
  • Pinterest
  • Twitter
  • YouTube

Vivat Veritas

Custom Wedding Dress & Kimono Upcycled Clothes | オーダーメイドウェディングドレス&着物ドレス

  • Home
  • About
    • Press
    • Collaborations
  • Blog
  • Bridal
    • Lovely Words
    • Price List
  • Sewing Class
  • Kimono Dress
    • MADE-TO-ORDER BUSTIERS
  • Contact
  • Location
  • 日本語
/ blogs / DIY / Tutorial | How to Make a Cotton Sack Dress

Tutorial | How to Make a Cotton Sack Dress

January 18, 2010 By Chie


Tutorial | How to Make a Cotton Sack Dress

I love working on custom orders. Custom orders are a lot of work since it often requires me to make something out of patterns I don’t have, but give me fun challenges. It is an opportunity to expand different variations and patterns of work.

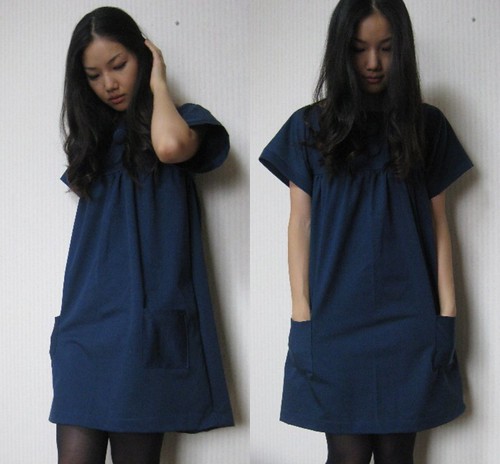
I was recently asked to make a modification of this dress. Her request was to keep the big front buttons, add rolled up sleeves, and big pockets. Before I made one for her, I made one sample to make sure the patterns work. It turned out the dress was pretty simple to make. The dress can be adjusted to fit different sizes easily.
Although I added darts for the previous dress, this custom order dress has none. It is all straight line sewing.


You need measurements of your:
♥ shoulder to shoulder measurement (16″ for me)
♥ from your shoulder to the top of the bust measurement (mine was 9″)
♥ desired length of the dress (in this case, I made it for 34″)

Material:
♥ About 1.50m of fabric
♥ covered button kit
♥ invisible zipper

Pattern:
1. Top panels
♥ Take your shoulder to shoulder measurement (mine is about 16″), and add 3″ each side. So the total width of the top front panel is about 23″.
♥ The length of your top front panel is the measurement of your shoulder to the top of your bust.
♥ Now your have a rectangle fabric, 23″ ×9″. Cut two (one for front, and one for back)
♥ Adjust the neckline, you can make it like boat neck, or round neck.

2. Skirt panels
♥ Take the length of your shoulder to shoulder measurement (16″), and multiply it by 1.5. In my case, this is 24″. This becomes the width of your skirt panels, front and back.
♥ The length of your skirt panels should be (your desired length of the dress) – (length of your top panel). In this case, 34-9=25.
♥ Now you have a rectangle fabric, 24″ ×25″.
♥ Gather the top of this skirt panel fabric, and shorten it (gather) so it becomes your shoulder to shoulder measurement (16″). Then sew this into the top panel, leave 3″ both sides for the sleeve.

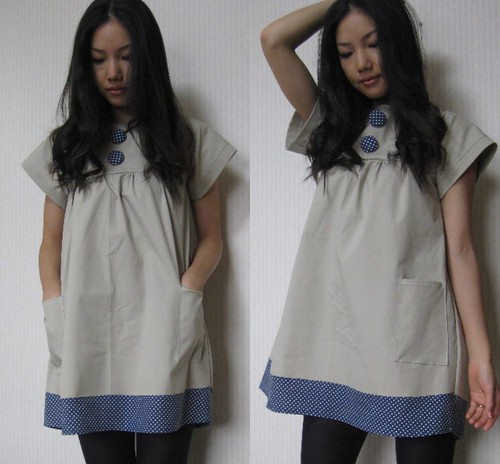
3. Pockets, roll up sleeves etc.
This is your preference. Make many different variations!

4. Zipper should be added to the back middle, and I would cut the back top and skirt panels 0.5″ longer so it has extra seem allowance for installing zipper.

Please link to this post if you make a dress from this tutorial. Happy sewing♥

Sign me up!

Want more post like this? 

Get it in your inbox, once a month. Check out my previous newsletters to see if you would like one.

Related Posts

  • Tutorials
  • New creations!New creations!
  • Braided hair tutorialBraided hair tutorial
  • MADE: Khaki Wrap Dress

Filed Under: DIY, dress Tagged With: tutorial

Reader Interactions

Previous: Monday,
Next: Hair inspiration

Comments

  1. RubyTed says

    January 18, 2010 at 1:14 pm

    Thank you for the tutorial! It's a beautiful dress! I can't wait to have a go!!

    Ali

  2. lunatepetal says

    January 18, 2010 at 5:21 pm

    very cute!

  3. Jo says

    January 19, 2010 at 3:25 am

    i think the tutorial is too hard for me.. but i love the dress… 🙂 do you think you will put it in your shop:)

  4. littlecottondresses says

    January 19, 2010 at 4:58 am

    Love the simple chic dress – thanks for the tutorial!

  5. Anonymous says

    January 19, 2010 at 5:46 pm

    At last, I found this post once again. You have few [url=http://tipswift.com]useful tips[/url] for my school project. This time, I won't forget to bookmark it. 🙂

  6. the guilty hyena says

    January 20, 2010 at 12:57 am

    they look good especially the shoulder arms

    @ The GUILTY HYENA †

  7. sulovessew says

    January 20, 2010 at 6:43 am

    thanks for sharing such a great tutorial, what kind of fabric will be suitable? I normally work with quilting cotton but i realize how wrinkly they tend to get.

  8. issa says

    January 20, 2010 at 8:43 pm

    such cute dresses!!

  9. vivatveritas says

    January 21, 2010 at 12:21 am

    thanks all for your comment!

    > jo
    sorry it's too hard – perhaps i'll make more detail post with step by step instruction.

    > sulovessew
    in the photos, i used medium weight cotton fabric. i would recommend using light weight – to medium weight cotton or linen, and avoid thick fabric:)

  10. Lucie says

    January 21, 2010 at 7:15 am

    Im just getting into this kind of thing – the tutorial is so helpful, thankyou!

    Lucie
    tasteslikevogue.blogspot.com

    xxxx

  11. atia says

    January 21, 2010 at 10:48 pm

    thanks, this is a great dress, will definitely try it out!

  12. vivatveritas says

    January 21, 2010 at 11:35 pm

    hi lucie and atia, thanks for your comment! i'm looking forward to seeing your version of the dress:)

  13. Anonymous says

    January 28, 2010 at 1:13 pm

    I love this type of dress and I've been trying to figure out a pattern for one, so thank you! Do you have any tips on making the sleeves?

    Claire x

  14. vivatveritas says

    January 28, 2010 at 2:09 pm

    hi claire, hmmm tips on making sleeves, it's pretty simple, because you dont have to put a separate sleeve.the sleeves are connected to the front panel.

    good luck making! let me know if you have any questions:)

    • Megan S. says

      February 17, 2012 at 12:27 pm

      This is so adorable! I’m a little confused on the sleeves though too (I’m a beginner lol). Would you be able to explain to me what you mean by “leave 3 inches for the sleeves” when you’re sewing the top panel to the dress part? I’m sure you’ve explained it properly and I’m just confused. And also, in your above comment reply, are you saying that the sides of the panels (the 3 inches on each side) actually become the sleeves? Or do we make the sleeves out of entirely different pieces of fabric and sew them on? Sorry if those are ridiculous questions… just learning and love this dress : ) Great job!

      • Chie says

        February 19, 2012 at 6:12 pm

        Hi! Thank you for your comments. I’m sorry that this tutorial is a bit confusing. I’ve written this a while ago..I should post a step by step instructions with pictures! I’ts in my to-blog list:)
        Anyway, there are no separate pieces for sleeves. Sleeves are similar to kimono or raglan sleeves, and it is connected to the front panel. I hope this makes sense..I will work on the instruction photos soon.

  15. J.S says

    May 3, 2010 at 11:50 pm

    Do your measurements include seam allowances?

  16. vivatveritas says

    May 4, 2010 at 6:19 am

    J.S., no, it does not include seam allowance.

  17. Ainsley says

    May 9, 2011 at 11:26 pm

    super duper cute! i love this dress!

  18. Liza A. says

    May 10, 2011 at 7:02 am

    I just came thru this post, had no idea why I didn't read the post 🙁 hmm…the dresses looks very me =) simple and comfortable. Had to try this!! Thank you for the instructions and i love the navy blue dress 🙂

  19. Sewing Tutorials Library says

    September 21, 2011 at 10:16 am

    Love this dress! I’m adding your link today to Sewing Tutorials Library. You have such a beautiful sense of style, such an inspiration!

  20. Cassie says

    March 26, 2012 at 4:36 pm

    Hello, I have been contemplating on attempting this for a while now, and I was just wondering what type of fabric would be best for this project?

    Thank you,
    I am really excited to make this.

    • Chie says

      March 27, 2012 at 9:25 am

      Hi Cassie! Thank you for your comment! In the photo, I used cotton blend. It was a medium weight. I have not tried to make this dress in lighter or heavier fabric yet, so I can’t make any suggestion for those. I think nice medium weight cotton or linen would be nice!

  21. dedeyez says

    July 31, 2012 at 9:10 am

    Do you think you will ever post a detailed tutorial with pics? I’m a beginner seamstress and that would really help me out a lot. Thanks!

    • Chie says

      July 31, 2012 at 9:32 pm

      Hi, I’m sorry I’ve been meaning to do it but never got to it. This tutorial was written two years ago and I lost motivation..

  22. Tui says

    March 17, 2013 at 9:16 am

    If I was turning this pattern into a maternity pattern would I just add extra length in the front panel?

  23. Tui says

    March 17, 2013 at 9:16 am

    Ohhhh and width??

    • Chie says

      March 17, 2013 at 4:18 pm

      I would add width!

  24. maize says

    July 31, 2013 at 8:46 pm

    Just saw this on Buzz Feed and it’d be awesome if there was a step by step tutorial. 🙂 Thanks!

  25. Simone says

    September 12, 2016 at 12:03 pm

    Is this dress suitable for a beginning sewer

    • Chie says

      September 23, 2016 at 11:21 am

      I think so as it involves mostly straight sewing; however, please note the instructions are pretty minimal as I did not do step-by-step instructions.

Trackbacks

  1. A trip to the zoo & other inspiration « lifeinvintage says:
    August 29, 2011 at 1:25 pm

    […] and versatile to chase the little munchkins!  I found what I think would be the perfect dress by Vivat Veritas. I’m thinking maybe yellow/gray combo? or maybe the blue with red […]

  2. Sewing Tutorials - Women's Big Buttons Dress | Sewing Tutorials Library says:
    September 21, 2011 at 10:14 am

    […] Big Buttons Dress Tutorial by Vivat Veritas […]

  3. Who Am I? How My Personality Helps Define My Style – Part 2 « She Found Style says:
    October 21, 2011 at 9:52 am

    […] – Thank goodness there are so many DIY projects out there.  I’ll never run out of ideas.  On an artistic level, creating calls for […]

  4. Tutorials says:
    January 19, 2012 at 6:50 pm

    […] Big Buttons Dress Tutorial […]

  5. Crochet Hobbes and No Poo Update | Henvious.net says:
    January 27, 2012 at 12:13 am

    […] anyways, I’ve decided this dress is going to be my first project. It looks simple enough and is mainly straight lines. I’m […]

  6. Finished Dress | Henvious.net says:
    February 13, 2012 at 2:31 am

    […] a previous post I mentioned that I decided to do this dress as my first sewing project on my new sewing machine. Well, I finished it last week! Here it is: […]

  7. 5 progetti DIY per future mamme - la cynique romantique - says:
    September 17, 2012 at 4:20 am

    […] from: a beautiful mess/cotton&curls/viva veritas/amanda be sweet/my growing home]   17 settembre 2012 • fashion, inspiration • […]

  8. Sewing for the bump | food and do says:
    August 8, 2013 at 2:18 pm

    […] Big Buttons Dress (Vivat Veritas) Look how cute and roomy this is! Also, I love how often the maternity-like clothes […]

  9. DIY Dress Roundup! | Queen Lila-royalty crafts says:
    September 3, 2013 at 6:02 am

    […] Big Buttons Dress Tutorial from vivat veritas […]

  10. Freebooks: Umstandsmode - SewSimple says:
    May 21, 2016 at 2:43 pm

    […] Baby-Doll-Kleid von Vivat Veritas […]

  11. Boots Blog says:
    December 22, 2016 at 5:53 am

    Brigitte Bailey Ainsley Sleeveless Mock Neck Dress Navy Women Dress

    […] s are similar to kimono or raglan sleeves, and it is connected to the front pane […]

  12. Satin Blog says:
    January 24, 2017 at 5:02 am

    Business Ceremony Wedding Solid 100 Cotton Buttons Pockets

    […] for sleeves. Sleeves are similar to kimono or raglan sleeves, and it is connecte […]

Primary Sidebar

JOIN MY EMAIL LIST

You can read a sample newsletter here, including my latest edition.

Recent Posts

  • UNPLAN shinjuku Pop Up
  • Japanese Iconic Pop Up & Mini Fashion Show 
  • Responsible Marché Vol.8 — A Day to Discover the Stories Behind Clothes
  • Seplumo Nihonbashi POP UP
  • Coaster Aobadai X VIVAT VERITAS POP UP

Categories

Follow me

  • Email
  • Facebook
  • Instagram
  • Pinterest
  • Twitter
  • YouTube

♥ Blog Archives

  • Etsy
  • Creema

Footer

ABOUT ME

My name is Chie. I design and make custom wedding dresses in Tokyo, Japan. Read More…

GET UPDATES!

Get monthly updates including new items in the shop, favorite links and more!

CONTACT

Feel free to send a message if you have any comment:

chie@vivatveritas.com

LET´S GET IN TOUCH

  • Email
  • Facebook
  • Instagram
  • Pinterest
  • Twitter
  • YouTube
Something I've been building since 2008 — taking k Something I've been building since 2008 — taking kimono fabric, fabric that already holds someone's memory, and giving it a new life.

Last Saturday, I got to share that with someone very special.

@designerhelen is a designer from New York who first reached out to me through my little sewing lesson account. When we started talking, I realized we were asking the exact same question: how do you take something with a past, and carry it forward?

We met in person here in Tokyo last December. That conversation became Released. Reimagined.
Two designers. Two cities. One shared belief — that beautiful things deserve a second life.

None of this would have been possible without our incredible team:

👗 Models: @emorylove33 @naka_kanar @bethenny.x @izumi_nishida @yui78_02 @aino.yamada03 @_kasumi.y @sienna.christinaaa

💅 Nails: @ms_muse_nail — gorgeous handmade nail designs 
💍 Jewelry: @viviange — pieces specially designed to coordinate with each piece
✂️ Hair: @angh0 @sho_kanaida @iam__little__boy — next level editorial 
💄 Makeup: @glam_by_jyoti — 8 models, flawlessly done 
📸 Photography: @nothing_special_88 — can't wait for you all to see his shots 
🎯 Model Coordinator: @naka_kanar — styling schedules, rehearsals, walkthrough, everything

Thank you to everyone who came🤍

Photos by @robertorivera.mx

2008年から、ずっと作り続けてきたもの——誰かの記憶を宿した着物の生地を手にとり、新しい命を吹き込むこと。

先週の土曜日、その想いをとても大切な人と一緒に分かち合うことができました。

@designerhelen はニューヨークを拠点とするデザイナー。最初に連絡をくれたのは、私の小さなお裁縫レッスンのアカウントを通じてでした。話し始めてすぐに、私たちは同じ問いを抱えていると。過去を持つものを、どうやって未来へ連れていくか。

昨年12月、東京で初めて直接会いました。その会話が、このショーになりました。

Released. Reimagined. ふたりのデザイナー。ふたつの都市。ひとつの共通した信念——美しいものには、もう一度輝く機会がある✨

#releasedreimangined #tokyofashionshow #harajuku #japanfashionshow projectrunwa
この会場を見つけるまで、けっこう歩き回りました。原宿竹下口から少し路地に入ったところ。前面ガラス張り この会場を見つけるまで、けっこう歩き回りました。原宿竹下口から少し路地に入ったところ。前面ガラス張りで光がたっぷり入って、一目見て「ここだ」と思いました🌱

入口すぐの受付エリアには @brownie_shots のポップアップ、中央スペースはランウェイ会場になります。VIP席も準備中です✨

イベントまであと1週間を切りました。当日、いいお天気になりますように☀️

It took quite a bit of wandering to find this venue. Tucked just off a quiet side street from Harajuku’s Takeshita Exit — full glass frontage, light pouring in. The moment I stepped inside, I knew🌱

Right at the entrance, @brownie_shots will be running a pop-up☕︎ The central space becomes our runway. VIP seating going in now.

Less than one week to go. Fingers crossed for sunshine ☀️

#Harajuku #FashionShow #KimonoUpcycling #SustainableFashion #TokyoEvents
【VIP限定✨】 5/30のファッションショー、席付きVIPチケットをご予約いただいた方は、こちらの 【VIP限定✨】
5/30のファッションショー、席付きVIPチケットをご予約いただいた方は、こちらの帯をリメイクしたオリジナルポーチをプレゼント🎁 

意外とたくさん入ると大好評。
鍵、カードケース、スマホ、メイクポーチまでしっかり収納できる優秀サイズです。

パーティーにクラッチとして、ループにストラップを付ければショルダーにもなる✨

どの柄が届くかは当日までのお楽しみ🤫💕

🗓 2026.05.30 (Sat)
📍 Harajuku, Tokyo
Runway Event & Pop-up Store
詳細はプロフィールリンクをチェック🔗

【VIP Exclusive ✨】
A little sneak peek at the special gift for our VIP ticket holders🎁

For the May 30th fashion show, all VIP guests will receive this original pouch made from upcycled Kimono Obi.

It’s surprisingly spacious! It easily fits your keys, card case, phone, and even a makeup pouch. Wear it as a chic clutch for the party, or attach your own strap to the loops to transform it into a shoulder bag✨

Each one is a unique, one-of-a-kind piece. Which design will you get? It’s a surprise until the big day! 🤫💕

#帯リメイク #サステナブルファッション #ファッションショー #原宿イベント #着物リメイク 
ファッションイベント HelenCastillo
五月なのに、秋色🍂 日中は汗ばむくらいなのに、 夕方になるとふっと涼しくなる🌬️ この季節のそのギ 五月なのに、秋色🍂

日中は汗ばむくらいなのに、
夕方になるとふっと涼しくなる🌬️
この季節のそのギャップが、なんか好き♡

深みのある金茶とテラコッタ。
春の光に当てると、
秋色が美しく見える気がします✨

朝晩の肌寒さには、シルクの羽織りがちょうどいい。

It’s May — and yet, fall hues🍂

Warm enough to break a sweat by noon,
then a cool breeze sneaks in by evening🌬️

I kind of love that about this time of year♡

Rich amber and terracotta.
Something about spring light makes these autumn tones look even more beautiful✨

For those cool mornings and evenings,
a silk haori is just right.

Photographer @renphoto
Model @hotpotpancakes

#着物ガウン #春コーデ #アースカラー #サステナブルファッション #アップサイクル kimonostyle
「なんとなく」じゃなくて、選んだと言ってもらえる服作りをしたい🦋✂️ 紗の着物をほどいて、また縫い 「なんとなく」じゃなくて、選んだと言ってもらえる服作りをしたい🦋✂️

紗の着物をほどいて、また縫い直しました。
ざっくりとした夏のの素材感に、
白レースをひとすじ沿わせて。

甘すぎず、でも可愛くありたい日のための一枚。

I want to make clothes you reach for on purpose — not just whatever’s closest🦋✂️

Took apart a vintage sheer silk kimono and sewed it back into something new.

The loose, airy weave of summer, with a single trim of white lace.

For the days when you want to feel pretty — just not too precious.

#KimonoRework #ButterflyTop
#着物リメイク #紗 #一点もの 蝶々トップス
寄贈いただいた着物から生まれたドレス🥀 生地の質感に触れて次は何になりたいか問いかけます。 着る人 寄贈いただいた着物から生まれたドレス🥀

生地の質感に触れて次は何になりたいか問いかけます。
着る人に寄り添い、物語を紡ぐ一着になれば嬉しいです💐

Model: @aino.yamada03
Photo: @slyz_studio
MUA @erieri_makeup 

A dress brought to life from a gifted kimono 🥀

By feeling the texture of the material, I listen to what it wishes to be.

I hope this dress resonates with the person who wears it💐

 #着物リメイク #サステナブルファッション #ハンドメイドドレス #一点もの
Favorite coffee beans to my favourite jacket. ☕️🧥 Favorite coffee beans to my favourite jacket. ☕️🧥

お気に入りのコーヒーショップ @allpressespressojapan の麻袋をアップサイクルして、世界に一つだけのボンバージャケットにしました。

麻袋のラフな質感と、着物リメイクした裏地の組み合わせ。
ほんのりコーヒーの香りがします✨

Which one is your favorite detail? (私は背中のロゴが好き🫶🏻)

#upcycledfashion #allpressespresso #サステナブルライフ #リメイク #コーヒーのある暮らし
かつては特別な日に着用された美しい着物や帯。 それらが現代に息づくファッションへと生まれ変わりました かつては特別な日に着用された美しい着物や帯。
それらが現代に息づくファッションへと生まれ変わりました👗

孔雀の羽の細部まで描かれた繊細な染め、帯の複雑な織り目。
一針一針に込められた伝統の技を、今の時代にふさわしい形で受け継ぎます🪡

世代を超えて受け継がれる物語を、あなたらしく着こなして🧚

These garments are more than just fashion; they are stories preserved. From the detailed dyeing of the peacock's feathers to the intricate weave of the obi, we honor the original artisans by giving their work a new life.

Wear a piece of history and continue its journey✈️

Model @ptiite_shana
Photographer @nihonnokaidan

#VintageKimono #ObiUpcycle #JapaneseStyle #EthicalFashion #handmadewithlove
 着物リメイク ハンドメイド アップサイクル
Follow me on Instagram

Copyright © 2026 · vivien theme by Lovely Confetti DMCA.com Protection Status

Copyright © 2026 Vivat Veritas