• Skip to primary navigation
  • Skip to main content
  • Skip to primary sidebar
  • Skip to footer

Looking for something?

Get in touch

  • Email
  • Facebook
  • Instagram
  • Pinterest
  • Twitter
  • YouTube

Vivat Veritas

Custom Wedding Dress & Kimono Upcycled Clothes | オーダーメイドウェディングドレス&着物ドレス

  • Home
  • About
    • Press
    • Collaborations
  • Blog
  • Bridal
    • Lovely Words
    • Price List
  • Sewing Class
  • Kimono Dress
    • MADE-TO-ORDER BUSTIERS
  • Contact
  • Location
  • 日本語
/ Tutorial / Tutorial | MN1003 Wrap Around Maternity Top Variation

Tutorial | MN1003 Wrap Around Maternity Top Variation

March 17, 2011 By Chie

Transform Megan Nielsen Wrap Around Maternity Top to a Dress

I’m 35 week pregnant this week! I can’t believe how fast my whole pregnancy has gone. I only have 5 more weeks (or less) before baby Kiko will be born. By the way, I plan to avoid the subject of earthquakes and the nuclear power plant situation in this blog.  I’m not a news reporter (although my major in college was Broadcast Journalism..I’m such a bad writer!) and constantly dwelling on the whole situation makes me really nervous. So back to the good stuff, sewing and fashion, and the bright side of life here in Japan.
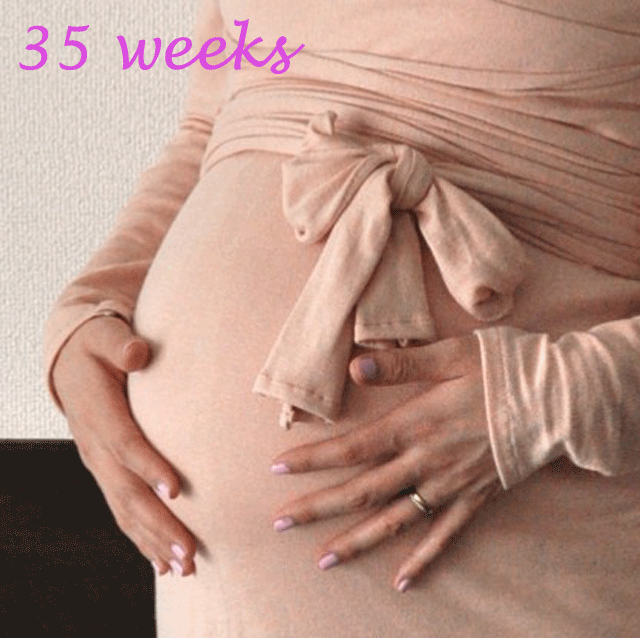
This week, I finally made myself the Meg Nielsen Maternity top variation. The original top looks like this. I think the top is great for the third trimester pregnant body.  So, I decided to do a Chie remix of the dress for a couple of reasons.  First I do not have jeans that fit me comfortably any longer so I needed to find a way to cover my bottom half. Also I wanted to make it a bit dressier because I planned on wearing this on my baby shower, which had to be canceled….because of the earthquake (I guess I couldn’t completely avoid the topic). So using Meg’s pattern, I made some alteration and turned it into a dress. 

I used two-way stretch jersey in peach color. After finding out that I’m pregnant with a baby girl, I find myself wearing more pink – Not sure why, but I want to feel girly in pink and peach and all that pretty colors of Spring.
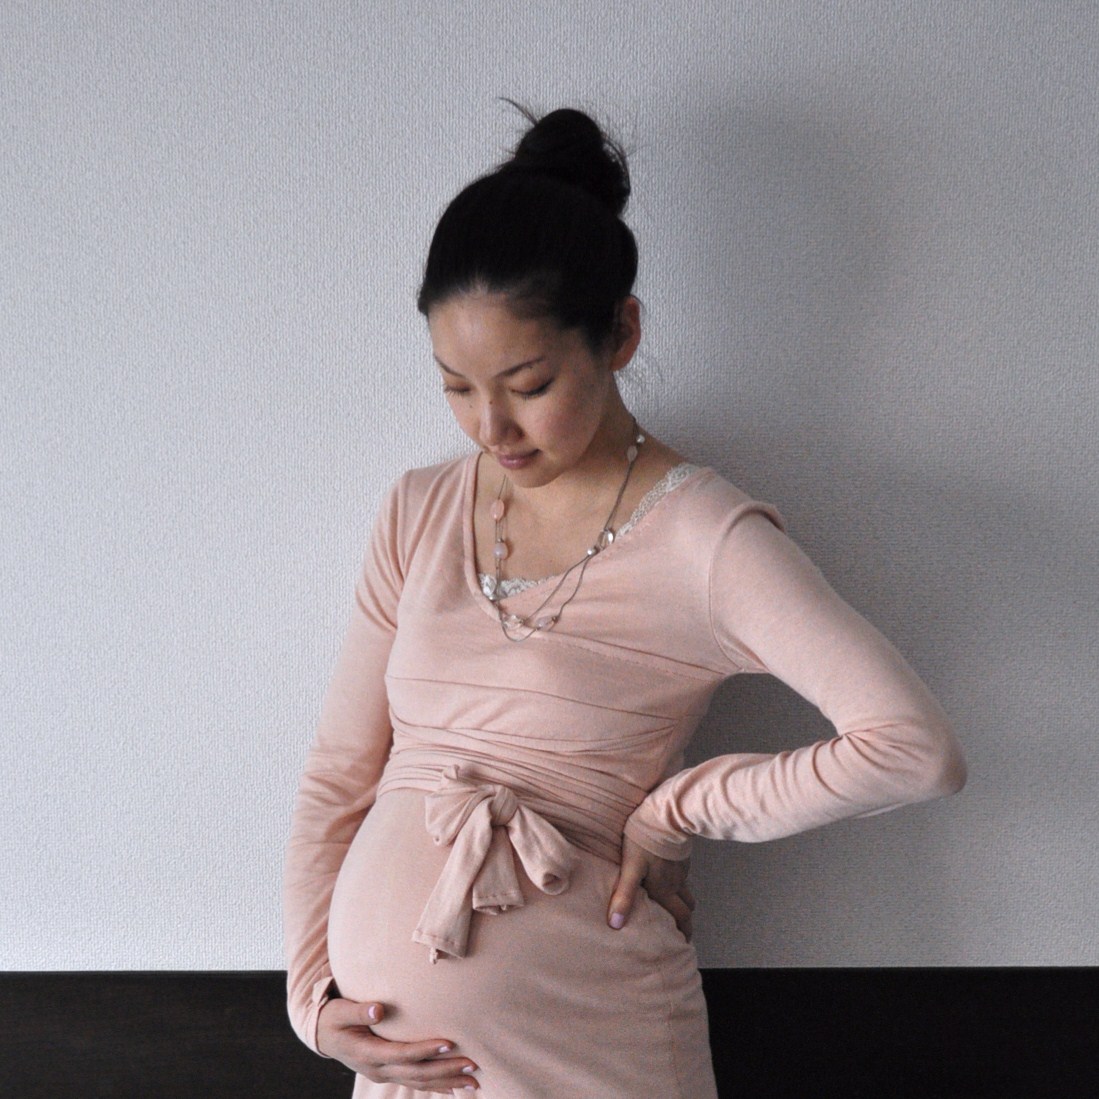
 

I love how the dress turned out, and I’ve already worn it once. It’s so comfortable! I think the criss cross front might work well for nursing as well.

When I wore this dress, Andy made a confession – he said one of the most unflattering pieces of clothing I own is a pair of black opaque tights. I was shocked. That’s my uniform! Since I barely wear pants, I wear black opaque tights almost every day. I had no idea he thought they were ugly. So I decided to switch to half sheer gray tights to pair with my new dress.


Here is a tutorial on how I turned Megan Nielson wrap around maternity top into a maternity dress!
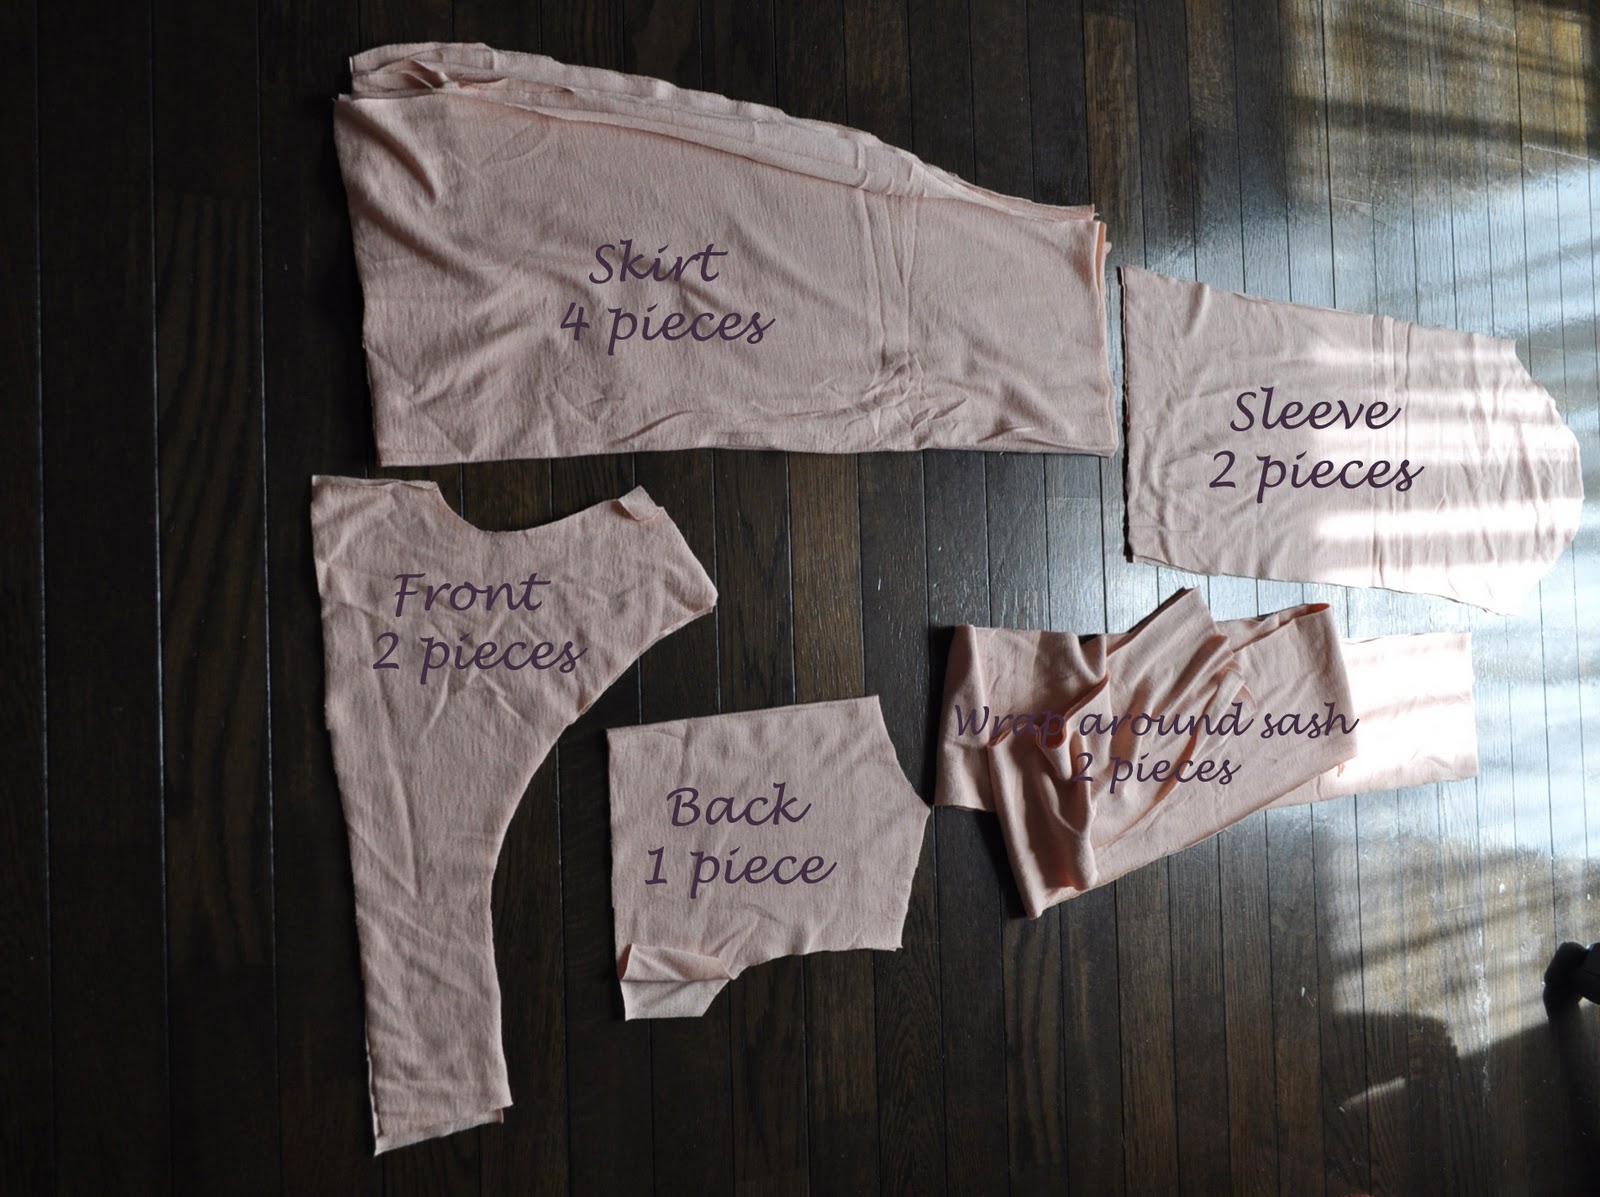
There are 3 pattern pieces to her original top: Front, Back and Sleeves.

1. Alteration on front pattern piece:  

2. Alteration on back pattern piece:

3. Alteration on sleeve pattern piece:
This step is not necessary, I lengthened the sleeve just because I wanted the dress to have long sleeves, but if you prefer the elbow length sleeves, you can just use the original sleeve pattern piece.

4. In addition to front, back and sleeve pattern pieces, you will need to draft an I-line skirt pattern yourself.
I used the pattern I drafted for the front cross dress from my Spring collection, and added 3 inches to the top to give it a high-waisted look. Perhaps you can try this tutorial to draft your I line skirt pattern, and omit the darts, because if you use stretchy fabric, you won’t need darts.

I cut 4 pieces for the skirt: 2 for front and 2 for back. The reason for this is to layer (or line) the skirt because the fabric I used was rather thin, and I was afraid that it might be sheer.

I would love to see your version of the dress! I think this is a great addition to a wardrobe even if you are not pregnant. I’m already planning on making another one for myself…but only if I can finish the 12+ custom orders I have to waiting before Kiko comes!

Sign me up!

Want more post like this? 

Get it in your inbox, once a month. Check out my previous newsletters to see if you would like one.

Related Posts

  • Tutorial | How to Make a Poncho TopTutorial | How to Make a Poncho Top
  • 20 weeks – best & worst things about being pregnant20 weeks – best & worst things about being pregnant
  • 39 weeks39 weeks
  • 23 weeks – Maternity clothes remake pt.123 weeks – Maternity clothes remake pt.1

Filed Under: pregnancy series, Tutorial Tagged With: creation, pregnancy, tutorial

Reader Interactions

Previous: Inspiration: papercup Alphaville look book
Next: Weekend recap & DIY links

Comments

  1. Casey says

    March 17, 2011 at 12:59 pm

    I love your remix of this pattern! I've been eying it since I found her site originally, since it looks like it'd be the perfect piece to have on hand (whenever I get to the point of having a baby ;). Plus the light peach is such a beautiful color on you!

    ♥ Casey

  2. Feel What's Real says

    March 17, 2011 at 1:09 pm

    so sweet photos 🙂

    kisses,Marilena

  3. nette says

    March 17, 2011 at 2:22 pm

    You look so beautiful and this color is just like it has been made especially for you. 🙂

  4. hana.k says

    March 17, 2011 at 3:43 pm

    I love this wrap dress! And the color is lovely on you 🙂 wow only five weeks left!! She is going to be sooo cute!

  5. Emily says

    March 17, 2011 at 4:09 pm

    Gorgeous! I love your version.

  6. redsilvia says

    March 17, 2011 at 4:09 pm

    You look beautiful in that dress! And the color is perfect for you, that must be why you're drawn to it.

    I think Andy just thinks you're so beautiful that he wants to see every part of you, and must have been missing you're seeing your lovely legs 😉 How's he feel about leggings? Those are easy to make…

  7. emmalemma says

    March 17, 2011 at 4:45 pm

    Very pretty. You make being pregnant look so elegant!

  8. Paunnet says

    March 17, 2011 at 5:53 pm

    You look so sweet, this colour is really cute.
    I if had to give up black opaque tights I'd be devasted (ok, no, but it would be sad), so I feel for you 🙂

  9. Carolina says

    March 17, 2011 at 9:48 pm

    you are GORGEOUS!! and what a lovely top you made ^.^ your secret garden collection..i want it all, I am not kidding <3 jejeje

    greetings & good vibes from Canada

  10. LoveMakesTheGirl says

    March 17, 2011 at 9:50 pm

    Hi Chie! I'm sure you hear this all the time, but you make a very lovely and stylish pregnant lady 🙂 The dress looks beautiful on you!

    About the tights…I never wear jeans, so tights (typically black) are part of my uniform too. Maybe John doesn't like them either…? Yikes! But he and I don't always see eye to eye when it comes to my style. The other day he made a negative comment about my beloved yellow cardigan. I was shocked too!

    Anyway, the gray tights are a good compromise! Take care of yourself and baby Sophia!

  11. It's a Hoot! says

    March 18, 2011 at 4:36 am

    I wish I had known how to make maternity clothes when I was pregnant only 8 short weeks ago! This dress is fantastic and you're just the most adorable pregnant woman I've ever seen.

  12. oonaballoona says

    March 18, 2011 at 1:13 pm

    you look just gorgeous. if ever i get pregnant, i'm making thirty of these and calling it a nine months.

    isn't it shattering when your man reveals something like that? i have a "go-to" outfit that i KNOW looks and fits perfect… that is until ruggy finally told me (after many wears) it was an absolute bust.

  13. Ai says

    March 18, 2011 at 4:17 pm

    i always love wrap dress and yours looks more stunning coz of teh color.

    That is a good idea Chie not to talk more about the tragedy, it will not be good of your pregnancy. take care and enjoy your pregnant days, u will miz that moment when baby is still inside u.

  14. Naoko says

    March 18, 2011 at 5:19 pm

    Chie, you look so beautiful!!!

  15. petiterepublic says

    March 18, 2011 at 9:36 pm

    i LOVE it! 😀 love the pink and the fit, you look so pretty and radiant in it! those stockings are good choices too, our hubbies have similar taste in that regard!

  16. Kayla says

    March 18, 2011 at 11:59 pm

    wow this looks so nice, you did such an awesome job!

  17. carlyjcais says

    March 19, 2011 at 7:52 am

    Chie-
    I am so glad you are okay after the disasters in Japan! My mother and cousin, and all my husband's family, and so many of our friends, are there and it was devastating to be stuck here in the U.S. and unable to help.

    I hope that all your friends and loved ones are okay!

    I donated money to the Red Cross and Save the Children, and then decided to donate socks. There is an organization called Socks for Japan, based in Sano, that is asking for new socks from all over the world, with a care letter included, in order to provide some measure of comfort to all the survivors. The socks are going to be delivered directly to the people in the survivor camps. Their website is http://jasonkelly.com/helpjapan if you wanted to check it out, or felt moved to perhaps send something.

    You look lovely in your dress and thank you for sharing the pattern!
    xoxox
    Carly

  18. miamoonlove says

    March 21, 2011 at 9:11 am

    It's beautiful, & u look amazing!
    I want one too!! 🙂

  19. sarah says

    March 21, 2011 at 12:56 pm

    your dress is so cute you look really stylish in it and those grey tights go really well together.

    fashbrickroad.blogspot.com/

  20. lin3arossa says

    March 22, 2011 at 2:27 pm

    5 weeks or less could also turn into 5 weeks or more. Believe me, my daughter was fashionably late at 42 weeks. That being said, I love your dress!

  21. 35 weeks pregnant says

    April 5, 2011 at 8:00 am

    I think it looks smart, classy and it's reasonable to demand. And, I am surely can say that that you feel happy and comfortable.

  22. Photo Booth Girl says

    April 25, 2011 at 8:20 am

    I was hoping that you would explain how you altered the pattern! Thank you! This is absolutely gorgeous.

  23. vivatveritas says

    April 27, 2011 at 1:50 am

    >photobooth girl

    the pattern modification is explained in the post:) let me know if you have any questions!

    chie

  24. A Jennuine Life says

    May 1, 2011 at 5:28 pm

    I'm hosting a Maternity/Nursing/Postpartum competition on my site – http://www.ajennuinelife.blogspot.com called Mother to Be, Being, Been. I'd love it if you entered a project!

  25. Katrine says

    February 7, 2012 at 10:22 am

    This is beautiful! And you look so lovely in it. Your dress almost makes me feel like I was pregnant! haha

  26. Chandrika says

    February 29, 2012 at 3:08 pm

    I’m going to make this dress for my friend, can you please tell me how long you made your sash as the original pattern says 9ft and I’m guessing you didn’t need as much as that. Thank you and I’m looking forward to making your creation.

    • Chie says

      February 29, 2012 at 11:29 pm

      Hi Chandrika, I actually kept the length of the sash as it is on the pattern. It was quite long, but I thought it would be better to keep it long so I can wrap it around the belly. In retrospect, it wasn’t all that necessary and I should have shorten the length, because it looked like a giant octopus when I wash it and it took forever to dry. If I were to make it again, I would keep the sash short, perhaps long enough to wrap it around the belly once and tie. Hope this helps:)

      • Chandrika says

        March 1, 2012 at 12:53 pm

        Thank you.

  27. Chandrika says

    February 29, 2012 at 3:20 pm

    Sorry one more question, how wide is your sash? Thank you

  28. Aubrey says

    May 23, 2012 at 3:39 pm

    Hi Chie!
    I’m wondering how you attached the pices so that both sash pieces could wrap around? Seems like with the original pattern one would get trapped inside the dress?
    Am I missing something? Making this for myself. 🙂 Love the alternative you’ve created. 🙂

    • Chie says

      May 24, 2012 at 8:02 am

      Hi Aubrey, I sandwitched the sash with front and back pieces at side and sewed them all together with one seam. Hope this makes sense! Good luck making the dress and let me know when you are done! I’d love to see 🙂

      • Aubrey says

        May 24, 2012 at 1:38 pm

        Totally makes sense! Did you sandwich on both sides or just one? I will take a picture when it’s done. 🙂

        • Chie says

          May 25, 2012 at 4:36 am

          I sandwiched on both sides:)

  29. Maki says

    December 23, 2012 at 11:52 am

    You are the most beautiful pregnant woman I’ve ever seen! I don’t know how you managed to do that! I want to do something similar with the pattern for my version of the shirt, too!

    Did you leave this as a “true” wrap or make it into a “faux” wrap by sewing both sides together? When you put it on, does it go over your head or do you actually wrap it?

    • Chie says

      December 23, 2012 at 6:10 pm

      Hi Maki! Thank you for your comment! I made this a faux wrap and sewed the side together:)

  30. Amelia says

    November 6, 2013 at 3:38 pm

    Hi, I love this pattern! I was hoping to try it myself but the links you put up say the page is no longer available. Do you have any way of up dating the pattern that you used? THank you so much. I love your work!!

    • Chie says

      November 6, 2013 at 3:52 pm

      Hi Amelia, it seems like it is only available through MN stocklist. Checkout this post here http://megannielsen.com/collections/sewing-patterns/products/wrapped-maternity-top-sewing-pattern
      Hope this helps!

      • Adriann says

        February 20, 2014 at 10:02 pm

        The pattern is now available thru Simplicity- the only maternity patterns they have in the current book (Feb 2014)

Trackbacks

  1. Top 10 DIY Maternity Clothes - Top Inspired says:
    November 10, 2013 at 8:59 am

    […] DIY project and photo credit to vivatveritas.com […]

  2. Our Favorite Indie Sewing Patterns + Giveaway: Wrapped Maternity Top | Sew Mama Sew | says:
    July 23, 2014 at 1:38 am

    […] Chie from Vivat Veritas […]

  3. Freebooks: Umstandsmode - SewSimple says:
    May 21, 2016 at 2:27 pm

    […] Wickelkleid von Vivat Veritas […]

Primary Sidebar

JOIN MY EMAIL LIST

You can read a sample newsletter here, including my latest edition.

Recent Posts

  • UNPLAN shinjuku Pop Up
  • Japanese Iconic Pop Up & Mini Fashion Show 
  • Responsible Marché Vol.8 — A Day to Discover the Stories Behind Clothes
  • Seplumo Nihonbashi POP UP
  • Coaster Aobadai X VIVAT VERITAS POP UP

Categories

Follow me

  • Email
  • Facebook
  • Instagram
  • Pinterest
  • Twitter
  • YouTube

♥ Blog Archives

  • Etsy
  • Creema

Footer

ABOUT ME

My name is Chie. I design and make custom wedding dresses in Tokyo, Japan. Read More…

GET UPDATES!

Get monthly updates including new items in the shop, favorite links and more!

CONTACT

Feel free to send a message if you have any comment:

chie@vivatveritas.com

LET´S GET IN TOUCH

  • Email
  • Facebook
  • Instagram
  • Pinterest
  • Twitter
  • YouTube
これを着て、カフェに行ったら絶対目立ちそう😆☕ アップサイクルで生まれた、新しいファッションの形。 これを着て、カフェに行ったら絶対目立ちそう😆☕

アップサイクルで生まれた、新しいファッションの形。
コーヒー豆袋のジャケット × 着物リメイクのセットアップ。

一枚一枚、生地の柄合わせから縫製まで、すべて手で仕上げています🪡🧚
実はこの着物、裏地にも別布を仕込んでいて、羽織ると初めて見える色があるんです♡

ヴィンテージ素材に眠っていたストーリーを、
もう一度誰かの日常に届けたくて作りました。

If you wore this to a café, you'd definitely stand out 😆☕

A new form of fashion, born from upcycling. A coffee bean sack jacket × a kimono-remake set-up.

Every single piece is finished entirely by hand, from matching the fabric patterns to the sewing itself 🪡🧚 Actually, this kimono has a different fabric worked into the lining too — there's a color that only reveals itself once you put it on ♡

I wanted to give the stories sleeping in vintage materials a chance to become part of someone's everyday life again.

Photographer 
@nothing_special_88 

Model
@emorylove33

Jewelry
@viviange

Make up
@elanoramua

#アップサイクルファッション #着物リメイク #サステナブルファッション
実はこのお洋服、今回のショーに入れるか自分では迷っていました。結構前に作った作品だったので。でもヘレ 実はこのお洋服、今回のショーに入れるか自分では迷っていました。結構前に作った作品だったので。でもヘレンと話す中で、これも一緒に見せようと決めました。

ヘレンと3週間近く一緒に準備を進める中で、コレクションの作り方、見る人を楽しませる魅せ方、ルック全体の組み立て方など、本当にたくさんのことを学びました。自分一人だったらこのルックスを入れる決断はしなかったと思う。誰かと一緒に作ることで見えてくるものがあるんだなと、改めて実感しました。
ヘレン、ありがとう♡

Honestly, I wasn't sure whether to include this piece in this show. It was something I'd made a while back. But talking it through with Helen, we decided to show it together after all.

Working with Helen for almost three weeks to prepare for the show, I learned so much — how to build a collection, how to style looks that engage an audience, how to put together a look as a whole. I don't think I would have made the decision to include this piece if I'd been on my own. Creating something together with someone else really opens your eyes to things you wouldn't see alone.

thank you Helen @designerhelen♡

Model @izumi_nishida

Photographer 
@nothing_special_88 

Jewelry
@viviange

Hair 
@angh0
@sho_kanaida
@iam__little__boy

Make up
@glam_by_jyoti

#KimonoUpcycled #SustainableFashion #DesignerCollab #着物リメイク #ものづくり
お客様からお預かりした大切な帯。 大切に保管されていた帯ほど、実は「日常でどう使えばいいかわからな お客様からお預かりした大切な帯。

大切に保管されていた帯ほど、実は「日常でどう使えばいいかわからない」という声をよく伺います。だからこそ、その帯の物語を読み解きながら、現代の暮らしに馴染むデザインに仕立て直すことを意識してます😌

パッと見にはわからないけれど、実は使いやすさを追求した仕掛けが隠れています。

ショルダーを付ければ、両手が空くアクティブなスタイルにも対応👜

あなたの思い出の帯も、こんな風に日常の相棒にしてみませんか?

A precious obi entrusted to me by a client.

I often hear people say they aren't sure how to incorporate their cherished obis into their daily lives. That is exactly why I focus on reading the story woven into the fabric and reimagining it into a design that fits modern living😌

There are hidden details that make this bag truly functional, even if you can't see them at first glance. By attaching the shoulder strap, it becomes the perfect hands-free bag for an active lifestyle👜

#upcycledfashion #着物リメイク #obibag #remake #sustainablestyle
飛行機と電車の中で作ったジャケットです✈️🚆 去年の夏の3週間、アメリカとヨーロッパを旅しながら、 飛行機と電車の中で作ったジャケットです✈️🚆

去年の夏の3週間、アメリカとヨーロッパを旅しながら、座席でひたすらチクチク🪡着物の裏地にキルト芯を挟んで、フリーハンドで刺し子して、日本に帰ってから染めました。

This jacket was made on airplanes and trains✈️🚆

Over three weeks last summer, traveling through the US and Europe, I stitched away in my seat🪡 
Kimono lining sandwiched with quilt batting, sashiko stitched freehand, then dyed after I got back to Japan.

Model
@kana_nakar

Photographer 
@nothing_special_88 

Nails
@ms_muse_nail

Jewelry
@viviange

Hair 
@angh0
@sho_kanaida
@iam__little__boy

Make up
@glam_by_jyoti

#kimonoupcycle #sashiko #sustainablefashion #ReleasedReimagined
#刺し子
お客様から届いたステキな帯を、オーダーメイドのリュックにアップサイクルしました✂️ 吉祥文様が織り お客様から届いたステキな帯を、オーダーメイドのリュックにアップサイクルしました✂️

吉祥文様が織り込まれた錦の帯地は、黒地に金・白・紫…と、見る角度によって表情が変わる贅沢な一品。その美しさをそのまま活かしながら、毎日持ち歩きたくなる使いやすいリュックに仕立てました。内ポケット付きで、実用性もしっかり。

受注制作についてはプロフィールのリンクよりお問い合わせください💌

A client’s treasured obi has found a new life as a custom-made backpack✂️

The brocade fabric, woven with auspicious Japanese motifs, shifts from gold to white to violet depending on the light, a truly luxurious textile. I tried to preserve its beauty while crafting it into a backpack you’d actually want to carry every day. Complete with interior pockets for real-world practicality.

For custom orders, visit the link in our profile 💌

#KimonoUpcycle #SlowFashionJapan #WearableHeritage #着物リメイク #帯リメイク
着物リメイクをするとき、どうしても捨てられてしまうことの多い裏地。 薄手のシルクの手触り、もったい 着物リメイクをするとき、どうしても捨てられてしまうことの多い裏地。

薄手のシルクの手触り、もったいなくてサマーワンピースに生まれ変わらせました。

そのままでは物足りないのでアーティストの Riko Monma @rikoshurimonmaさんに染め直しをお願いしたら、一気に息を吹き返しました✨

数年前に作ったこの一着、今回の @designerhelен とのイベントで、コレクションに加えることにしました。

Helenからは色の組み合わせについていろいろアドバイスをもらって、自分だけでは絶対に辿り着けなかったような配色を試してみたり。準備の時間も、とても楽しかった😌

The lining of a kimono — often discarded when the fabric is remade into something new.
That soft, lightweight silk felt too good to let go, so I turned it into a summer dress. It needed something more, so I asked artist Riko Monma to dye it for me — and suddenly it came alive again.

I made this piece a few years ago, but for the recent event with @designerhelena, I decided to bring it into the collection. Helen gave me so much guidance on color — combinations I never would have arrived at on my own. The whole preparation process was just really, really fun😌

Model
@bethenny.x

Photographer 
@nothing_special_88 

Nails
@ms_muse_nail

Jewelry
@viviange

Hair 
@angh0
@sho_kanaida
@iam__little__boy

Make up
@glam_by_jyoti

#着物リメイク #キモノアップサイクル #KimonoUpcycle #SustainableFashionTokyo #ReleasedReimagined
生地をよく見ると、お姫様が👸 金彩の御所車、菊、そしてひっそりと佇む姫。 裾に宿ったまま、また別 生地をよく見ると、お姫様が👸

金彩の御所車、菊、そしてひっそりと佇む姫。 
裾に宿ったまま、また別の人生を歩みだしました♡

Released. Reimagined. — Helen Castillo @designerhelen x Vivat Veritas 

Look closely at the fabric — there’s a princess👸

A gilded royal carriage, chrysanthemums, and a maiden standing quietly in the shadows. Still living in the hem, she steps into another life♡

Model
@_kasumi.y

Photographer 
@nothing_special_88 

Hair 
@angh0
@sho_kanaida
@iam__little__boy

Make up
@glam_by_jyoti

Nails
@ms_muse_nail

#着物リメイク #御所解 #KimonoRemake #TokyoFashion #ReleasedReimagined
@allpress_espresso のコーヒーバッグで作りました☕️ Cafés do Bras @allpress_espresso のコーヒーバッグで作りました☕️

Cafés do Brasil 豆を運んでいた頃の文字が、そのままジャケットの背中に残っています。
着物だけでなく、面白い来歴のある生地をもっと取り入れていきたいと思っています✂️
素材:コーヒーバッグ × 着物シルク

Made from a coffee sack sourced from @allpress_espresso.

Cafés do Brasil — the stamp from its days carrying beans stays right there on the back. 

Kimono fabric has always been at the heart of what I do, but I want to bring in more materials with a history — things that have traveled, carried weight, meant something before they became a garment.

Materials: coffee sack × kimono silk

Photographer 
@nothing_special_88 

Model
@emorylove33

Jewelry
@viviange

Hair 
@angh0
@sho_kanaida
@iam__little__boy

Make up
@glam_by_jyoti

#upcycledfashion #sustainablestyle #coffeesack #wearablestories #ReleasedReimagined
Follow me on Instagram

Copyright © 2026 · vivien theme by Lovely Confetti DMCA.com Protection Status

Copyright © 2026 Vivat Veritas