• Skip to primary navigation
  • Skip to main content
  • Skip to primary sidebar
  • Skip to footer

Looking for something?

Get in touch

  • Email
  • Facebook
  • Instagram
  • Pinterest
  • Twitter
  • YouTube

Vivat Veritas

Custom Wedding Dress & Kimono Upcycled Clothes | オーダーメイドウェディングドレス&着物ドレス

  • Home
  • About
    • Press
    • Collaborations
  • Blog
  • Bridal
    • Lovely Words
    • Price List
  • Sewing Class
  • Kimono Dress
    • MADE-TO-ORDER BUSTIERS
  • Contact
  • Location
  • 日本語
/ Archives for blogs / DIY

DIY

Make This Handmade Holiday Gift!

December 14, 2019 By Chie

How to Make a Jewelry Holder (to prevent the necklace from tangling)

With the Holiday season approaching, I’m decided to share an easy DIY using fabric scraps! I always have a lot of left over fabric from making kimono dresses. Even though the scraps are small, I have hard time parting with them because I know they are one-of-a-kind as well as high quality silk. What to do? After some thinking I came up with a great idea…a portable jewelry holder. I am going back home for a few days at the end of the year, and am planning on carrying this with me. I wear a lot of jewelry (at least 6! See the proof here) and I don’t want them to get lost during my trip. This jewelry holder is also great as a gift or stocking stuffer. 

AURATE gold necklace
jewelry holder kimono fabric

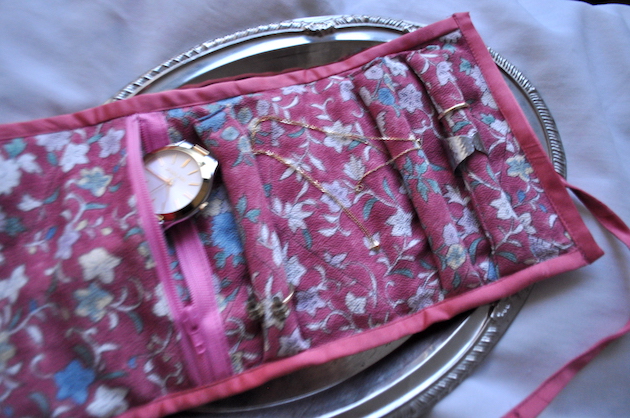
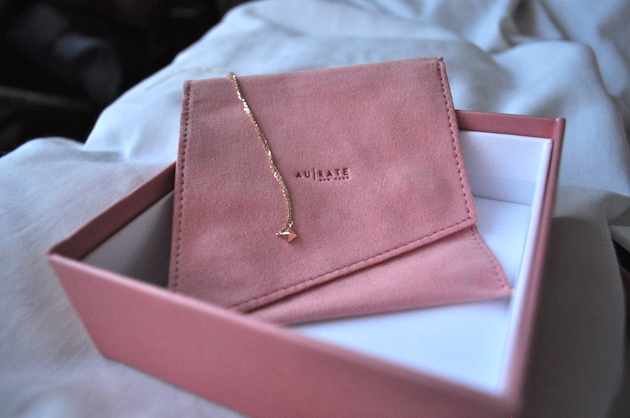
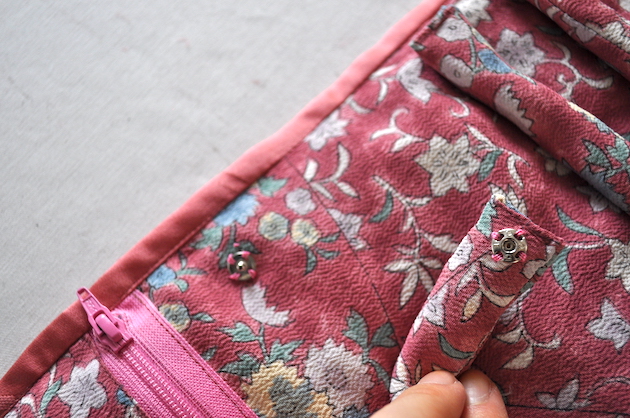
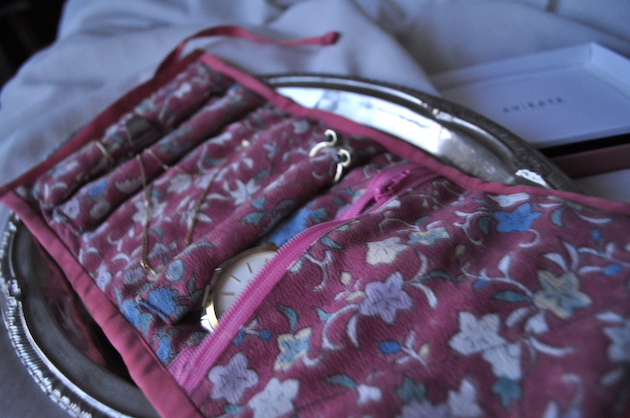
The snap buttons keep the necklaces from getting tangled. In this picture it is holding my recent addition from AU-RATE gold necklace. 

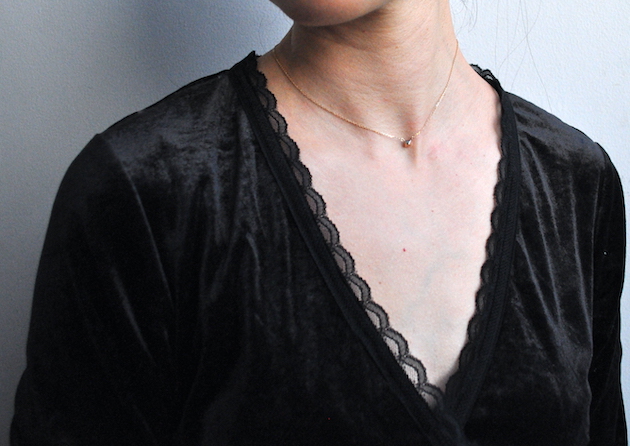
I’m wearing a Mini Charm Pyramid Necklace in 14k with H&M velvet dress I thrifted and added lace trim to it.

AURATE gold necklace

What you need:
– Fabric
– Thread
– Snap buttons
– Quilt battings

Cut fabrics according to the following measurements:
– 15cm x 32cm x 2 (face fabric and lining for the jewelry holder)
– 15cm x 13cm x 1 (zipper pocket)
– 15cm x 6cm x 3 (ring and necklace holders)

Cut quilt batting according to the following measurements:
– 15cm x 32cm x 1 (sandwich it between the face fabric and lining fabric)
– 15cm x 5.5cm x 3 (this goes inside the three ring and necklace holders)

jewelry holder using kimono fabric
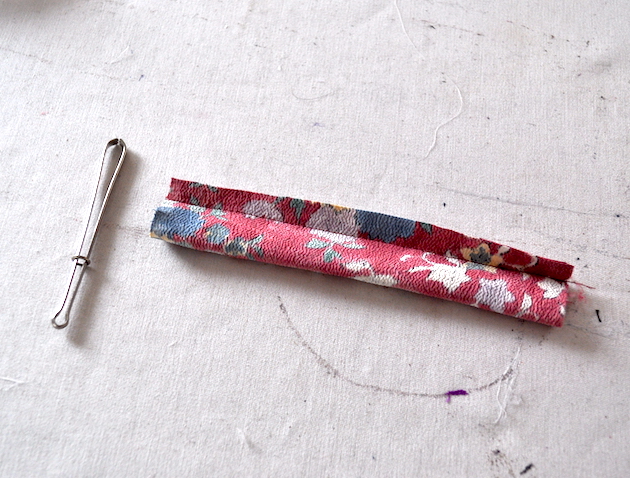
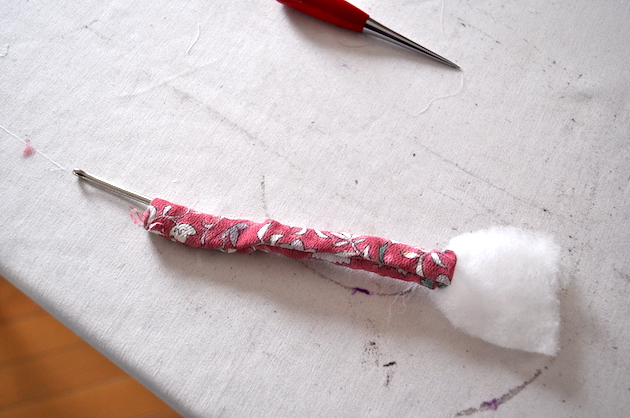
  1. Sew the 15cm x 6cm ring and necklace holders, inside out using 1cm seam allowances. Then turn them inside out using bodkin.
jewelry holder using kimono fabric

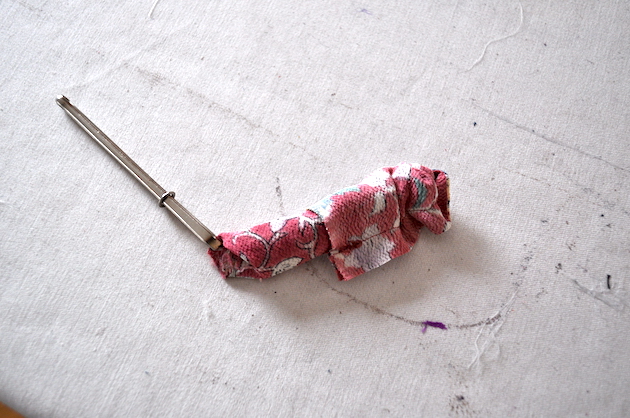
3. Put 15cm x 5.5cm quilt batting for the ring and necklace holder to add some padding. It is easier if you do this using a bodkin.

jewelry holder using kimono fabric

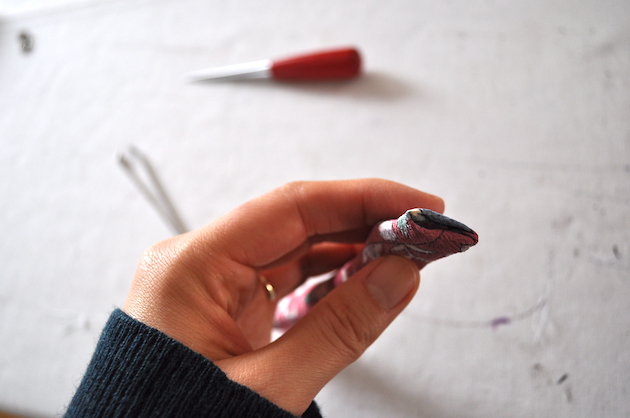
4. Sew one end of the ring and necklace holder (the raw edges will be covered by a strip of fabric later). For the other side, enter the rough edges inside and then sew. On this side, we will attach snap buttons for closure.

jewelry holder using kimono fabric

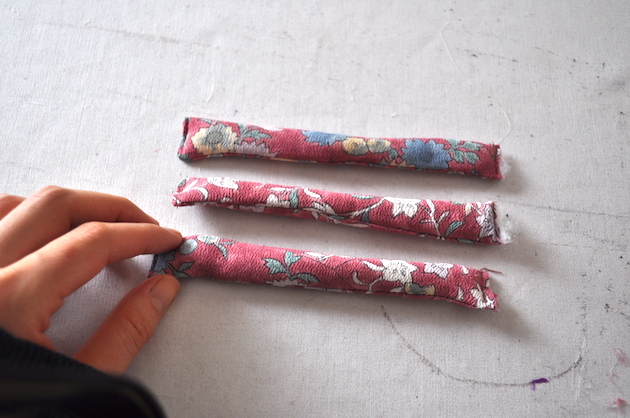
5. Make three of the ring and necklace holders.

jewelry holder using kimono fabric

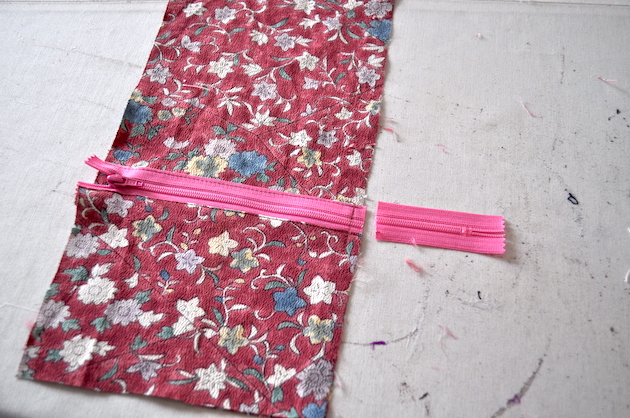
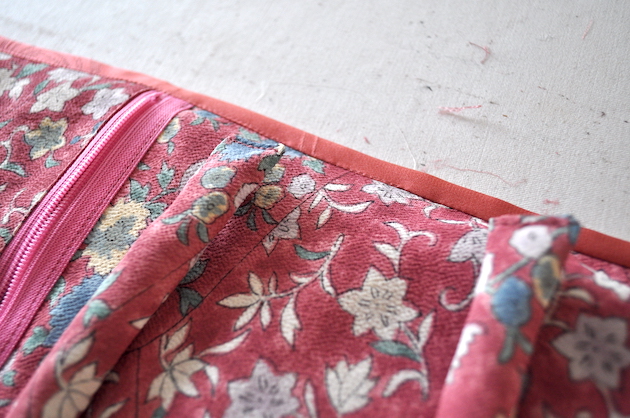
6. Sew pocket. Fold the edge of the pocket fabric with 1cm seam allowance and press. Place it on top of a flat knit zipper, and sew.

jewelry holder using kimono fabric

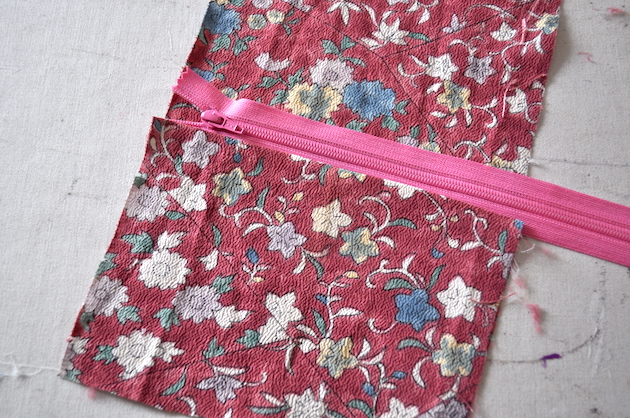
7. Attach the other side of the zipper tape directly on the lining fabric as shown below. If the zipper is too long, cut it.

jewelry holder using kimono fabric

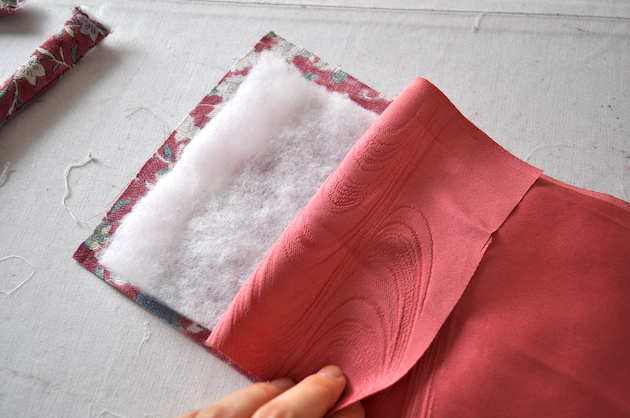
8. Sandwich the quilt batting with face fabric and the lining with zipper pocket. Baste it around with long (3mm) stitches.

jewelry holder using kimono fabric

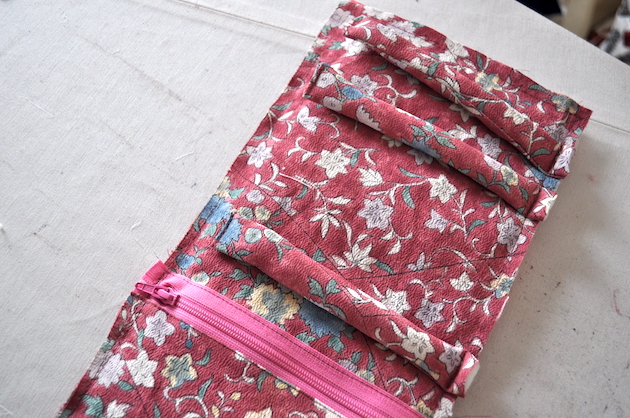
9. Attach the ring and necklace holders on one side. The other side with finished edges will be left loose, as you will be attaching snap buttons. I placed two holders on top, and another one closer to the zipper pocket.

jewelry holder using kimono fabric

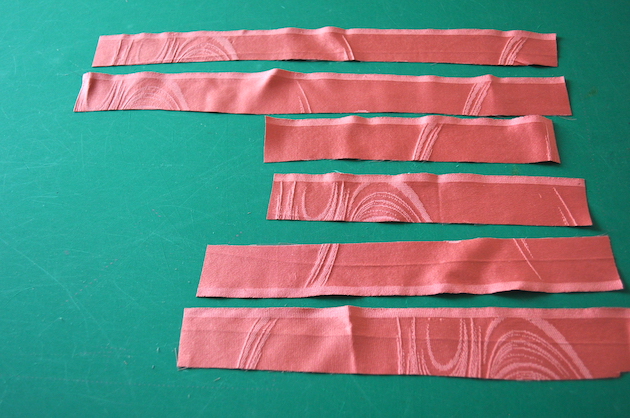
9. Cut fabrics according to the following measurements:
– 3.5cm x 32cm x 2 ( used to finish the side edges of the jewelry holder)
– 3.5cm x 17cm x 2 (used to finish the top and bottom edges of the jewelry holder)
– 3.5cm x 20cm x 2 ( used to make tie straps)

jewelry holder using kimono fabric

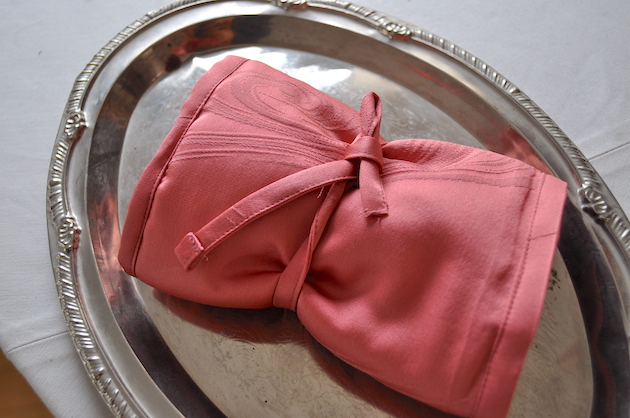
10. Using those fabric strips, finish the edges all around. Attach the tie straps so you can fold the folder twice and secure it with the straps.

11. Attach snap buttons on the loose ends of the ring and necklace holders.

jewelry holder using kimono fabric
jewelry holder for AU-RATE gold necklace

*This blog post is in collaboration with Nakturnal.

Filed Under: blog, creation, DIY, holiday, jewelry Tagged With: jewelry, necklace

Embroidered Jeans

May 6, 2017 By Chie

After finishing up my last knitting project, I needed another portable project for when I watch TV or travel. Because the season is heading toward Summer, I took a break from knitting and decided to transform my boyfriend denim. It was already refashioned once from thrifted mom jeans to tapered boyfriend fit but I wanted to incorporate the embroidery trend (You can see my mood board on Pinterest). I had a lot of embroidery threads left over from my previous projects (here and here) so I had everything I needed to tackle this project right away. 
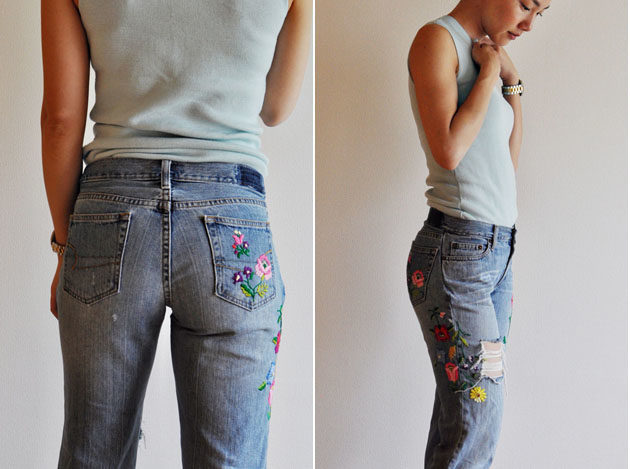
I used this Japanese book, titled “可愛いハンガリー刺しゅう:はじめてでも楽しめる伝統ある手仕事” and followed the patterns. I used an erasable pen to draw patterns on the jeans. Most things are done using satin stitches and lines are done by stem stitches (useful article on 10 hand embroidery stitches). The trick is to first do the running stitches around the border and then fill the canvas with satin stitches. This way the embroider has more 3D effect. 
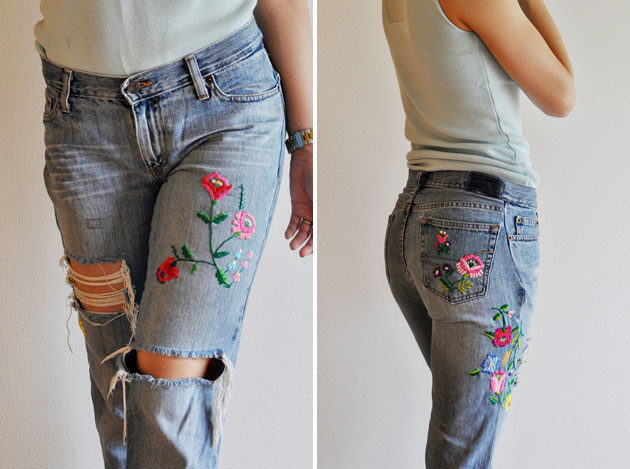
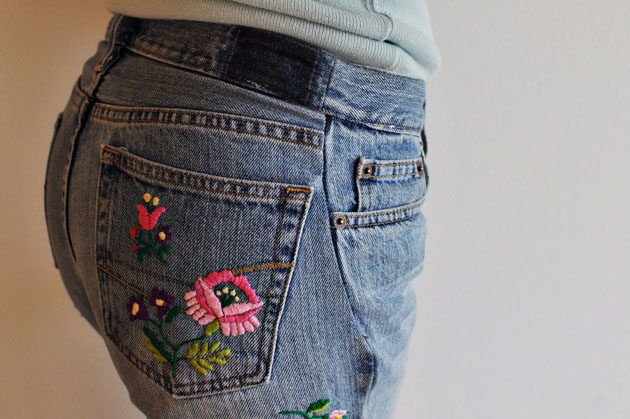
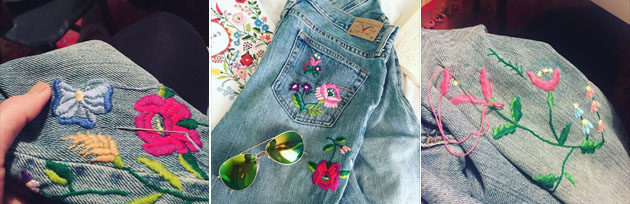
Here are some progress photos – from left, 3/23/2017, 3/9/2017 and 4/19/2017. It took a couple of months to finish. I’m glad that they are done before the embroidery trend is over. 
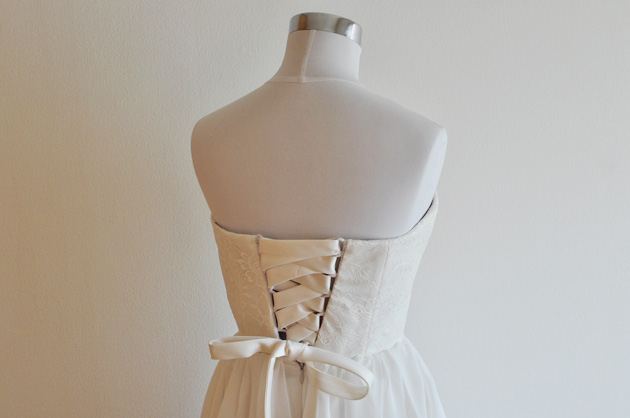
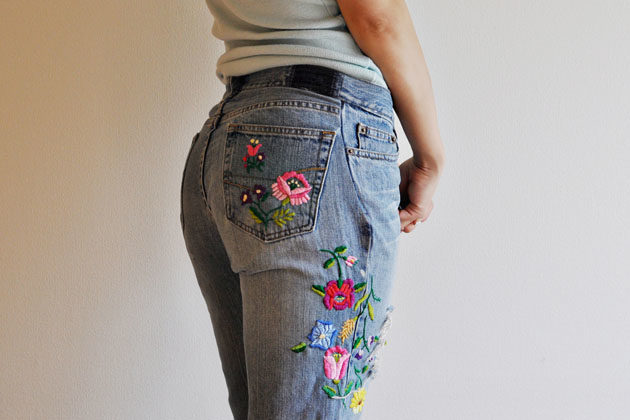
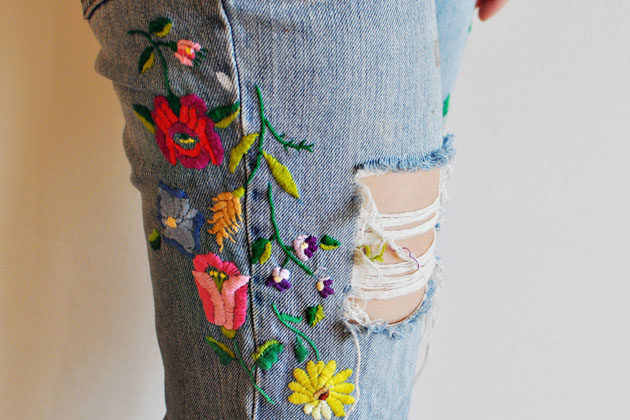
After I finish all the embroidery, I had to take in 12cm total of waist. I followed this youtube tutorial. 12cm was a lot to take in, so you can see the side seams are not in true side anymore. 
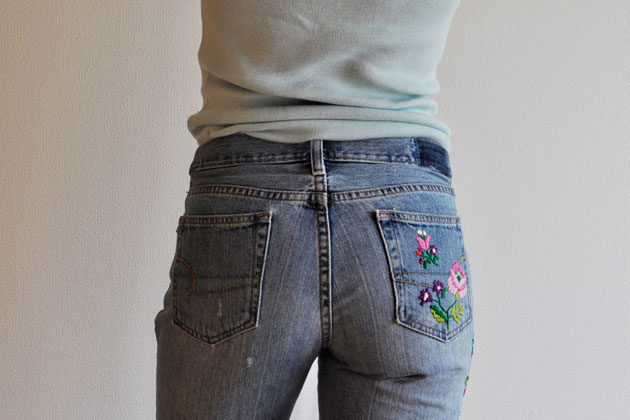
Sorry for the many butt photos! But I needed to show off the months of handy work:)  

昔サンキューマートで買った古着のジーンズをリメイクしました。
右後ろポッケとサイド、前股あたりにハンガリー風刺繍を。
海外ドラマを見ながらと、旅行中の飛行機の中でちくちく刺していきました。
刺繍トレンドが終わる前に出来上がって良かった!

ウエストが大きかったので、12㎝つめました。

Find me elsewhere:

Filed Under: blog, blogs, DIY, embroidery, pants, 日本語 Tagged With: embroidery, 刺しゅう, 刺繍

What to Do When Your Wedding Dress Color is Not Right

July 20, 2016 By Chie

What to Do When Your Wedding Dress Color is Not Right
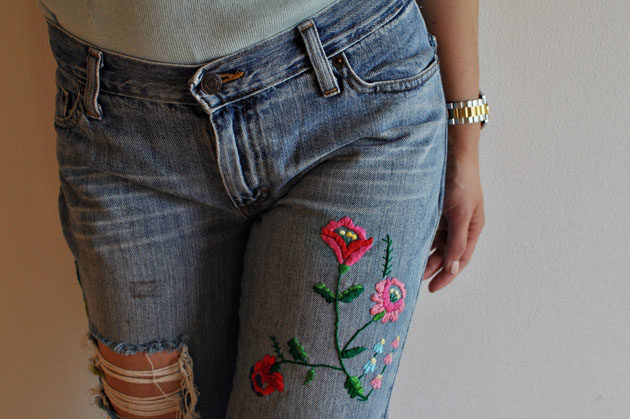
A few months ago, I received a text message from a make up artist that I worked with in the past (for this shoot), asking for help. She bought a wedding dress online but the color was not the color she was expecting. The dress was made in pure white polyester satin and organza, and it did not fit well with her skin color. This strapless sweet heart neckline dress came with an organza long sleeve top which she did not like either. She wanted the color to be more of an off-white and ivory shade. So she attempted to dye the dress with coffee; however, the color did not becaus the dress fabric was synthetic.

Here is the before and after picture. I am not sure if I was able to capture the color correctly in pictures, but the one on the left is white and the one on the right is the same dress after the modification, which is off-white.
before and after of color change wedding dress
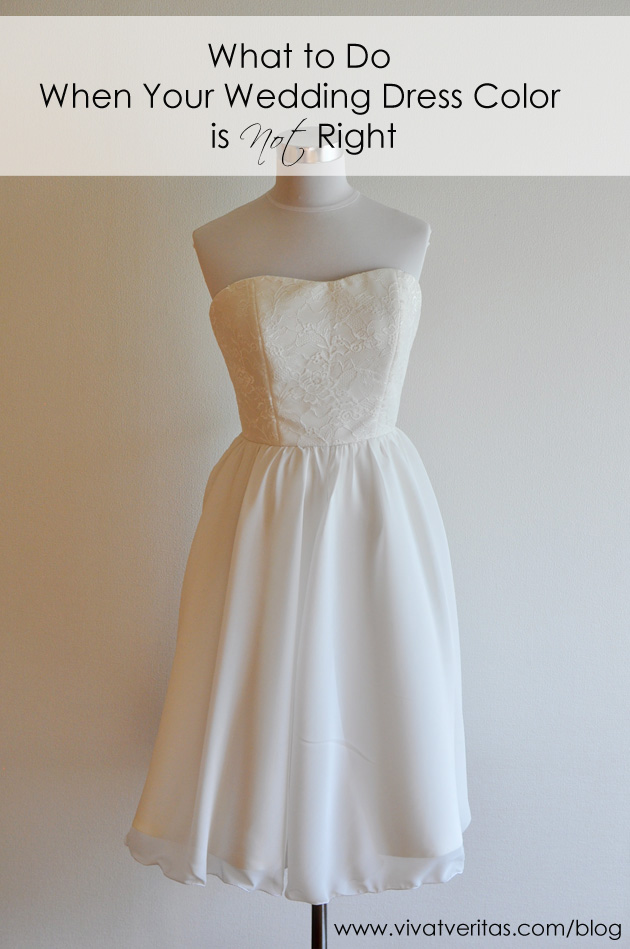
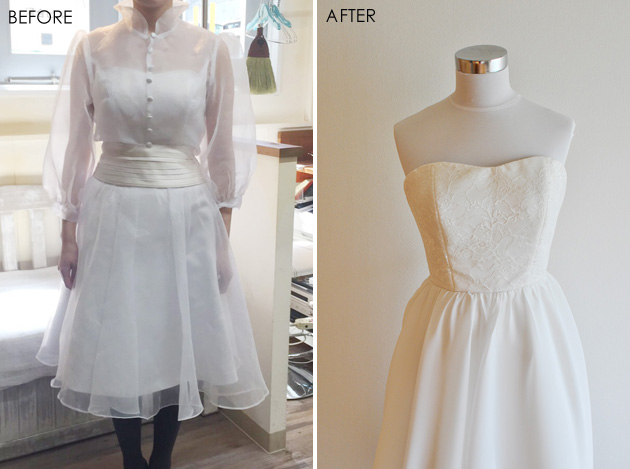
My plan was to take apart the top layers of the dress, and make new layers in off white satin, lace and chiffon using the patterns of the old wedding dress.plan for updating the white wedding dress
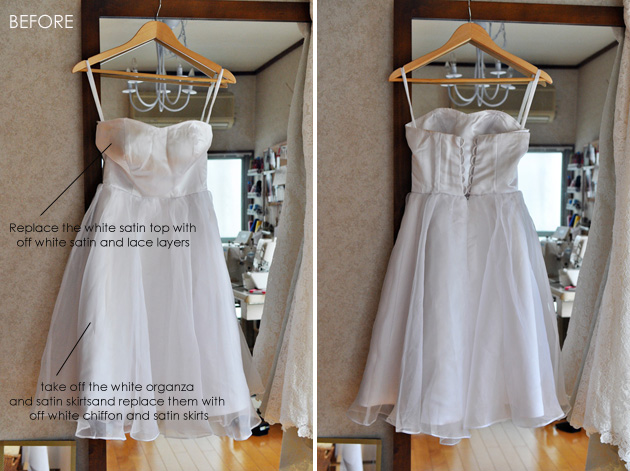
Here is the picture of the dress after the dissection. taking apart the dress
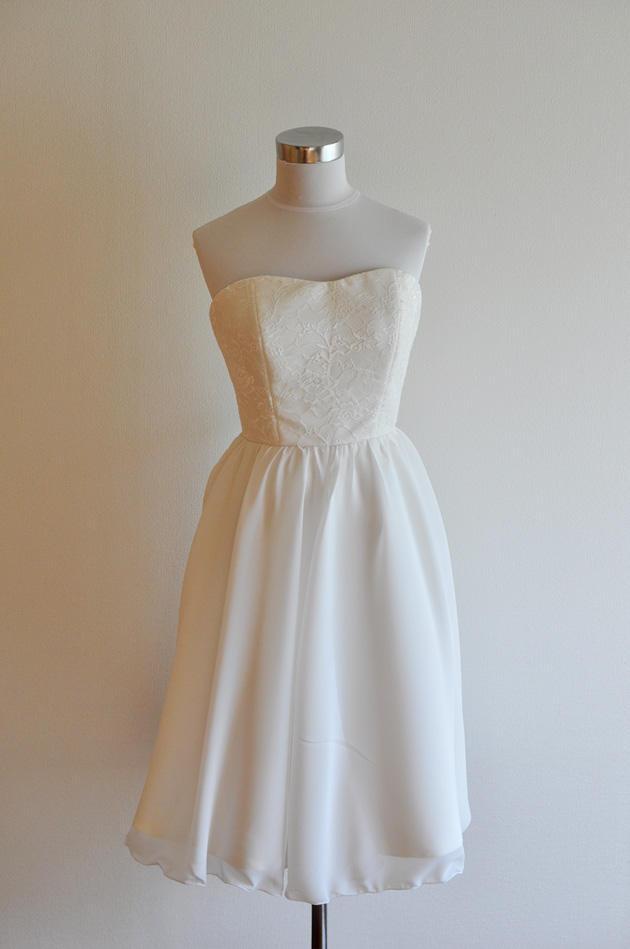
The dress bodice with off white satin and lace layers added.
bust part of wedding dress
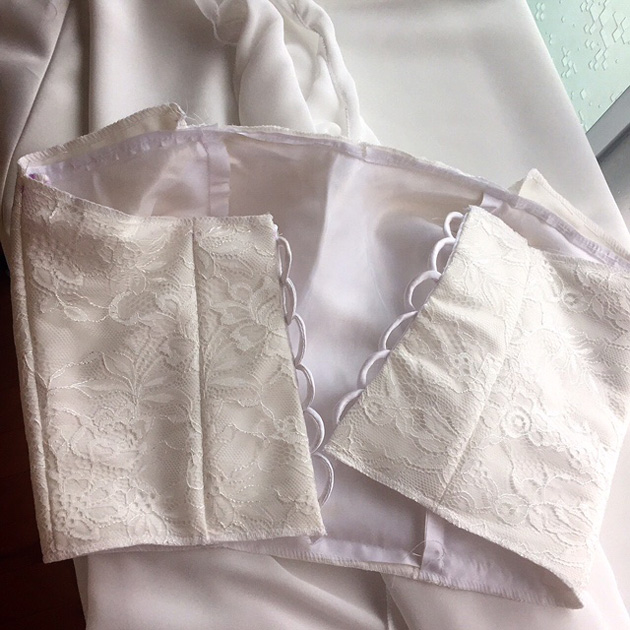
Here is the completed dress!

If your wedding dress color is not what you like, you can make the top layer based on the original dress. It is much easier and quicker than making a dress from scratch.
completed dresslaced up back detailsIvory lace wedding dresswedding circus x vivat veritas dresswedding circus x vivat veritas wedding dress3 ayumi dress

このページを日本語で読む

Filed Under: bridal, creation, DIY, dress Tagged With: bridal, clothes, dress

Next Page »

Primary Sidebar

JOIN MY EMAIL LIST

You can read a sample newsletter here, including my latest edition.

Recent Posts

  • UNPLAN shinjuku Pop Up
  • Japanese Iconic Pop Up & Mini Fashion Show 
  • Responsible Marché Vol.8 — A Day to Discover the Stories Behind Clothes
  • Seplumo Nihonbashi POP UP
  • Coaster Aobadai X VIVAT VERITAS POP UP

Categories

Follow me

  • Email
  • Facebook
  • Instagram
  • Pinterest
  • Twitter
  • YouTube

♥ Blog Archives

  • Etsy
  • Creema

Footer

ABOUT ME

My name is Chie. I design and make custom wedding dresses in Tokyo, Japan. Read More…

GET UPDATES!

Get monthly updates including new items in the shop, favorite links and more!

CONTACT

Feel free to send a message if you have any comment:

chie@vivatveritas.com

LET´S GET IN TOUCH

  • Email
  • Facebook
  • Instagram
  • Pinterest
  • Twitter
  • YouTube
1月末に行われたコレクティブファッションショーのルックスをご紹介💫 伝統的な生地の美しさを現代のス 1月末に行われたコレクティブファッションショーのルックスをご紹介💫

伝統的な生地の美しさを現代のスタイルへと落とし込めるように意識してデザインしました。

• 帯の巻きスカート
• 銘仙(めいせん)の風合いを活かした遊び心あるロンパース
• 袖のシルエットが際立つ、一枚仕立てのジャケット 

など🧚 

Introducing the looks from the Collective Fashion Show held at the end of January💫

In designing these pieces, my focus was on translating the timeless beauty of traditional Japanese textiles into contemporary, wearable styles.

• The Obi wrap skirt, reimagined for the modern wardrobe.
• The playful Meisen rompers, breathing new life into vintage silk.
• The unlined statement jacket, featuring a striking sleeve silhouette.

Photo credit:
Photographer @maiemilie 
Models @naka_kanar  @anna012945 @mae.suzu.ki @kotoha_mu @_kasumi.y @lei_seans
Event organizer @naka_kanar 

#コレクティブファッションショー #着物リメイク #銘仙 #帯リメイク #一点物 JapaneseTextiles KimonoStyle UpcycledFashion SustainableFashion ModernKimono
今回のオーダーはアメリカから🇺🇸 着物をツーピースにリメイクしました。 この繊細な刺繍、ずっと眺めて 今回のオーダーはアメリカから🇺🇸
着物をツーピースにリメイクしました。
この繊細な刺繍、ずっと眺めていられるくらい綺麗…😍
シルクの肌触りがとにかく柔らかくて、着心地も最高です。
ポケット付きなのも、地味に嬉しいポイント💡
しばらく関税の関係でアメリカに発送出来なかったのですが、UGXが使えるようになったので発送再開しました!

New custom order for a client in the USA! 🇺🇸✨

From vintage kimono to a chic two-piece set. Just look at that embroidery... absolutely stunning! 😍 The silk texture is pure luxury and so comfortable to wear. And yes, it has pockets! 🙌

📢 Shipping update: US shipping is officially BACK via UGX! Thank you for your patience.

#着物リメイク #アップサイクル #サステナブルファッション #着物コーディネート #kimonoremake upcycledfashion handmade
【Pop-up at UNPLAN Shinjuku】 I’ll be setting up a s 【Pop-up at UNPLAN Shinjuku】
I’ll be setting up a shop at UNPLAN Shinjuku @unplan_shinjuku from Feb 28 to March 6. If you’re in the area, come by and check out the pieces in person💕

When I’ll be there:
 * Feb 28 (Sat): 5 PM – 11 PM
 * March 6 (Friday): 5 PM – 11 PM

📍UNPLAN Shinjuku
Address: 5-chōme-3-15 Shinjuku, Shinjuku City, Tokyo 160-0022

Hope to see you there🫶🏻

【UNPLAN Shinjuku でポップアップします】
2月28日から3月6日まで、UNPLAN Shinjuku でポップアップを開催することになりました。
帯ビスチェや着物で作ったMA1などを直接手に取って頂ける機会なので、ぜひ遊びに来てください♡

在廊日(直接お会いできる日):
 * 2月28日(土): 17:00 – 23:00
 * 3月6日(金): 17:00 – 23:00

3月1日〜5日の期間中も、会場にアイテムを展示、販売しています。ふらっと立ち寄ってもらえると嬉しいです。

📍 UNPLAN Shinjuku(新宿)
160-0022 東京都新宿区新宿5-3-15

Photo credit:
Photographer @maiemilie 
Model @rima_a0905
Event organizer @naka_kanar 

#UNPLANShinjuku #東京ファッション #ポップアップ #TokyoFashion #PopUp
お客様の帯でリュックを作りました🪡 こだわりポイントは… ✔︎縁起の良い「青海波」の柄を活かしたデ お客様の帯でリュックを作りました🪡
こだわりポイントは…

✔︎縁起の良い「青海波」の柄を活かしたデザイン
✔︎荷物がたっぷり入る13cmのマチ
✔︎普段着に合わせやすい絶妙なネイビー

動画の最後で実際に背負ってみましたが、サイズ感もちょうど良く、デイリーユースにぴったりです!通勤でお使い頂けると聞いて嬉しい🥹🫶🏻

I remade a customer’s Obi belt into a backpack🪡✨

Here are the details:
✔︎ A design featuring the ""Seigaiha"" (wave) pattern—a symbol of good luck and peace.
✔︎ A spacious 13cm depth for plenty of storage.
✔︎ A beautiful navy that blends perfectly with everyday outfits.

As you can see in the video, the size is just right and it's perfect for daily use. I’m so glad to hear that she’ll be using it for work🥹🫶🏻

#帯リメイク #アップサイクル #ハンドメイドバッグ  #青海波
Paint the world collection ミニファッションショーから🎨 受け継がれてきた Paint the world collection ミニファッションショーから🎨
受け継がれてきた着物の美しさを、今の空気感に閉じ込めたMA-1。
さりげなく裏地も素敵💓

A glimpse from the "paint the world” collection mini fashion show.
Vintage kimono silk reimagined into a modern bomber jacket.
The vivid red lining tells a story of its own💕

▶︎ Online Shopにて販売中
詳細はプロフィール@vivatveritasのURLをチェック✔︎

Photographer @maiemilie 
Model @ppotatodesu
Event organized by @naka_kanar

#kimonoremake #fashioncollection #着物リメイク#upcycledfashion #kimonostyle tokyofashion
オーストラリアのお客様からオーダーいただいた、着物リメイクのドレスとバッグ。 海を越えてお届けしま オーストラリアのお客様からオーダーいただいた、着物リメイクのドレスとバッグ。

海を越えてお届けしました🌊

桜の柄がスカートの裾と袖🌸

お揃いの巾着バッグも🫶🏻

遠く離れた地で、このドレスが特別な時間を彩りますように💫

A custom-made kimono remake dress and matching bag for my client in Australia🇦🇺

Sent with love across the ocean🌊

The beautiful cherry blossom patterns bloom elegantly along the hem and sleeves🌸

I also crafted a matching drawstring bag to complete the look🫶🏻

#着物リメイク #着物ドレス #オーダーメイド #サステナブルファッション #桜 Kimonoremake Kimonodress UpcycledKimono Custommade Japanesestyle
視線を奪う、孔雀さん🦚💙 正絹の艶やかさを活かした、バックレスデザインのロングドレスです。 チョー 視線を奪う、孔雀さん🦚💙

正絹の艶やかさを活かした、バックレスデザインのロングドレスです。
チョーカー風のホルターネックが顔周りを華やかに見せてくれます。

特別な日は、特別なドレスで👗

▶︎ Online Shopにて販売中
詳細はプロフィール@vivatveritasのURLをチェック✔︎

Eyes on the peacock🦚✨

This backless gown is made from genuine silk kimono fabric. Featuring a chic choker-style halter neck, it’s designed to make an entrance at your next party or resort getaway.

Special days deserve a special dress👗

▶︎ Shop online now
Link in bio: @vivatveritas ✔︎

Photographer @maiemilie 
Model @ganguro_egg
Headband and jewelry @catwalk_bijoux
Event organized by @naka_kanar

#KimonoRemake #SustainableFashion #SlowFashion #Peacock #VivatVeritas
着物ドレス リメイクファッション リゾートコーデ 孔雀 ハンドメイドドレス
様々な表情をしてる唐子さんが可愛すぎる着物羽織を発見したので👀カジュアルに着れるMA 1にしてみまし 様々な表情をしてる唐子さんが可愛すぎる着物羽織を発見したので👀カジュアルに着れるMA 1にしてみました🍎

もちろんポケット付きで機能性アップ+リブの袖口とネックラインで気易く✨

Found this stunning vintage kimono fabric featuring ""Karako"" (children) with so many adorable facial expressions! 👀 I’ve transformed it into a casual MA-1 bomber jacket🍎

I’ve added pockets for extra functionality, and the ribbed cuffs and neckline make it super easy and comfortable to wear✨

Model @naka_kanar

#着物リメイク #着物アップサイクル #MA1 #唐子 
#KimonoRemake UpcycledFashion
Follow me on Instagram

Copyright © 2026 · vivien theme by Lovely Confetti DMCA.com Protection Status

Copyright © 2026 Vivat Veritas