• Skip to primary navigation
  • Skip to main content
  • Skip to primary sidebar
  • Skip to footer

Looking for something?

Get in touch

  • Email
  • Facebook
  • Instagram
  • Pinterest
  • Twitter
  • YouTube

Vivat Veritas

Custom Wedding Dress & Kimono Upcycled Clothes | オーダーメイドウェディングドレス&着物ドレス

  • Home
  • About
    • Press
    • Collaborations
  • Blog
  • Bridal
    • Lovely Words
    • Price List
  • Sewing Class
  • Kimono Dress
    • MADE-TO-ORDER BUSTIERS
  • Contact
  • Location
  • 日本語
/ Archives for blogs / DIY

DIY

Guest blogger: Freehand machine embroidery by Paunnet

April 18, 2011 By Chie

Hello, everyone! I’m Paunnet (but you can call me Anna) and I’m very happy to be here while Chie takes care of lovely little Sophia.

Today I’d like to talk to you about a technique I was introduced to about two years ago and that has been inspiring me a lot, lately. It is called freehand machine embroidery (if you’re a quilter you probably know it already) and it allows you to put your designs on anything you want without an expensive embroidery machine.
This is what you’re gonna need:
1.      A darning foot (sometimes called quilting foot): mine didn’t come with my machine, but I bought one for a few euros at my machine dealer. This allows you to move the fabric while you sew and to stitch in any direction you want.
2.      Water soluble stabilizer: it’s a plastic-y film on which you can draw you design. When you are done, you just wash it and will dissolve. I used Madeira’s Avalon, which comes in a roll of 5m x 25cm.
3.      A permanent marker: make sure it’s water resistant or the ink will bleed on to your fabric when you wash it.
4.      Tape: to tape the stabilizer on the fabric, so that it doesn’t move around.
5.      (Optional) Embroidery thread: I had some in my sewing box, but regular thread works great too.
Now you can choose your design and transfer it or drawing it on the stabilizer. I chose this sketch of three little girl dresses that I found a long time ago on the Internet.
The next step is to prepare your machine: put on the darning foot, set a low thread tension and lower the feed dogs (my machine has a button on the back, check your machine’s instructions if you don’t know how to do it).
Now start following the lines of your design. You’ll need some practice to adjust the movement of the fabric and the speed of the pedal, but it’s not too hard to get a good result. If you really can’t figure it out, there are a lot of Youtube videos in which you can see the machine in action, which might be more useful than my written explanation.
In the picture you can see I finished the the first part and I left a long tail before cutting the thread and moving to the next little dress.
Once you have finished, turn your fabric, with the help of a seam ripper, pull the threads on the wrong side and knot them, so your design won’t unravel.
Now you’re almost done! Rip the stabilizer and wash away the remaining.
I used my little dresses to make a zippered pouch (and I made a matching pencil case with an ice-cream design that I found here).
Aren’t they cute? They are for sale in my Etsy shop.
I also decorated a plain t-shirt with some butterflies going from the front to the back.
                                                            
I hope this little tutorial will inspire you to create something beautiful. If you try it, I’d be delighted to see your results!

Filed Under: DIY, interview

Braided hair tutorial

April 12, 2011 By Chie

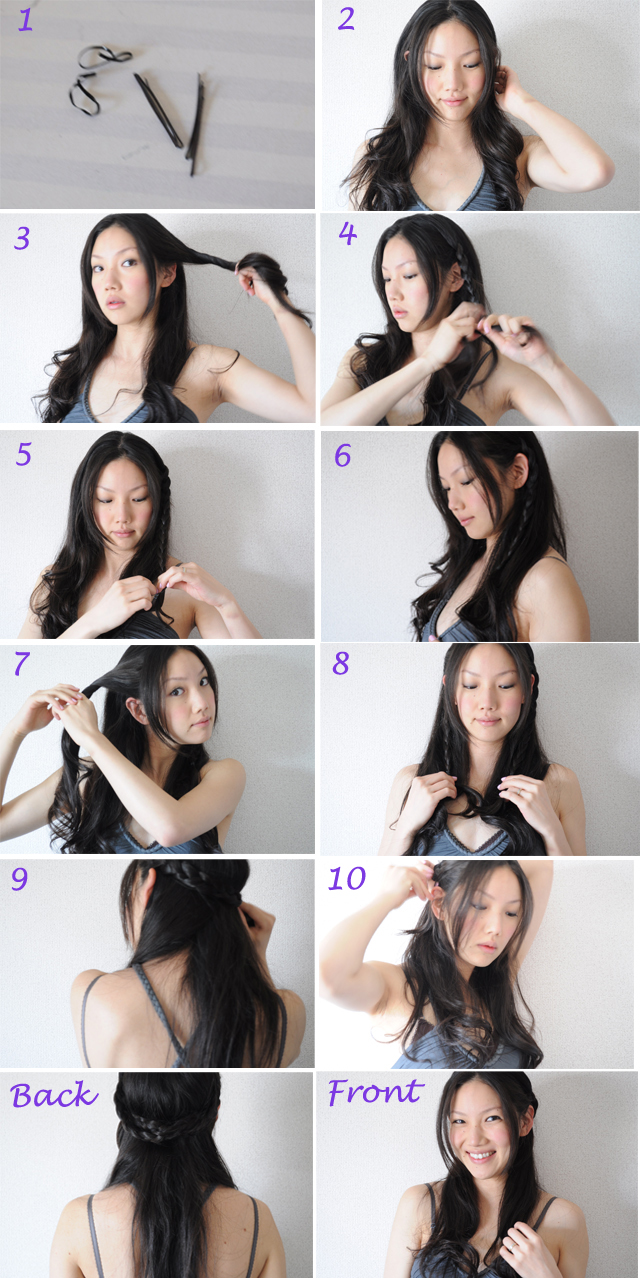
I’ve been doing different hair arrangement using braids lately. I like this one since its easy yet looks like I spent more time on it than I actually did :p I hope you like the tutorial!

1. You need two elastic bands and a couple of hair pins.
2. I like to start by curling my hair slightly with a curling iron, but this step  is totally up to you! I think this braided hair is great with straight hair, wavy or curled, as long as your hair has enough length to wrap a braided piece around the back of your head 🙂
3. First part your hair in the center. Then take a strand of hair right above your ear, leaving your bang, if you have it.
4. Then braid tightly.
5. Braid till the end, and tie it with the elastic band.
6. The side will look like this.
7-8. Do the same for the other side.
9. Take the braid, and wrap it around the back of your head and pin it right behind your ear. Make sure to hide the end under your non-braided hair.
10. Do the same for the other side.

And tada! It’s so easy and takes less than 3 minutes:)

Filed Under: DIY, dress

Saturday date in Machida and thrift shopping

January 10, 2011 By Chie

Hi! I hope everyone’s weekend was nice and relaxing. My husband and I went out a little date on Saturday to a city called Machida. It’s close to where we live and has two fabric shops that I like, Yuzawaya and Okadaya. Besides going to fabric shops and grabbing a bite, we stopped by at a thrift shop called “390”. Literally everything they have is 390 yen (about less than $4). I like the shop because they actually have vintage clothing imported from the U.S. and Europe, not just someone’s old clothes from GAP. Besides vintage clothes, they have new scarves, i-phone case shaped like candy bar, head phones and other cute goodies.

There I found this 70’s (maybe 80’s? tag was removed) dress. I love the dusty pale pink color, bat/dolmen sleeves and, peplum, but the dress seems to be able to use some tweaking.

So I removed the shoulder pads, shorten the length, and added lining for the skirt part.
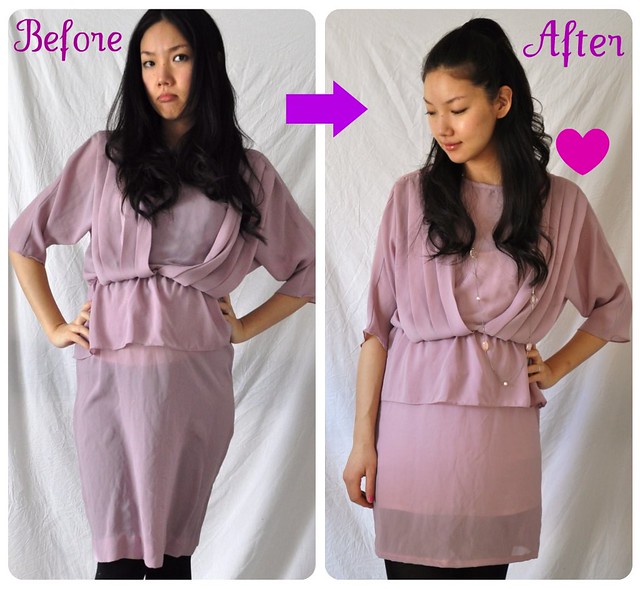
It’s kind of hard to see the difference between before & after in the photos, but I like after version much better, and I think it’s more wearable!

Filed Under: DIY

« Previous Page
Next Page »

Primary Sidebar

JOIN MY EMAIL LIST

You can read a sample newsletter here, including my latest edition.

Recent Posts

  • Seplumo Nihonbashi POP UP
  • Coaster Aobadai X VIVAT VERITAS POP UP
  • RiE MORRiS 1st Album 「On My Mind」 Release Party
  • BLACK FRIDAY Coupon Code 
  • Kinko Town, Kagoshima – Ao no Craft Marche

Categories

Follow me

  • Email
  • Facebook
  • Instagram
  • Pinterest
  • Twitter
  • YouTube

♥ Blog Archives

  • Etsy
  • Creema

Footer

ABOUT ME

My name is Chie. I design and make custom wedding dresses in Tokyo, Japan. Read More…

GET UPDATES!

Get monthly updates including new items in the shop, favorite links and more!

CONTACT

Feel free to send a message if you have any comment:

chie@vivatveritas.com

LET´S GET IN TOUCH

  • Email
  • Facebook
  • Instagram
  • Pinterest
  • Twitter
  • YouTube
色打掛のリメイクドレス👗 成人式の 色打掛のリメイクドレス👗
成人式の振袖やお母様、お祖母様のお着物からのオーダーメイドも承っております✂️

シルク100%の生地は通気性も良くて光沢も最高に上品✨

お袖はそのままにして、ドラマチックな演出を🫶🏻

Remake dress from a colorful uchikake 👗 
I also accept custom orders from coming-of-age ceremony furisode or your mother’s or grandmother’s kimono ✂️ 

100% silk fabric is breathable and has a supremely elegant sheen ✨ 

#和ドレス #お色直しドレス #マーメイドライン
#kimonoremake #kimonodress
"女優のステファニーアリアンに第3 回横浜国際映画祭「CROSSPOINT」にてビバベリタスの着物ドレスをご着用頂きました🌸👗

シャーベットカラーに紫ピンクの花柄が可愛らしい着物ワンピース。
ウエストバンドには同色ピンク系のレースを使用しました✂️

Stefanie Arianne @stefanie.arianne wearing Vivat Veritas dress at #CROSSPOINT × #横浜国際映画祭
🇺🇸🇯🇵

#着物リメイク #kimonodress 
#puffsleeves
Recent custom orders ✂️🪡✨ From MA1 jacket Recent custom orders ✂️🪡✨
From MA1 jackets to bucket hats, men’s shirts to two-piece sets, the possibilities of kimono remakes are endless. Which piece do you like?💖

最近お作りしたオーダーメイド品色々♡
MA1、メンズシャツ、ツーピースセット、バケットハット、ベルト…など着物リメイクの可能性は無限大♾️💖

#着物リメイク #kimonoupcycle #kimonofashion #kimonodress
 #KimonoRemake #CustomCouture #SustainableStyle"
"The obi bustier features a silver floral fabric w "The obi bustier features a silver floral fabric with adjustable straps and lave up back, paired with a soft pink tiered skirt dyed from kimono lining. A wide sash adds a romantic touch. 

帯ビスチェはシルバーの花柄帯に調整可能な肩ストラップと編み上げが特徴。着物裏地を染めたソフトピンクのティアードスカートと幅広のサッシュでロマンティックに。 

Model @anni_nakano
Make up artist @glam_by_jyoti

#アップサイクルファッション #着物リメイク
#KimonoMeetsModern #UpcycledFashion #JapaneseInspiration"
日本橋コレド室町3にセプル@seplumo_ethi 日本橋コレド室町3にセプル@seplumo_ethical  2号店が4月にオープンし、5月からVivat Veritasの商品も仲間入り✨ 「日本の良いもの」「日本の美しいもの」を提案する素敵な空間の3階でお待ちしております🌸

大切な人やお友達への特別なエシカルなプレゼント🎁を見つけませんか? 
もちろん、自分へのご褒美にもピッタリ♡ 

📅 日程: 2025年5月1日〜 
📍 場所: 東京都中央区日本橋室町1-5-5 コレド室町3 、3階 
⏰ 営業時間: 11:00~20:00     

Seplumo @seplumo_ethical opened its second store at COREDO Muromachi 3 in Nihonbashi in April, and starting in May, Vivat Veritas products will join the lineup! 
Visit us on the 3rd floor in a beautiful space showcasing "Japan's finest" and "Japan's beauty”🌸

Looking for a special ethical gift 🎁 for a loved one or friend? 
Or perhaps a perfect treat for yourself! ♡ 

📅 Date: From May 1, 2025 
📍 Location: COREDO Muromachi 3, 1-5-5 Nihonbashi Muromachi, Chuo-ku, Tokyo, 3rd Floor 
⏰ Hours: 11:00–20:00 

#Seplumo #Ethical #COREDOmuromachi #Nihonbashi #Sustainable
#セプルモ #エシカル #コレド室町 #日本橋 #サステナブル
大人ピンクの着物をリメイクした一点ものオールインワン🌸 
蛇の目傘を持ってお花見をする童子が可愛いアクセント🎎 
一見ワンピース風だけど実はパンツ!フレアAラインが軽やか✨ 
肩ストラップは後ろで調整可能、バストカップ付きで夏も楽ちん🌟 
バスト下のカットアウトでさりげない肌見せも💖 

A one-of-a-kind all-in-one remade from a chic pink kimono 🌸 
The child with a parasol enjoying hanami is such a cute touch 🎎 
Looks like a dress but it’s pants! Flared A-line for a breezy vibe ✨ 
Adjustable shoulder straps, built-in bust cups—perfect for summer 🌟 
Subtle cutout under the bust for a hint of skin 💖 

Model @naka_kanar
Photographer @themartycastro

#KimonoStyle 
#UniqueFashion 
#SummerLook 
#着物リメイク 
#一点もの 
#大人ピンク
@ukikimono_ で近日発売予定のリバーシブルバケットハット🧢✨ 
素材には上質な帯を使用、和の雰囲気が漂う特別な一品です🌸 
片面は華やかなゴールドの柄で、特別な日にぴったり👘 
もう片面はシンプルなベージュで、普段使いにも最適🎶 
どちらのスタイルも楽しめる、着物好きにはたまらないアイテムです💖 

販売開始をお楽しみに!

Coming soon to @ukikimono_ ! A stunning reversible bucket hat 🧢✨ 
Crafted from high-quality obi fabric, this piece brings a touch of Japanese elegance 🌸 
One side features a gorgeous gold pattern, perfect for special occasions 👘 
The other side is a chic beige, ideal for everyday wear 🎶 
A must-have for kimono lovers who want to switch up their style! 💖 
Stay tuned for the release!

 #KimonoRemake #BucketHat #JapaneseFashion #ukikomono
#着物リメイク #バケットハット #和ファッション #ukikomono
🌸Vibrant Kimono Mermaid Dress🌸 Transformed 🌸Vibrant Kimono Mermaid Dress🌸 
Transformed from a stunning floral kimono, this mermaid dress is a one-of-a-kind beauty💖 

✨Features: 
- Square neckline with wide, supportive straps 
- Side zipper for easy wear 
- Short, elegant 30cm train for a touch of drama (can be shortened if needed)
- Fully lined with original kimono fabric 

Perfect for standing out at any event💃 
 
*All Vivat Veritas pieces are one-of-a-kind, so they’re gone once sold out! 

🌸 華やかな着物リメイク・マーメイドドレス🌸 

色鮮やかな花柄の振袖をリメイクした、一点もののドレス💖 

- スクエアネックライン&幅広肩紐で安心感 
- 左横ファスナーで着脱簡単 
- 後ろは30cmの短めトレーン (必要でしたらカット出来ます)
- 着物の裏地をそのまま使用 

特別な日にぴったりの一着💃

*Vivat Veritasの商品はすべて 1点物となりますので、売り切れ次第終了となります。

Model @naka_kanar
Photographer @themartycastro

 #着物リメイク #マーメイドドレス #サステナブルファッション 
#KimonoRemake #MermaidDress #SustainableFashion
Follow me on Instagram

Copyright © 2025 · vivien theme by Lovely Confetti DMCA.com Protection Status

Copyright © 2025 Vivat Veritas