• Skip to primary navigation
  • Skip to main content
  • Skip to primary sidebar
  • Skip to footer

Looking for something?

Get in touch

  • Email
  • Facebook
  • Instagram
  • Pinterest
  • Twitter
  • YouTube

Vivat Veritas

Custom Wedding Dress & Kimono Upcycled Clothes | オーダーメイドウェディングドレス&着物ドレス

  • Home
  • About
    • Press
    • Collaborations
  • Blog
  • Bridal
    • Lovely Words
    • Price List
  • Sewing Class
  • Kimono Dress
    • MADE-TO-ORDER BUSTIERS
  • Contact
  • Location
  • 日本語
/ Archives for tutorial

tutorial

Tutorial | How to Make Reusable Nursing Pads

December 30, 2010 By Chie

DIY Reusable Nursing Pads

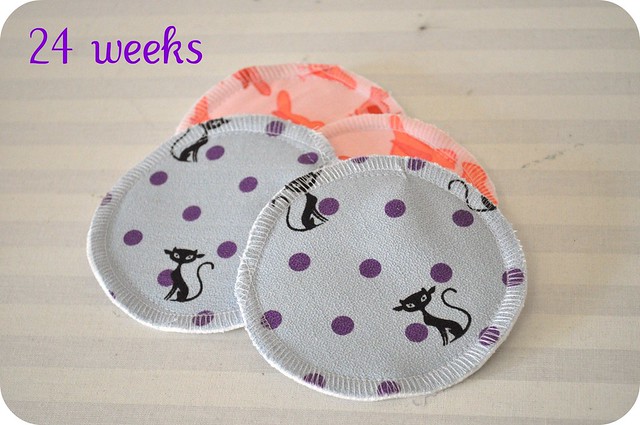
Hello! I’m 24 week pregnant now. No picture of belly this week, but instead, I would like to show you how to make reusable nursing pads. The thought of breast feeding the baby kind of scares me. I never look at my boobs as a source of food for a human being, and I’m not sure what it’s like. I know breast feeding is really good for the health of baby, so I want to nurse. Making cute nursing pads is my attempt to reduce the intimidating factor of breast feeding..:) Also it saves a lot of money, instead of using disposable nursing pads.

These pads are super easy to make! I used cute cotton prints that I found at a quilting section of fabric shop, Okadaya.

You will need:
– flannel (you can also reuse flannel shirts or blankets if you have them!)
– Some fun cotton print fabric
– vinyl or thick zip lock bag (or shower curtain)
– bowl or cup, 4-5 inches in diameter (mine is 4 inches in diameter)


1. Using the bowl, cut out 4-5 inch diameter circles of flannel, vinyl, and cotton. For one nursing pad, you will need 3 flannel, 1 vinyl and 1 cotton circles. Vinyl will prevent leaking.

2. Pin the circles in the following order – 3 flannel, 1 vinyl and finally 1 cotton on top.

3. Sew them together with sewing machine. I first sewed with straight stitch and then serge the edge.

4. You are done!

P.S. Please link to this post when you use this tutorial or tag me on instagram (@vivatveritas) to show what you made.

Related post: How to make nursing cape

Sign me up!

Want more post like this? 

Get it in your inbox, once a month. Check out my previous newsletters to see if you would like one.

Filed Under: pregnancy series Tagged With: tutorial

Tutorial | How to Make a Cotton Sack Dress

January 18, 2010 By Chie


Tutorial | How to Make a Cotton Sack Dress

I love working on custom orders. Custom orders are a lot of work since it often requires me to make something out of patterns I don’t have, but give me fun challenges. It is an opportunity to expand different variations and patterns of work.

I was recently asked to make a modification of this dress. Her request was to keep the big front buttons, add rolled up sleeves, and big pockets. Before I made one for her, I made one sample to make sure the patterns work. It turned out the dress was pretty simple to make. The dress can be adjusted to fit different sizes easily.
Although I added darts for the previous dress, this custom order dress has none. It is all straight line sewing.


You need measurements of your:
♥ shoulder to shoulder measurement (16″ for me)
♥ from your shoulder to the top of the bust measurement (mine was 9″)
♥ desired length of the dress (in this case, I made it for 34″)

Material:
♥ About 1.50m of fabric
♥ covered button kit
♥ invisible zipper

Pattern:
1. Top panels
♥ Take your shoulder to shoulder measurement (mine is about 16″), and add 3″ each side. So the total width of the top front panel is about 23″.
♥ The length of your top front panel is the measurement of your shoulder to the top of your bust.
♥ Now your have a rectangle fabric, 23″ ×9″. Cut two (one for front, and one for back)
♥ Adjust the neckline, you can make it like boat neck, or round neck.

2. Skirt panels
♥ Take the length of your shoulder to shoulder measurement (16″), and multiply it by 1.5. In my case, this is 24″. This becomes the width of your skirt panels, front and back.
♥ The length of your skirt panels should be (your desired length of the dress) – (length of your top panel). In this case, 34-9=25.
♥ Now you have a rectangle fabric, 24″ ×25″.
♥ Gather the top of this skirt panel fabric, and shorten it (gather) so it becomes your shoulder to shoulder measurement (16″). Then sew this into the top panel, leave 3″ both sides for the sleeve.

3. Pockets, roll up sleeves etc.
This is your preference. Make many different variations!

4. Zipper should be added to the back middle, and I would cut the back top and skirt panels 0.5″ longer so it has extra seem allowance for installing zipper.

Please link to this post if you make a dress from this tutorial. Happy sewing♥

Sign me up!

Want more post like this? 

Get it in your inbox, once a month. Check out my previous newsletters to see if you would like one.

Filed Under: DIY, dress Tagged With: tutorial

« Previous Page

Primary Sidebar

JOIN MY EMAIL LIST

You can read a sample newsletter here, including my latest edition.

Recent Posts

  • UNPLAN shinjuku Pop Up
  • Japanese Iconic Pop Up & Mini Fashion Show 
  • Responsible Marché Vol.8 — A Day to Discover the Stories Behind Clothes
  • Seplumo Nihonbashi POP UP
  • Coaster Aobadai X VIVAT VERITAS POP UP

Categories

Follow me

  • Email
  • Facebook
  • Instagram
  • Pinterest
  • Twitter
  • YouTube

♥ Blog Archives

  • Etsy
  • Creema

Footer

ABOUT ME

My name is Chie. I design and make custom wedding dresses in Tokyo, Japan. Read More…

GET UPDATES!

Get monthly updates including new items in the shop, favorite links and more!

CONTACT

Feel free to send a message if you have any comment:

chie@vivatveritas.com

LET´S GET IN TOUCH

  • Email
  • Facebook
  • Instagram
  • Pinterest
  • Twitter
  • YouTube
Something I've been building since 2008 — taking k Something I've been building since 2008 — taking kimono fabric, fabric that already holds someone's memory, and giving it a new life.

Last Saturday, I got to share that with someone very special.

@designerhelen is a designer from New York who first reached out to me through my little sewing lesson account. When we started talking, I realized we were asking the exact same question: how do you take something with a past, and carry it forward?

We met in person here in Tokyo last December. That conversation became Released. Reimagined.
Two designers. Two cities. One shared belief — that beautiful things deserve a second life.

None of this would have been possible without our incredible team:

👗 Models: @emorylove33 @naka_kanar @bethenny.x @izumi_nishida @yui78_02 @aino.yamada03 @_kasumi.y @sienna.christinaaa

💅 Nails: @ms_muse_nail — gorgeous handmade nail designs 
💍 Jewelry: @viviange — pieces specially designed to coordinate with each piece
✂️ Hair: @angh0 @sho_kanaida @iam__little__boy — next level editorial 
💄 Makeup: @glam_by_jyoti — 8 models, flawlessly done 
📸 Photography: @nothing_special_88 — can't wait for you all to see his shots 
🎯 Model Coordinator: @naka_kanar — styling schedules, rehearsals, walkthrough, everything

Thank you to everyone who came🤍

Photos by @robertorivera.mx

2008年から、ずっと作り続けてきたもの——誰かの記憶を宿した着物の生地を手にとり、新しい命を吹き込むこと。

先週の土曜日、その想いをとても大切な人と一緒に分かち合うことができました。

@designerhelen はニューヨークを拠点とするデザイナー。最初に連絡をくれたのは、私の小さなお裁縫レッスンのアカウントを通じてでした。話し始めてすぐに、私たちは同じ問いを抱えていると。過去を持つものを、どうやって未来へ連れていくか。

昨年12月、東京で初めて直接会いました。その会話が、このショーになりました。

Released. Reimagined. ふたりのデザイナー。ふたつの都市。ひとつの共通した信念——美しいものには、もう一度輝く機会がある✨

#releasedreimangined #tokyofashionshow #harajuku #japanfashionshow projectrunwa
この会場を見つけるまで、けっこう歩き回りました。原宿竹下口から少し路地に入ったところ。前面ガラス張り この会場を見つけるまで、けっこう歩き回りました。原宿竹下口から少し路地に入ったところ。前面ガラス張りで光がたっぷり入って、一目見て「ここだ」と思いました🌱

入口すぐの受付エリアには @brownie_shots のポップアップ、中央スペースはランウェイ会場になります。VIP席も準備中です✨

イベントまであと1週間を切りました。当日、いいお天気になりますように☀️

It took quite a bit of wandering to find this venue. Tucked just off a quiet side street from Harajuku’s Takeshita Exit — full glass frontage, light pouring in. The moment I stepped inside, I knew🌱

Right at the entrance, @brownie_shots will be running a pop-up☕︎ The central space becomes our runway. VIP seating going in now.

Less than one week to go. Fingers crossed for sunshine ☀️

#Harajuku #FashionShow #KimonoUpcycling #SustainableFashion #TokyoEvents
【VIP限定✨】 5/30のファッションショー、席付きVIPチケットをご予約いただいた方は、こちらの 【VIP限定✨】
5/30のファッションショー、席付きVIPチケットをご予約いただいた方は、こちらの帯をリメイクしたオリジナルポーチをプレゼント🎁 

意外とたくさん入ると大好評。
鍵、カードケース、スマホ、メイクポーチまでしっかり収納できる優秀サイズです。

パーティーにクラッチとして、ループにストラップを付ければショルダーにもなる✨

どの柄が届くかは当日までのお楽しみ🤫💕

🗓 2026.05.30 (Sat)
📍 Harajuku, Tokyo
Runway Event & Pop-up Store
詳細はプロフィールリンクをチェック🔗

【VIP Exclusive ✨】
A little sneak peek at the special gift for our VIP ticket holders🎁

For the May 30th fashion show, all VIP guests will receive this original pouch made from upcycled Kimono Obi.

It’s surprisingly spacious! It easily fits your keys, card case, phone, and even a makeup pouch. Wear it as a chic clutch for the party, or attach your own strap to the loops to transform it into a shoulder bag✨

Each one is a unique, one-of-a-kind piece. Which design will you get? It’s a surprise until the big day! 🤫💕

#帯リメイク #サステナブルファッション #ファッションショー #原宿イベント #着物リメイク 
ファッションイベント HelenCastillo
五月なのに、秋色🍂 日中は汗ばむくらいなのに、 夕方になるとふっと涼しくなる🌬️ この季節のそのギ 五月なのに、秋色🍂

日中は汗ばむくらいなのに、
夕方になるとふっと涼しくなる🌬️
この季節のそのギャップが、なんか好き♡

深みのある金茶とテラコッタ。
春の光に当てると、
秋色が美しく見える気がします✨

朝晩の肌寒さには、シルクの羽織りがちょうどいい。

It’s May — and yet, fall hues🍂

Warm enough to break a sweat by noon,
then a cool breeze sneaks in by evening🌬️

I kind of love that about this time of year♡

Rich amber and terracotta.
Something about spring light makes these autumn tones look even more beautiful✨

For those cool mornings and evenings,
a silk haori is just right.

Photographer @renphoto
Model @hotpotpancakes

#着物ガウン #春コーデ #アースカラー #サステナブルファッション #アップサイクル kimonostyle
「なんとなく」じゃなくて、選んだと言ってもらえる服作りをしたい🦋✂️ 紗の着物をほどいて、また縫い 「なんとなく」じゃなくて、選んだと言ってもらえる服作りをしたい🦋✂️

紗の着物をほどいて、また縫い直しました。
ざっくりとした夏のの素材感に、
白レースをひとすじ沿わせて。

甘すぎず、でも可愛くありたい日のための一枚。

I want to make clothes you reach for on purpose — not just whatever’s closest🦋✂️

Took apart a vintage sheer silk kimono and sewed it back into something new.

The loose, airy weave of summer, with a single trim of white lace.

For the days when you want to feel pretty — just not too precious.

#KimonoRework #ButterflyTop
#着物リメイク #紗 #一点もの 蝶々トップス
寄贈いただいた着物から生まれたドレス🥀 生地の質感に触れて次は何になりたいか問いかけます。 着る人 寄贈いただいた着物から生まれたドレス🥀

生地の質感に触れて次は何になりたいか問いかけます。
着る人に寄り添い、物語を紡ぐ一着になれば嬉しいです💐

Model: @aino.yamada03
Photo: @slyz_studio
MUA @erieri_makeup 

A dress brought to life from a gifted kimono 🥀

By feeling the texture of the material, I listen to what it wishes to be.

I hope this dress resonates with the person who wears it💐

 #着物リメイク #サステナブルファッション #ハンドメイドドレス #一点もの
Favorite coffee beans to my favourite jacket. ☕️🧥 Favorite coffee beans to my favourite jacket. ☕️🧥

お気に入りのコーヒーショップ @allpressespressojapan の麻袋をアップサイクルして、世界に一つだけのボンバージャケットにしました。

麻袋のラフな質感と、着物リメイクした裏地の組み合わせ。
ほんのりコーヒーの香りがします✨

Which one is your favorite detail? (私は背中のロゴが好き🫶🏻)

#upcycledfashion #allpressespresso #サステナブルライフ #リメイク #コーヒーのある暮らし
かつては特別な日に着用された美しい着物や帯。 それらが現代に息づくファッションへと生まれ変わりました かつては特別な日に着用された美しい着物や帯。
それらが現代に息づくファッションへと生まれ変わりました👗

孔雀の羽の細部まで描かれた繊細な染め、帯の複雑な織り目。
一針一針に込められた伝統の技を、今の時代にふさわしい形で受け継ぎます🪡

世代を超えて受け継がれる物語を、あなたらしく着こなして🧚

These garments are more than just fashion; they are stories preserved. From the detailed dyeing of the peacock's feathers to the intricate weave of the obi, we honor the original artisans by giving their work a new life.

Wear a piece of history and continue its journey✈️

Model @ptiite_shana
Photographer @nihonnokaidan

#VintageKimono #ObiUpcycle #JapaneseStyle #EthicalFashion #handmadewithlove
 着物リメイク ハンドメイド アップサイクル
Follow me on Instagram

Copyright © 2026 · vivien theme by Lovely Confetti DMCA.com Protection Status

Copyright © 2026 Vivat Veritas