It was such a mistake to wait until two days before attending a wedding to start making a dress to wear for the event! It was particularly dumb considering I was planning on making a bombshell dress. It was much more time consuming than I expected. In the end, it turned out alright, but I stressed myself out trying to finish the dress. I ended up finishing it on the day of the wedding.
 The fabric I bought was cotton seething in sea foam color. I tend to go for dark blue, purple or lavender so I wanted to try something new. I didn’t realize it was such a bridemaidsy color until I was close to completing the dress. Thank God that we don’t have the bridesmaid tradition here in Japan. No one thought I looked like a bridesmaid because they don’t know what they are! The game would not have worked if it were a wedding in the States.
The pattern is a Burda pattern that came with Craftsy.com’s Perfect Fit Bombshell Dress class I took. I do like the pattern a lot. The sweet heart neckline is really lovely, and I like the sarong skirt. I did not have enough fabric to make the sarong skirt, so I used the pattern I previously drafted myself. It is an I line skirt with pleats in front and darts in back.
I cut out the smallest size pattern, and made a muslin. I’m not sure what the measurements should be for the smallest size, because I didn’t have time to read directions, but it was way too big for me. I ended up taking 6″ all around the bodice. I’m not sure what happened?! I usually fit the smallest size of the Burda pattern just fine. I was so glad to have made the muslin though! I would not have been happy if I jumped in with the fashion fabric just to discover that the dress didn’t fit at all.
I usually go for an invisible zipper, but as suggested in the class, I used flat zipper. I do like the look of it, and it is easier to zip up than an invisible zipper. Sometimes I fear that I will kill the zipper when I’m using an invisible one.

 The entire dress is underlined with muslin fabric. I love the effect of the underlining! It gave so much structure and shape to the dress, without being stiff like it would have, had I used paper-like iron on interface. I finished the skirt slit opening with grosgrain ribbon, that was left-over from making a waist stay.
Here is the look on inside of the dress. I’m pretty happy with how it looks… 🙂 For the top part, I lined it with the same fashion fabric, and also boning. The bust is padded. I attached the lining by hand, while watching Season 4 of project runway.

I am not sure what happened to this stain though?! Can you see this yellow mark I got on skirt? I was not pleased..

This is only the second strapless dress I have ever worn, the previous being my wedding dress. Thanks to boning in the bodice and waist stay it fit pretty well, better than what I would be able to buy at a store. However, I still felt a bit insecure about the bust line, and I had to pay attention not to reveal my breasts accidentally. I felt a bit “bare” at the wedding… everyone else had some kind of shawl or cardigan and I wished that I brought something to cover my shoulder. Surprisingly, the dress fit better by the end of the day, after all the food!
I think I am going to make shoulder straps so I can wear this for other occasions.


 Daddy’s diary: Mixed emotions
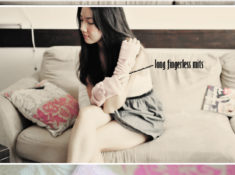 Shop Update: Early Fall Pieces
 Mommy’s Diary 43: Changing and Adapting
 MADE | Ballet Leotard
Forrest says
Love your dress! I bought the class but have been a little intimidated to try the dress, so you’re very inspiring to do it in 2 days! Also, I really like your skirt, it works really well!
Chie says
thank you!
Paunnet says
Beautiful! I love your skirt variation!
Chie says
thanks paunnet, it was an easy alternative, i just needed to make sure that the pleats line match up the bodice line!
Emily says
Wow! Your dress looks great! I just bought this class on Craftsy too, I’m a little scared because it will be the most complicated thing I’ve ever made! Do you have any tips? I’m unsure about the steel boning since I’ve only used plastic before. And I want to make sure to pick the right fabric too!
Chie says
Hi Emily! I would recommend making a muslin. That helped me a lot! I usually skip muslin because I’m lazy, but I was so glad to have made it this time. It would be a good practice for me because the bust part is a bit complicated with pivoting etc.
As for boning, I didn’t use steel boning. I used plastic, and just sew on the lining. I did this because I had no time to make the shell to put the boning inside. Also I think you can wash the dress if the boning is plastic? That is just my guess.. Good luck making yours, I’d love to see your version!
Emily says
That makes sense, I will definitely want to be able to wash it! I also have some plastic boning on hand, so I wouldn’t need to go out and buy it! I hope mine will turn out half as nice as yours ^__^
Chie says
I’m sure your dress will be fabulous emily!
Lisa says
It is beautiful and you look fabulous, as always!!!
Great job!!!
Now, matching romper for Kiko :O)
Chie says
Lisa 🙂 thank u! I wanted to make Kiko a bloomer or something, but I didn’t have any left over fabric 🙁
Janelle says
I love it! Your work is always so beautiful and well made 🙂 I especially love the sweetheart neckline.
I think straps are a good idea! Perhaps you could make them removable with snaps?
Chie says
I’m thinking of making shoulder straps that criss crosses in the back. Gertie shows in the class to make it detachable with buttons:)
Nika says
Amazing work! It is so beautiful dress and it is look great on you. But I am wonder how did you make top of your dress? Did you have some accessories or only with sewing?
Chie says
Hi Nika, thank you! by accessories, do you mean padding and boning?
sarah says
oo i love the dress and the colour, i’m considering taking the class now i’ve seen your dress. you look fab by the way , you’d never guess that you had a baby not too long ago 🙂
Chie says
aw thank you sarah!
Clémence says
Oh she is soo beautiful! congratulations !!
Anna says
wow! the dress is so adorable! It looks great on you!
Blanche Neige says
Greatttttt!
I’m also thinking about taking this online lessons, because i see all around the internet such beautifull bombshell dress. But first, cleaning the big to-do list…
Nika says
Yes, Chie, I mean padding and boning, but I didn`t know how did it say in . 🙂
Chie says
yes, i used plastic boning, muslin as an underline, and bust padding. i also used selvage of the fashion fabric as a twill tape for the sweet heart neckline. gertie’s course covers all of these details 🙂
bombshell dresses says
Amazing job even it’s taken only 2 days! You are really talented. And love this color, sea form blue! Adorable!
Chie says
Thank you! Glad you like it:)