• Skip to primary navigation
  • Skip to main content
  • Skip to primary sidebar
  • Skip to footer

Looking for something?

Get in touch

  • Email
  • Facebook
  • Instagram
  • Pinterest
  • Twitter
  • YouTube

Vivat Veritas

Custom Wedding Dress & Kimono Upcycled Clothes | オーダーメイドウェディングドレス&着物ドレス

  • Home
  • About
    • Press
    • Collaborations
  • Blog
  • Bridal
    • Lovely Words
    • Price List
  • Sewing Class
  • Kimono Dress
    • MADE-TO-ORDER BUSTIERS
  • Contact
  • Location
  • 日本語
/ blogs / blog / Tutorial: Heart Cut Out Dress

Tutorial: Heart Cut Out Dress

July 11, 2011 By Chie

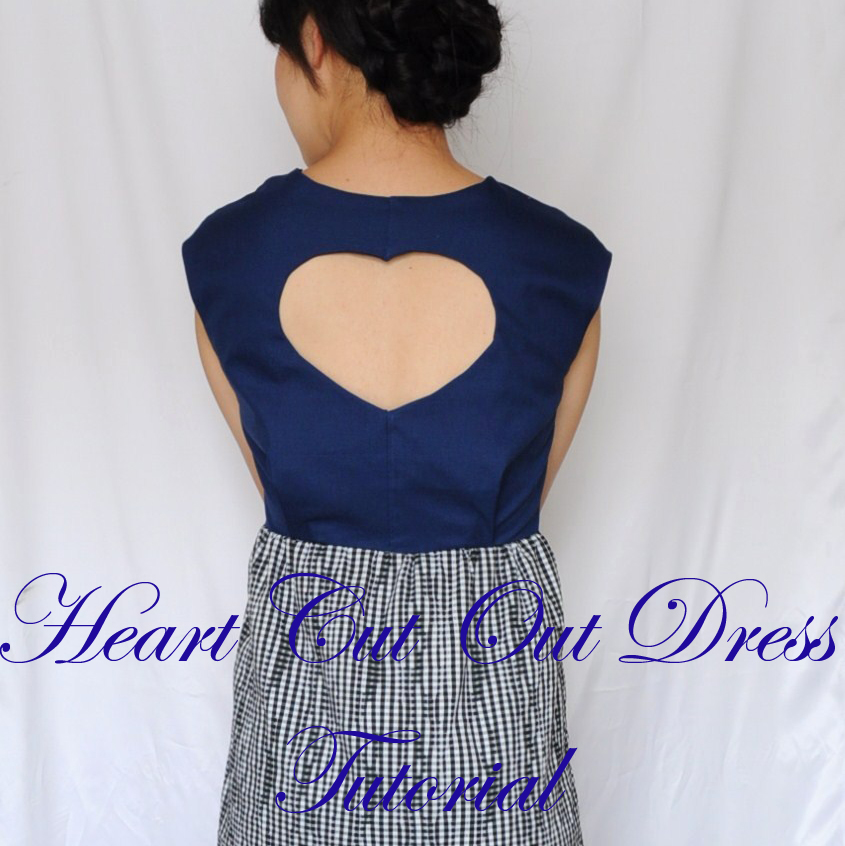
As I promised, here is the tutorial on how to add a heart shaped cut out to the back of your dress! It’s pretty simple, and once you get the hang of it, you can make the cut out in any shape of your choice! Round, square, star shaped, whatever…variation possibilities  are limitless 🙂 I’m not terribly good at explaining things, so I hope this tutorial makes sense! If anything is unclear, please feel free to leave a comment, and I’ll try to answer your questions.

1. First, pick out your pattern. Recommended patterns are something that’s fitted to the bodice, and has a separate panel for skirt part. For this tutorial, I used the Heidi pattern from BurdaStyle. I recommend Heidi or Danielle (although you might need to modify the pattern a bit to fit to your bodice) from BurdaStyle. If you have a basic bodice pattern that’s fitted to your size, you can use that as well.
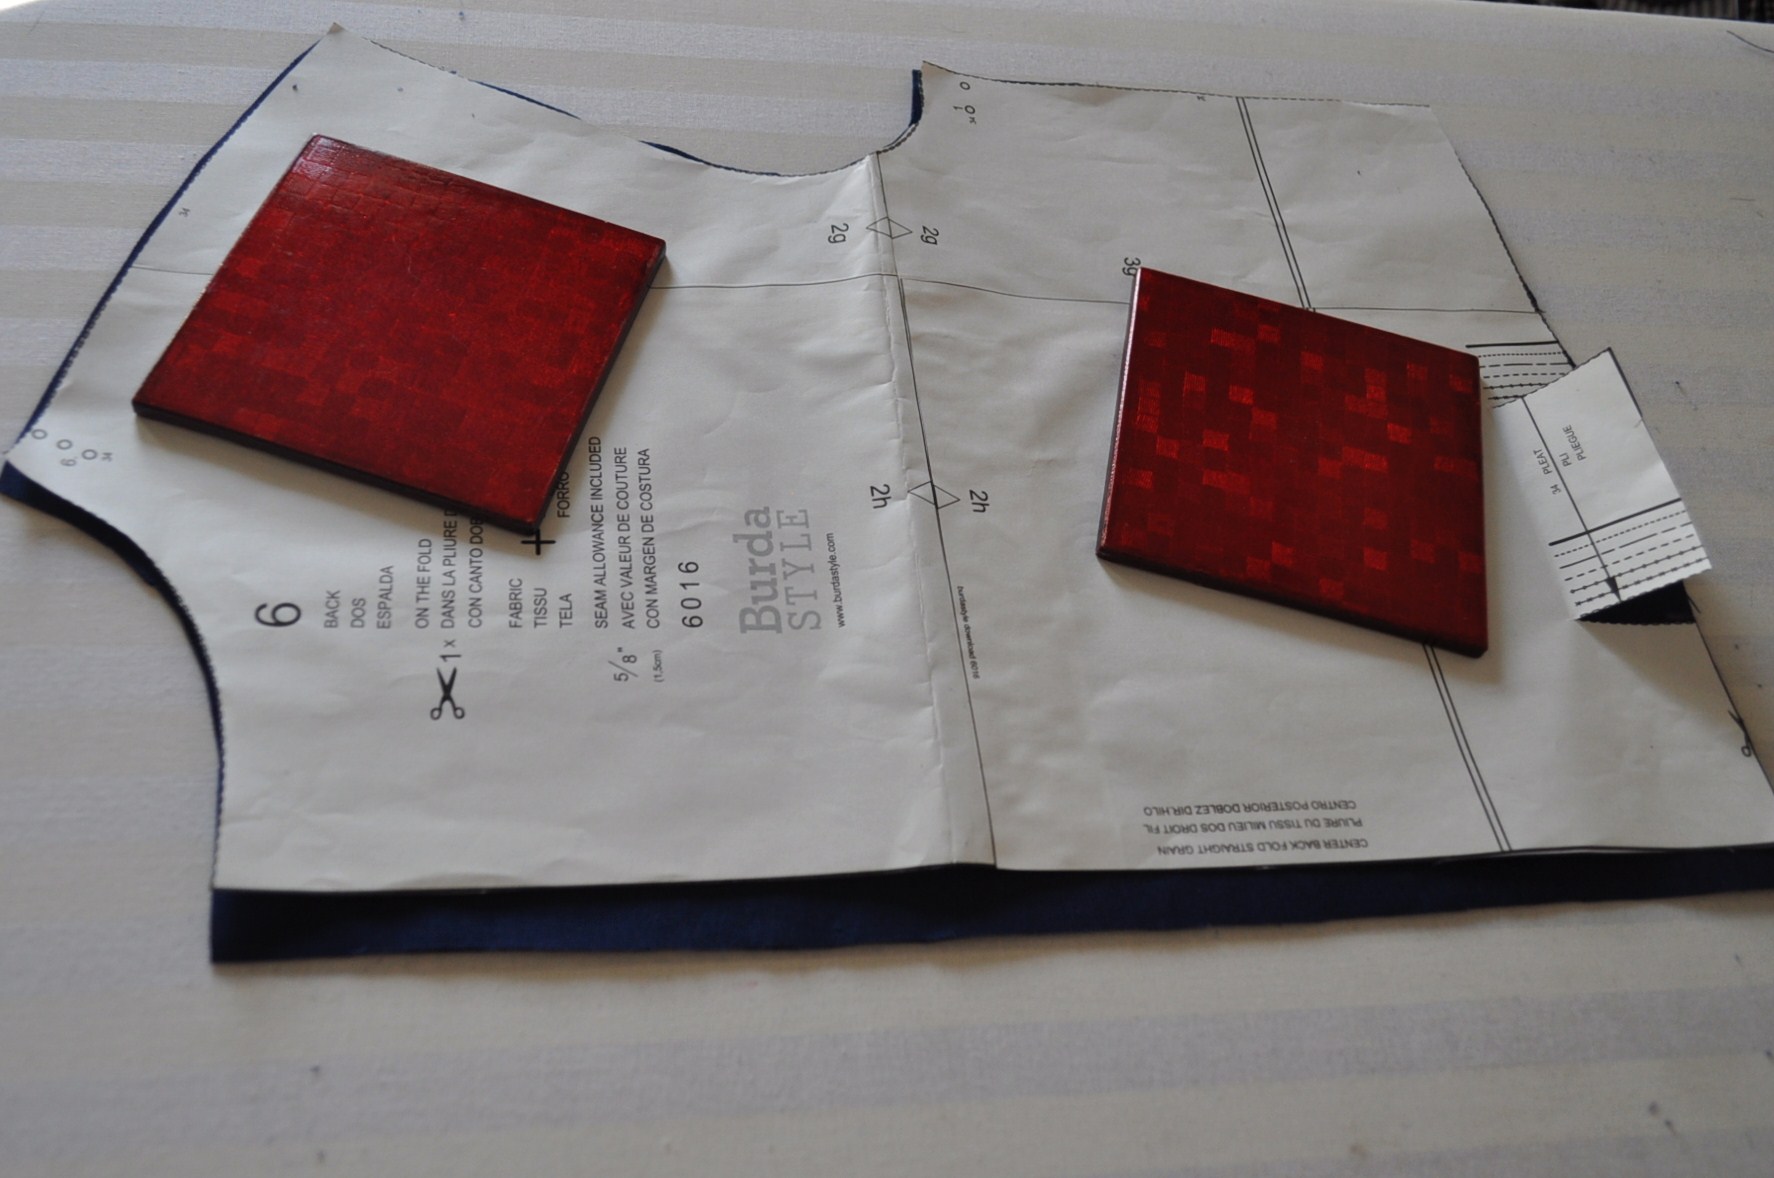
2. Cut 4 pieces of back bodice pattern (not center folded). For Heidi pattern, you are supposed to insert a side zipper on the left side, so the back bodice pattern says “cut 2, center folded”. In that case, add 1/2″ seam allowance to center back. You will need this seam allowance when turning the pieces inside out and connecting them together later on.
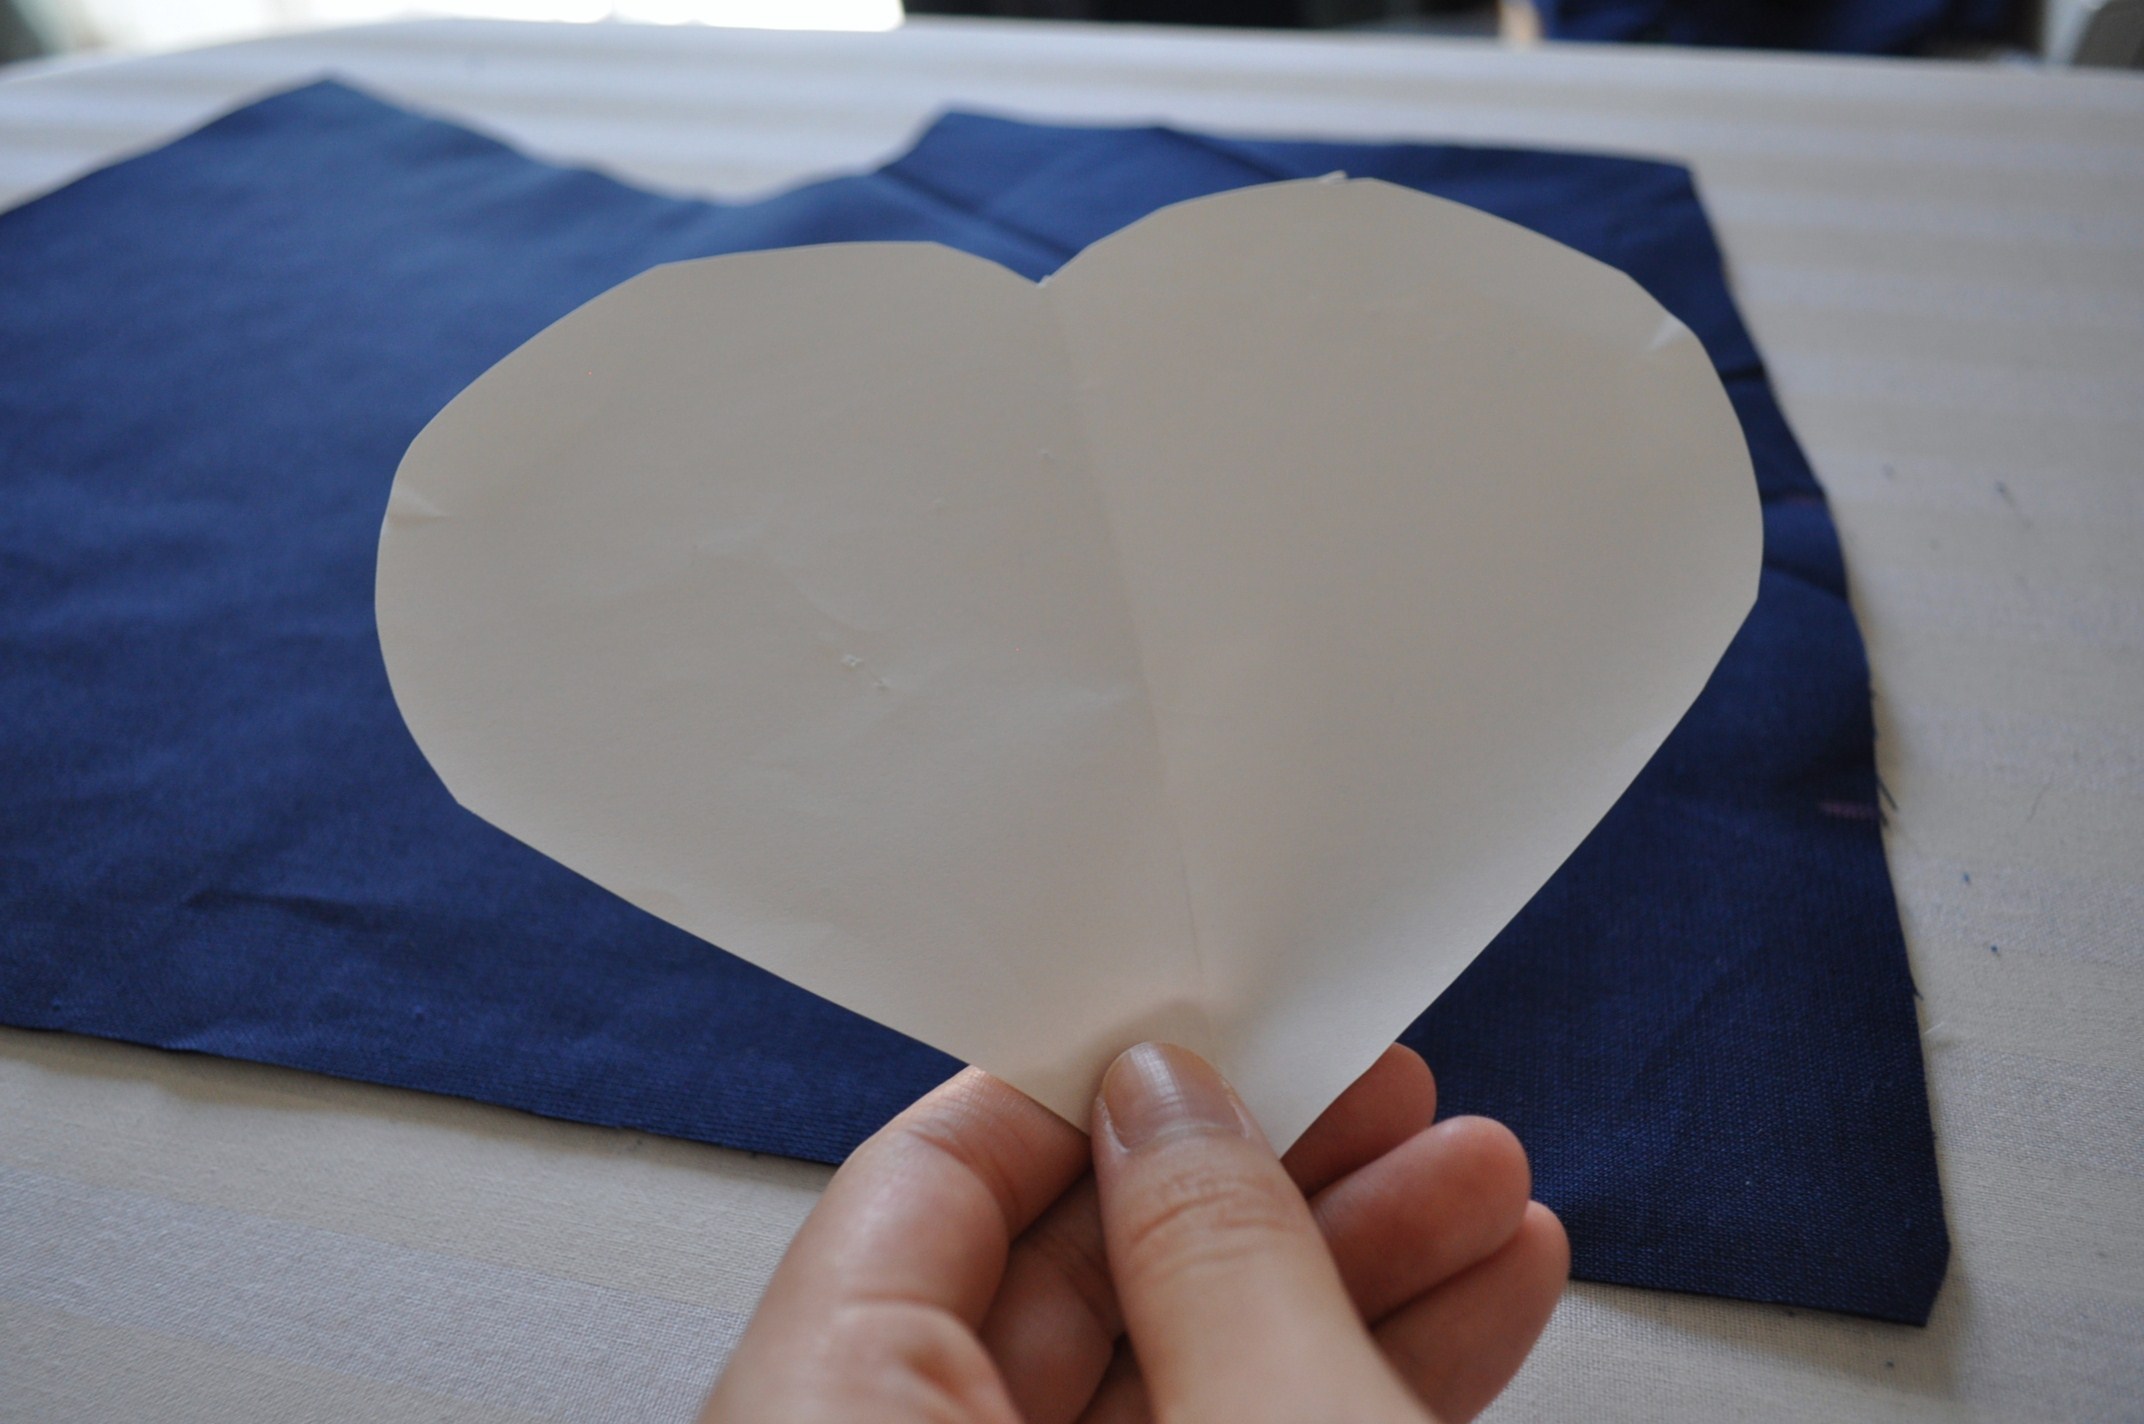
3. Prepare a heart shaped pattern. I typed “heart shape” in Google image, and printed out the type of heart shape I wanted. You can make the heart bigger or smaller, depending on your preference!
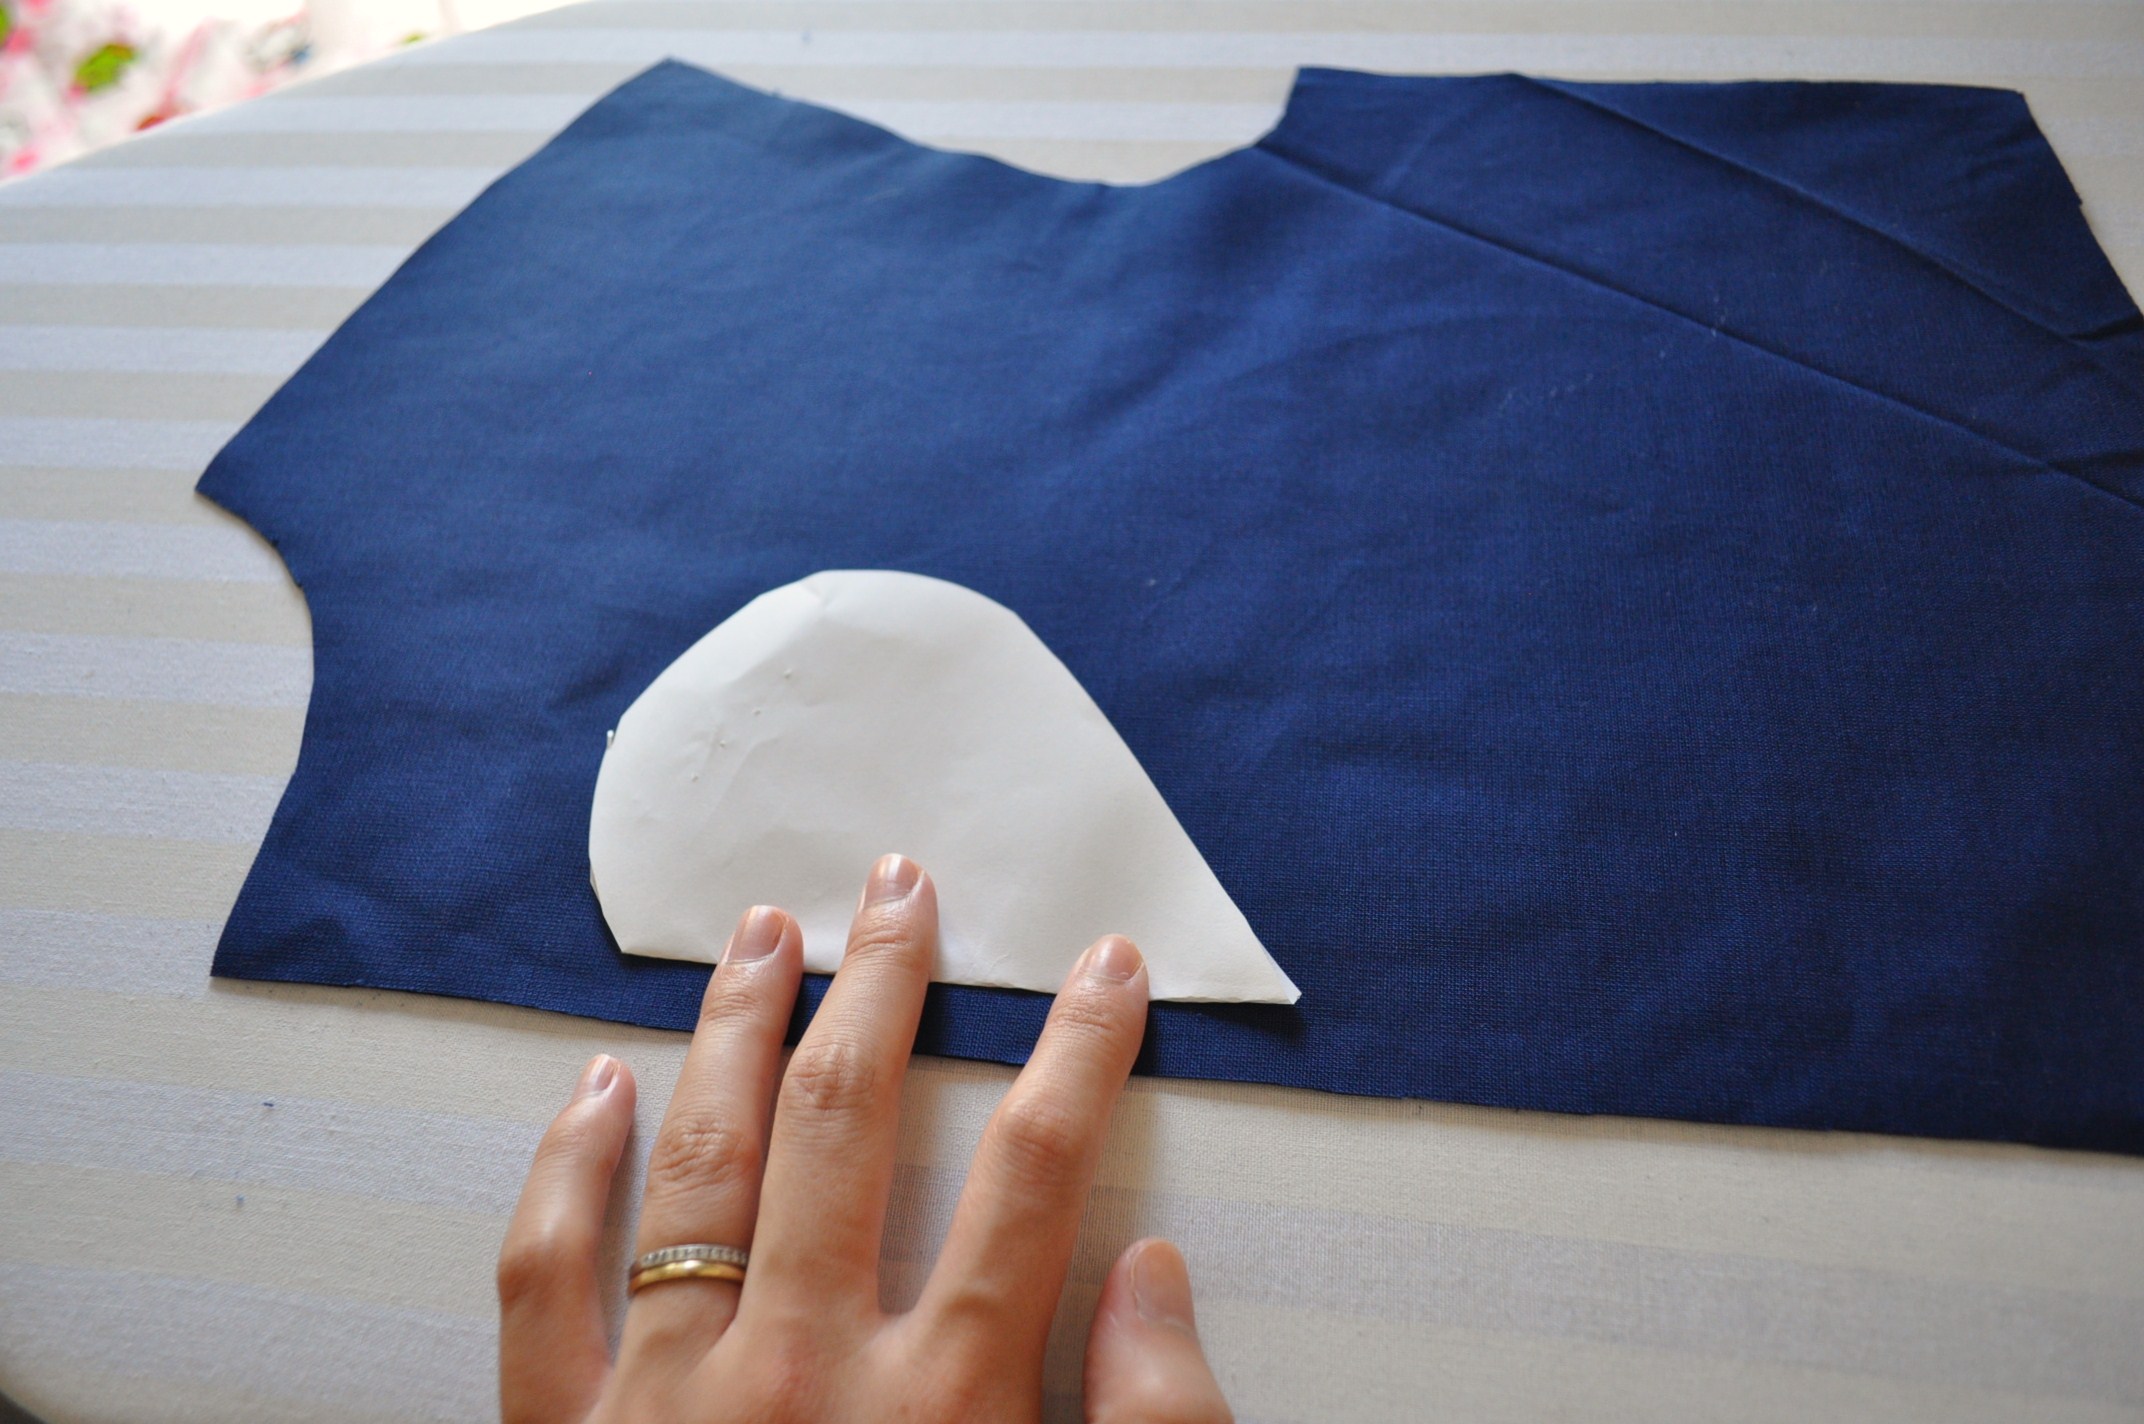
4. Fold the heart shape in half, and place the heart 1/2″ from the center back line. I like to have the heart cut out about 2-3 inches from the back neckline, but not too low, so you can wear a regular bra and not show the bra line.
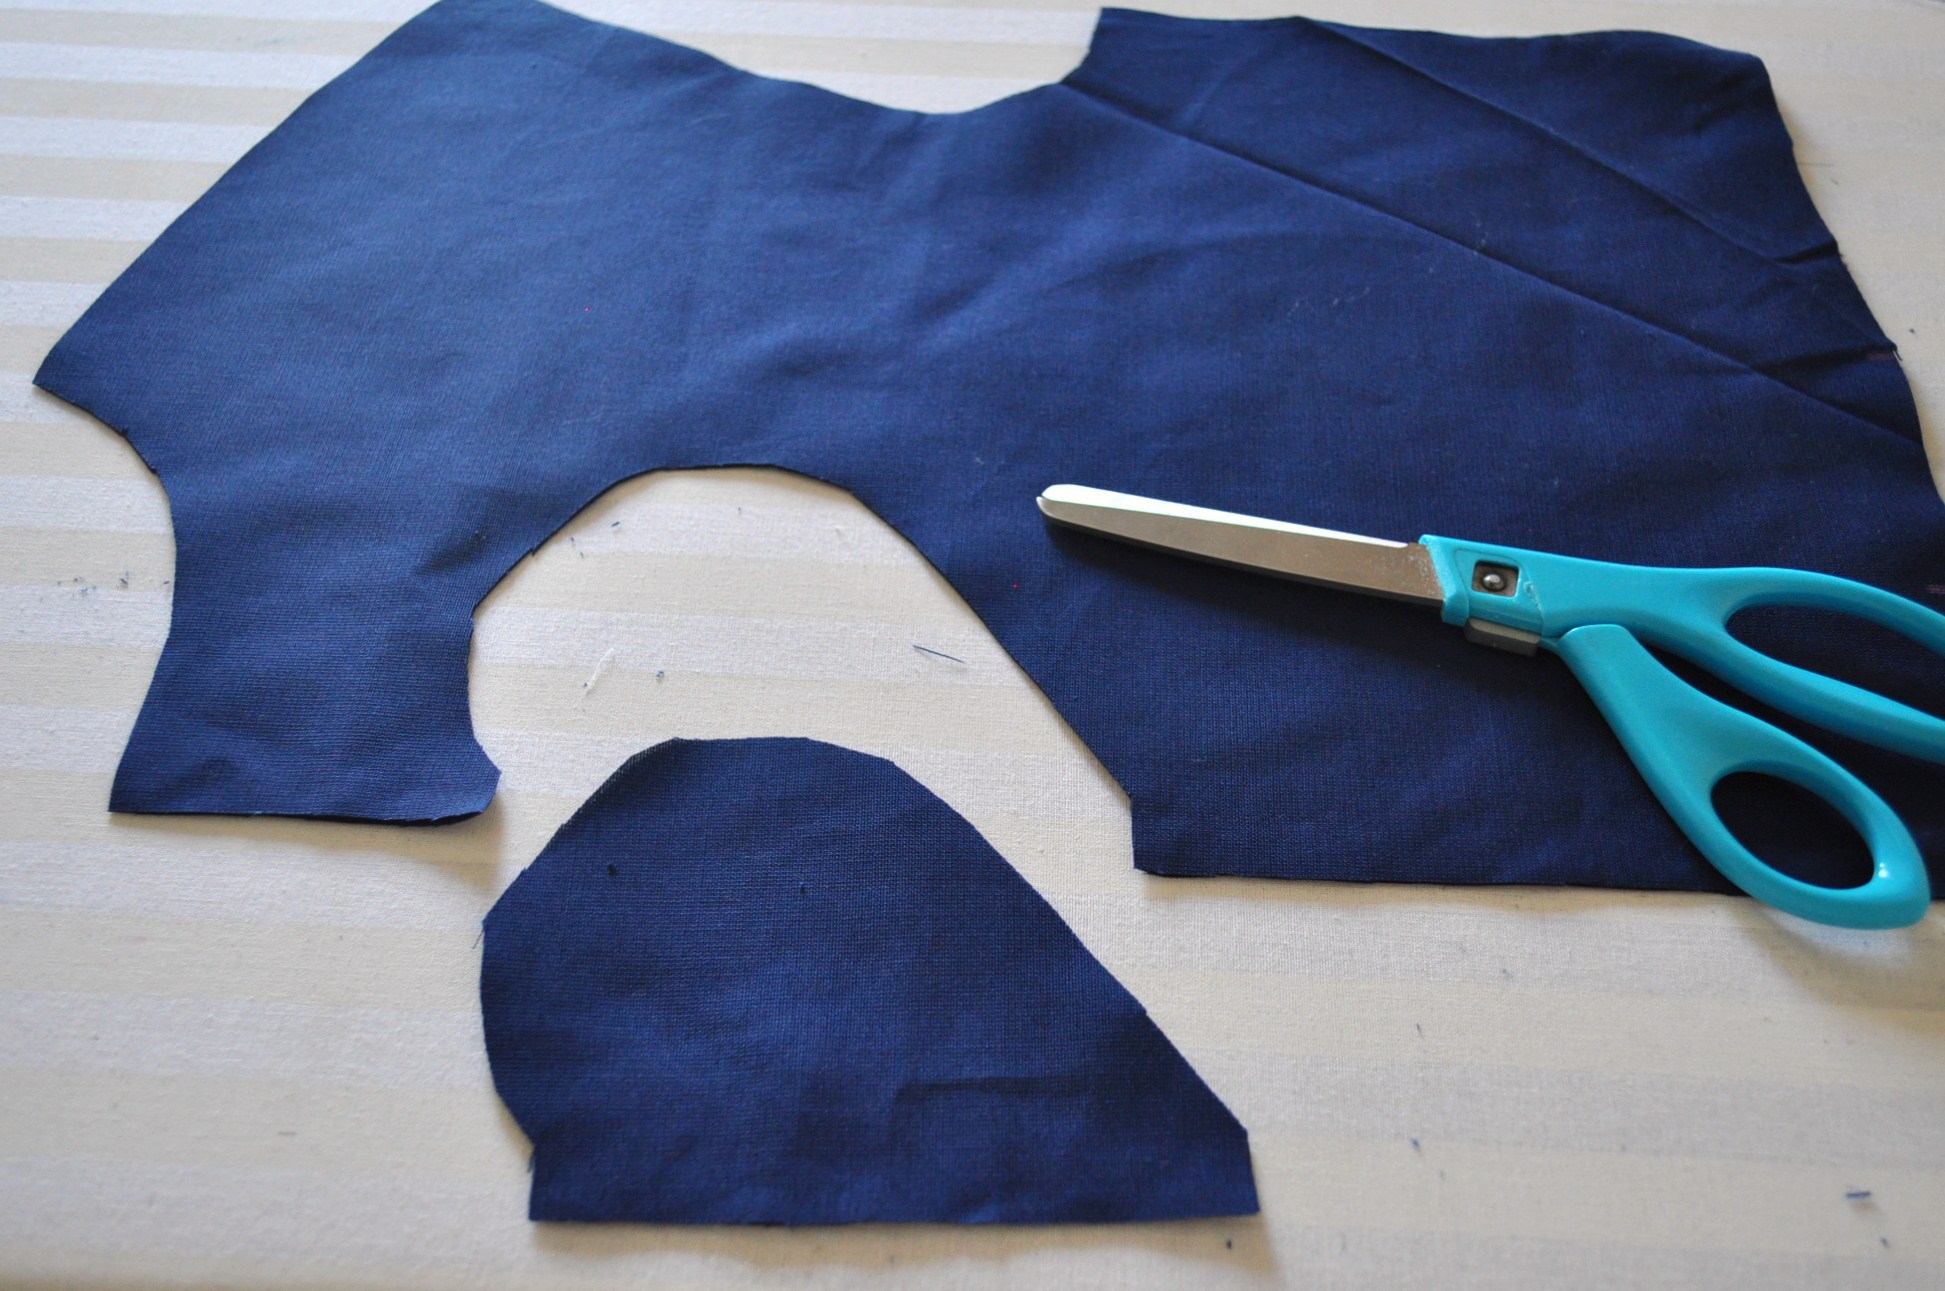
5. Cut out the half heart from your back bodice pieces. Do the same for all 4 pieces.
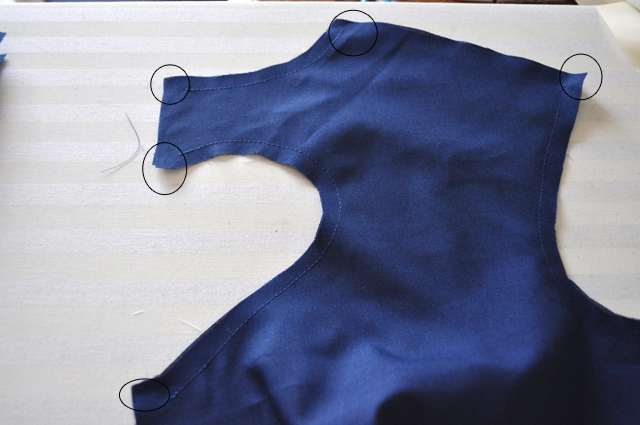
6. With the right sides facing, sew the neckline, arm hole and half heart shape as the picture above shows. For the places that’s circled in the above picture, leave 1/2″. You will need this space to connect two back bodice pieces later.
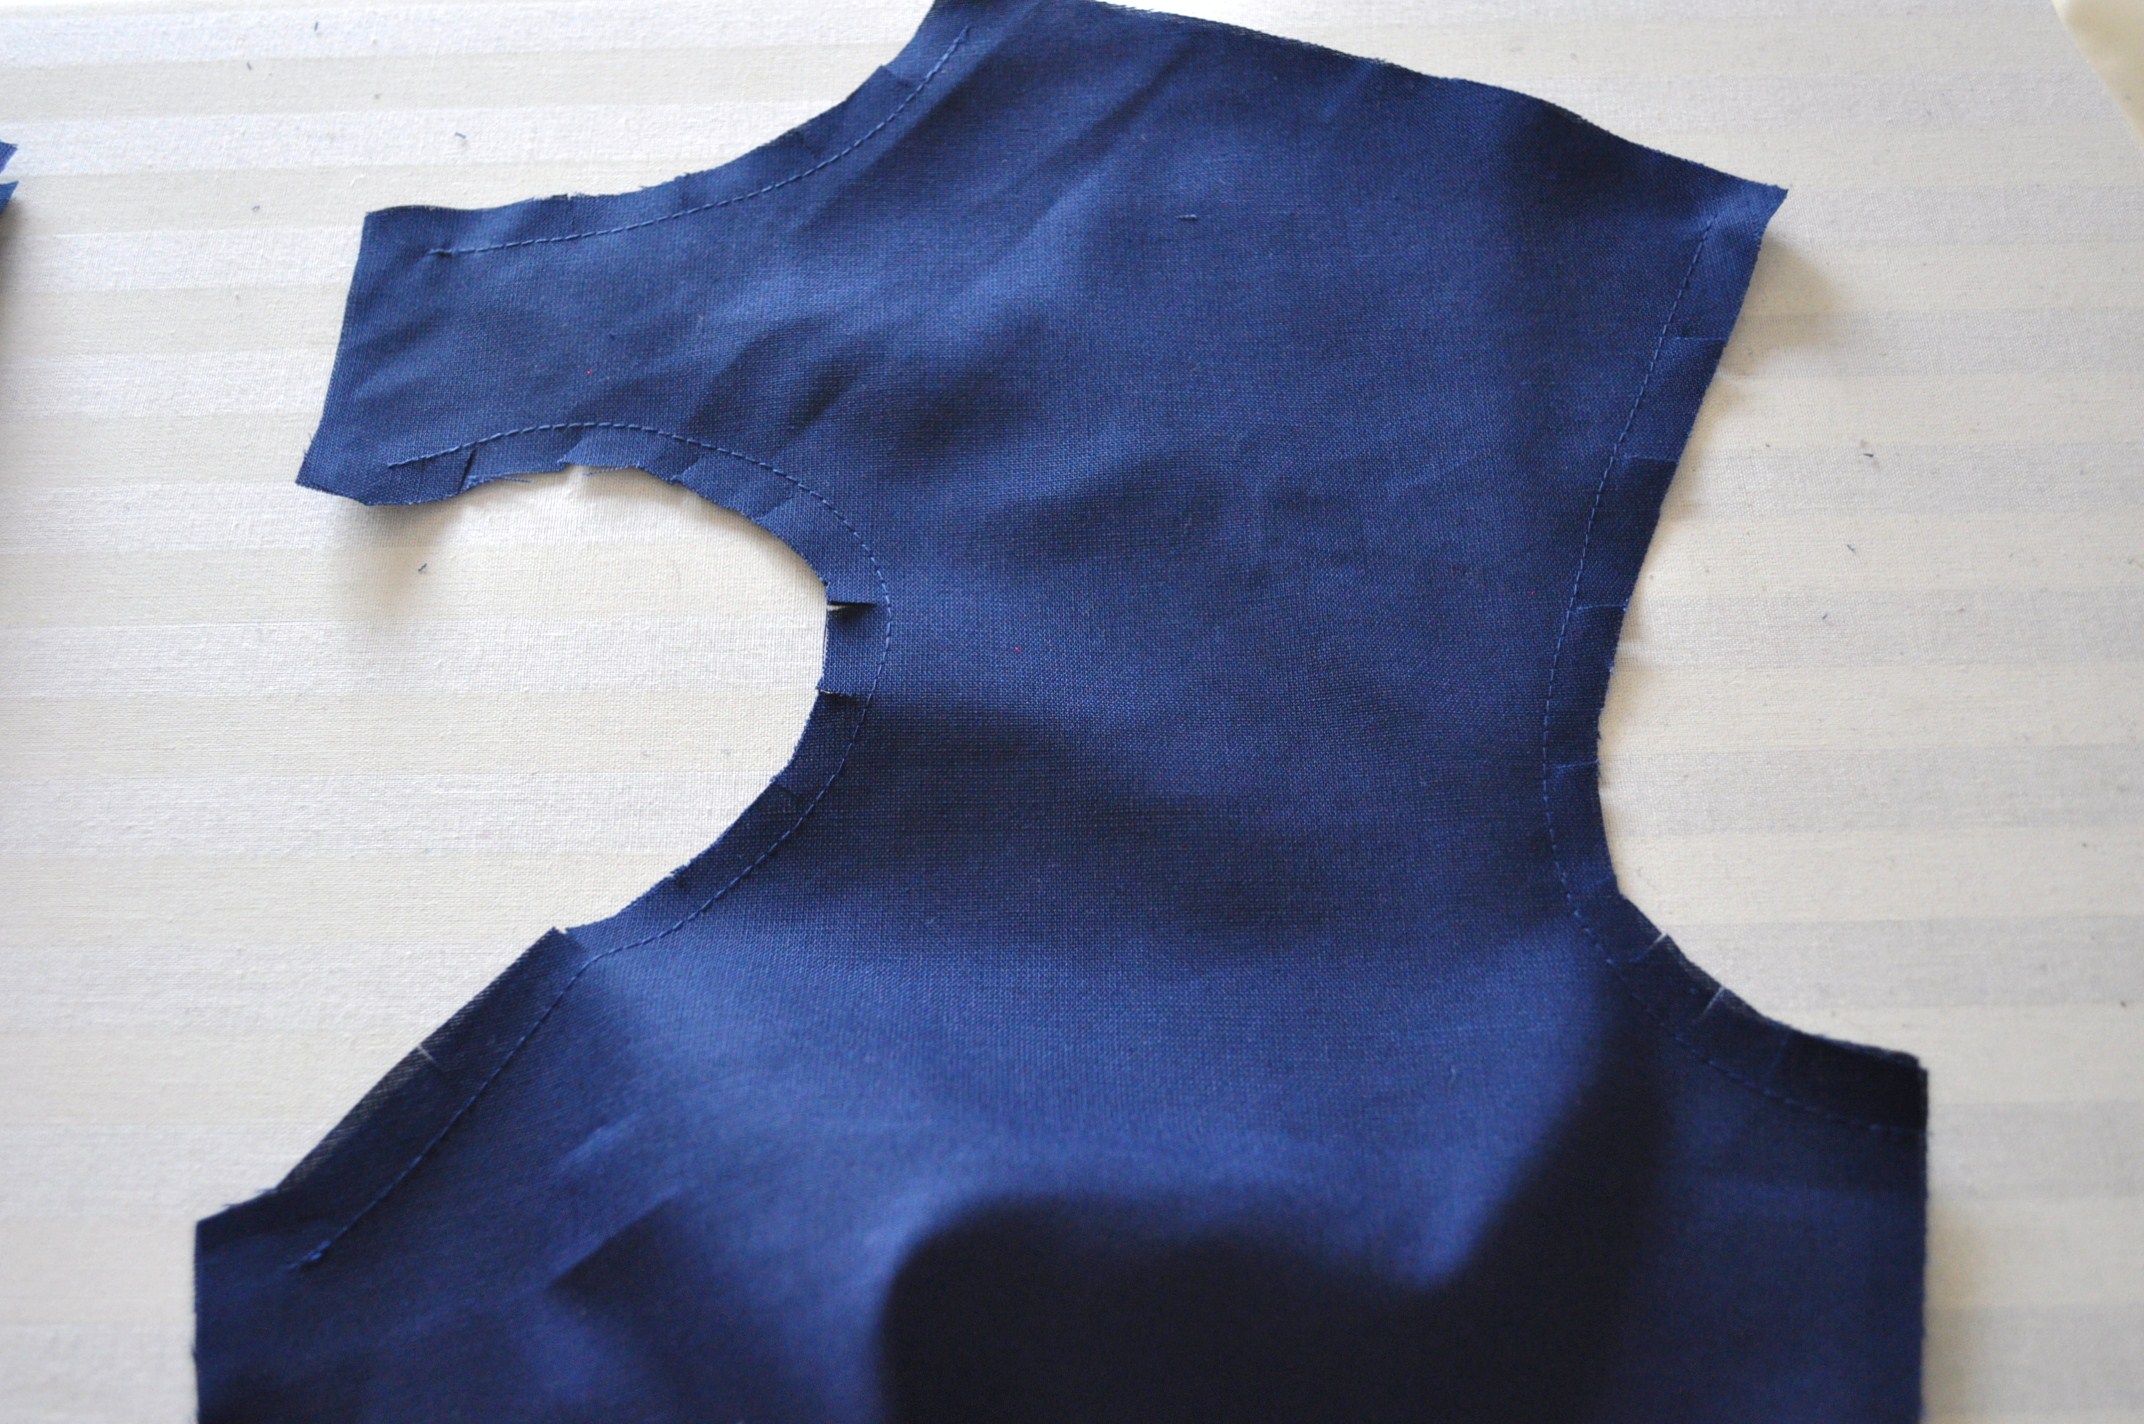

7. Clip the seam allowances for curves.
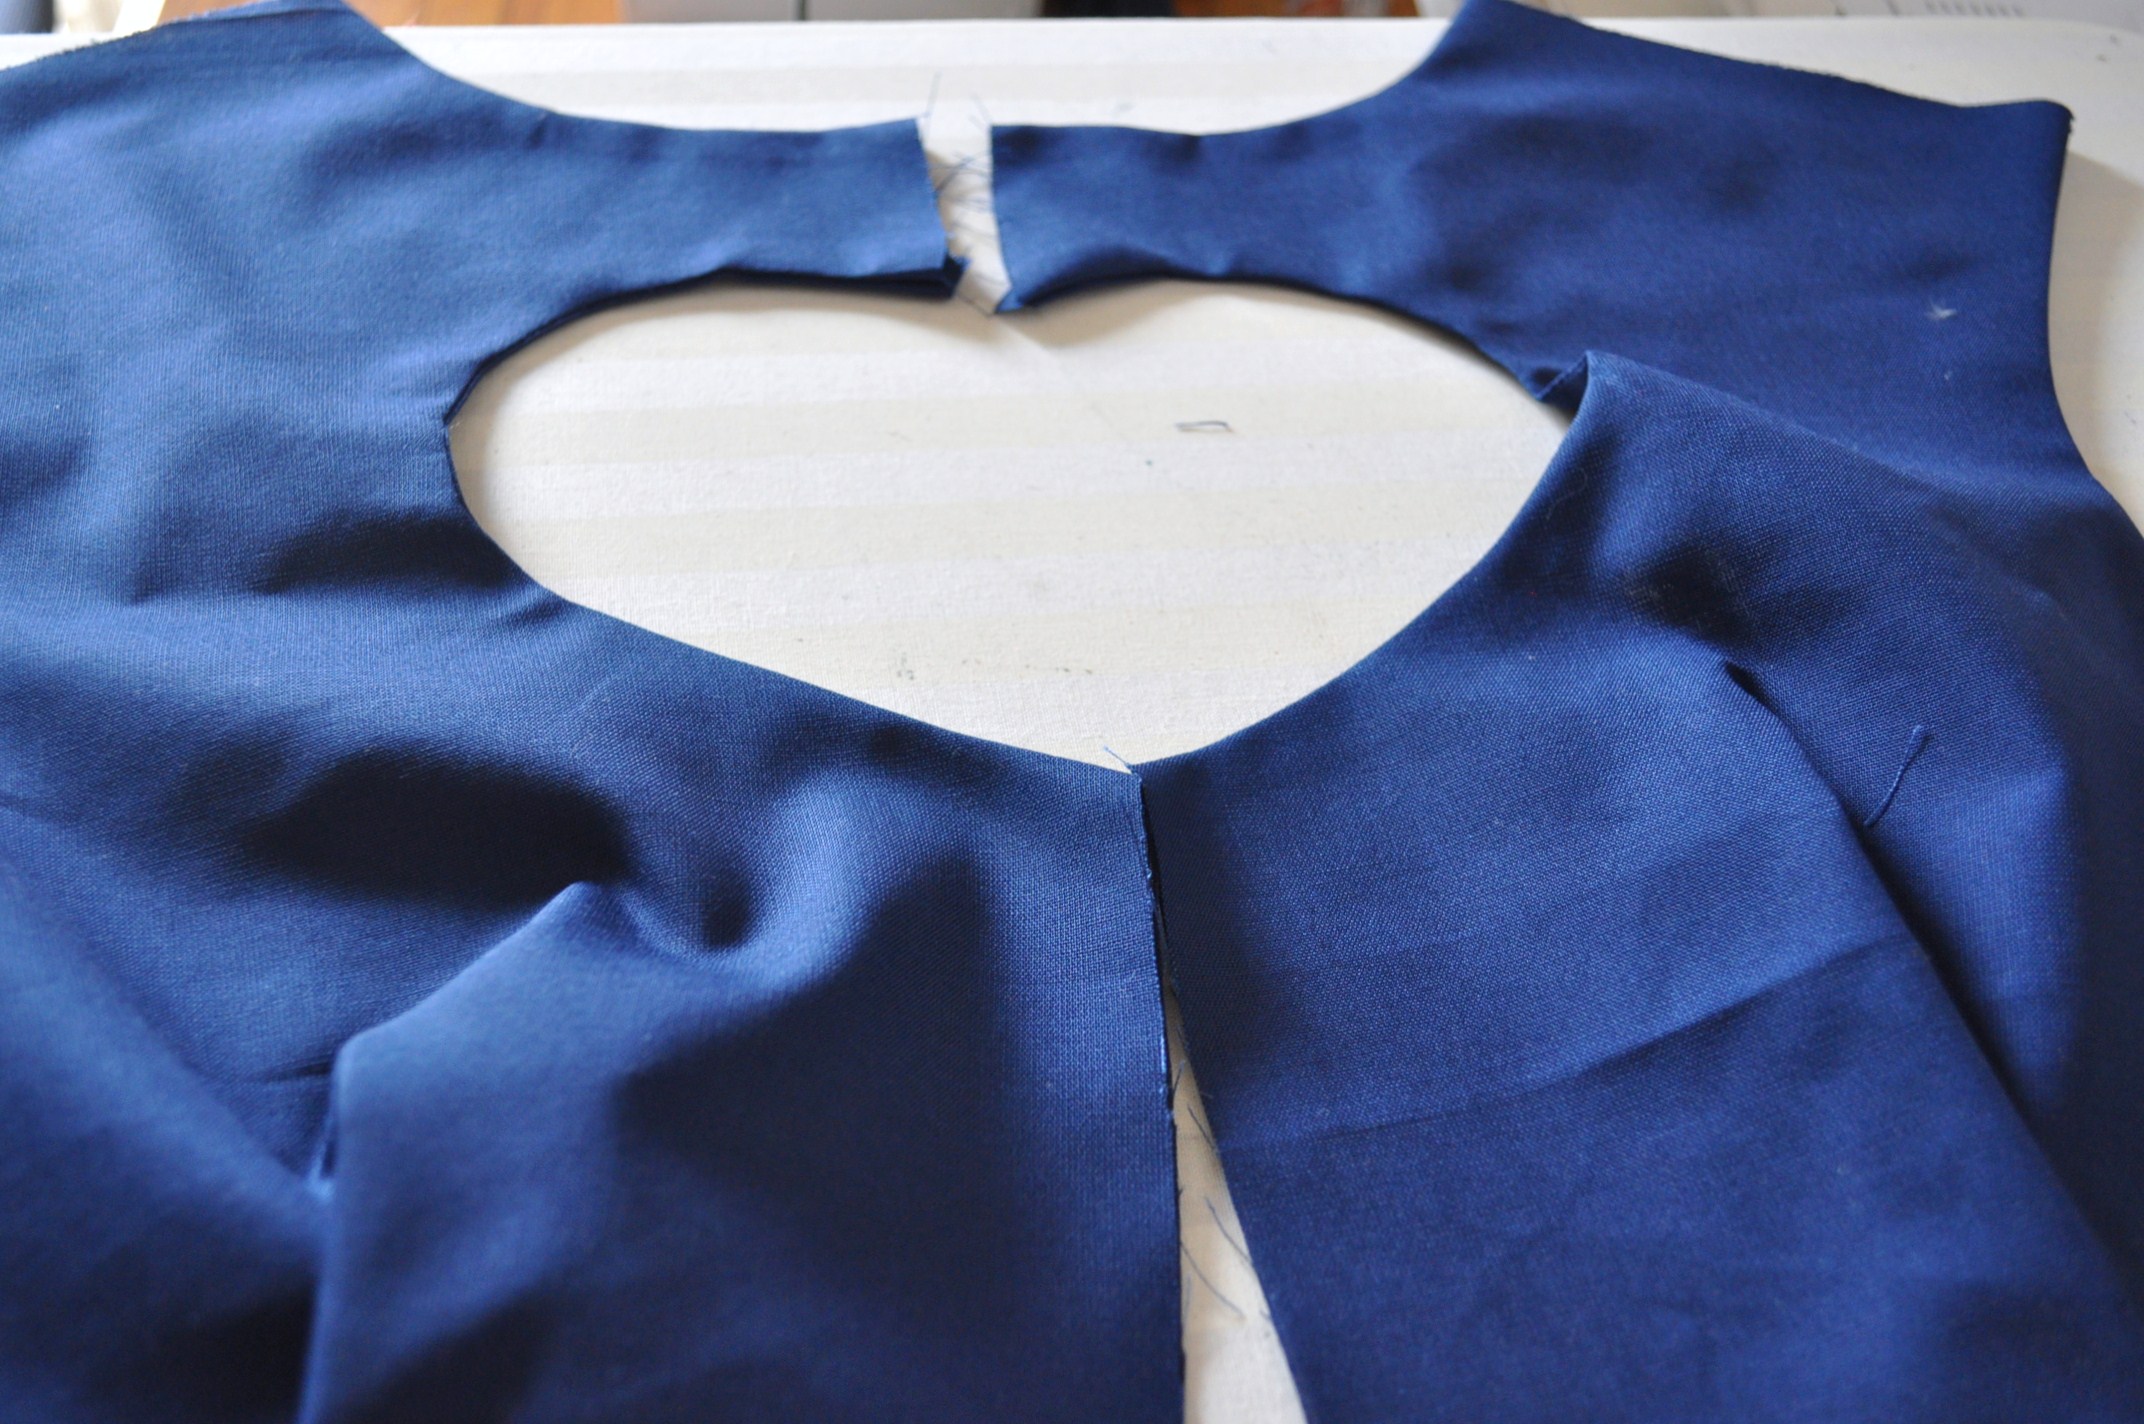
8. Turn the pieces inside out and iron.
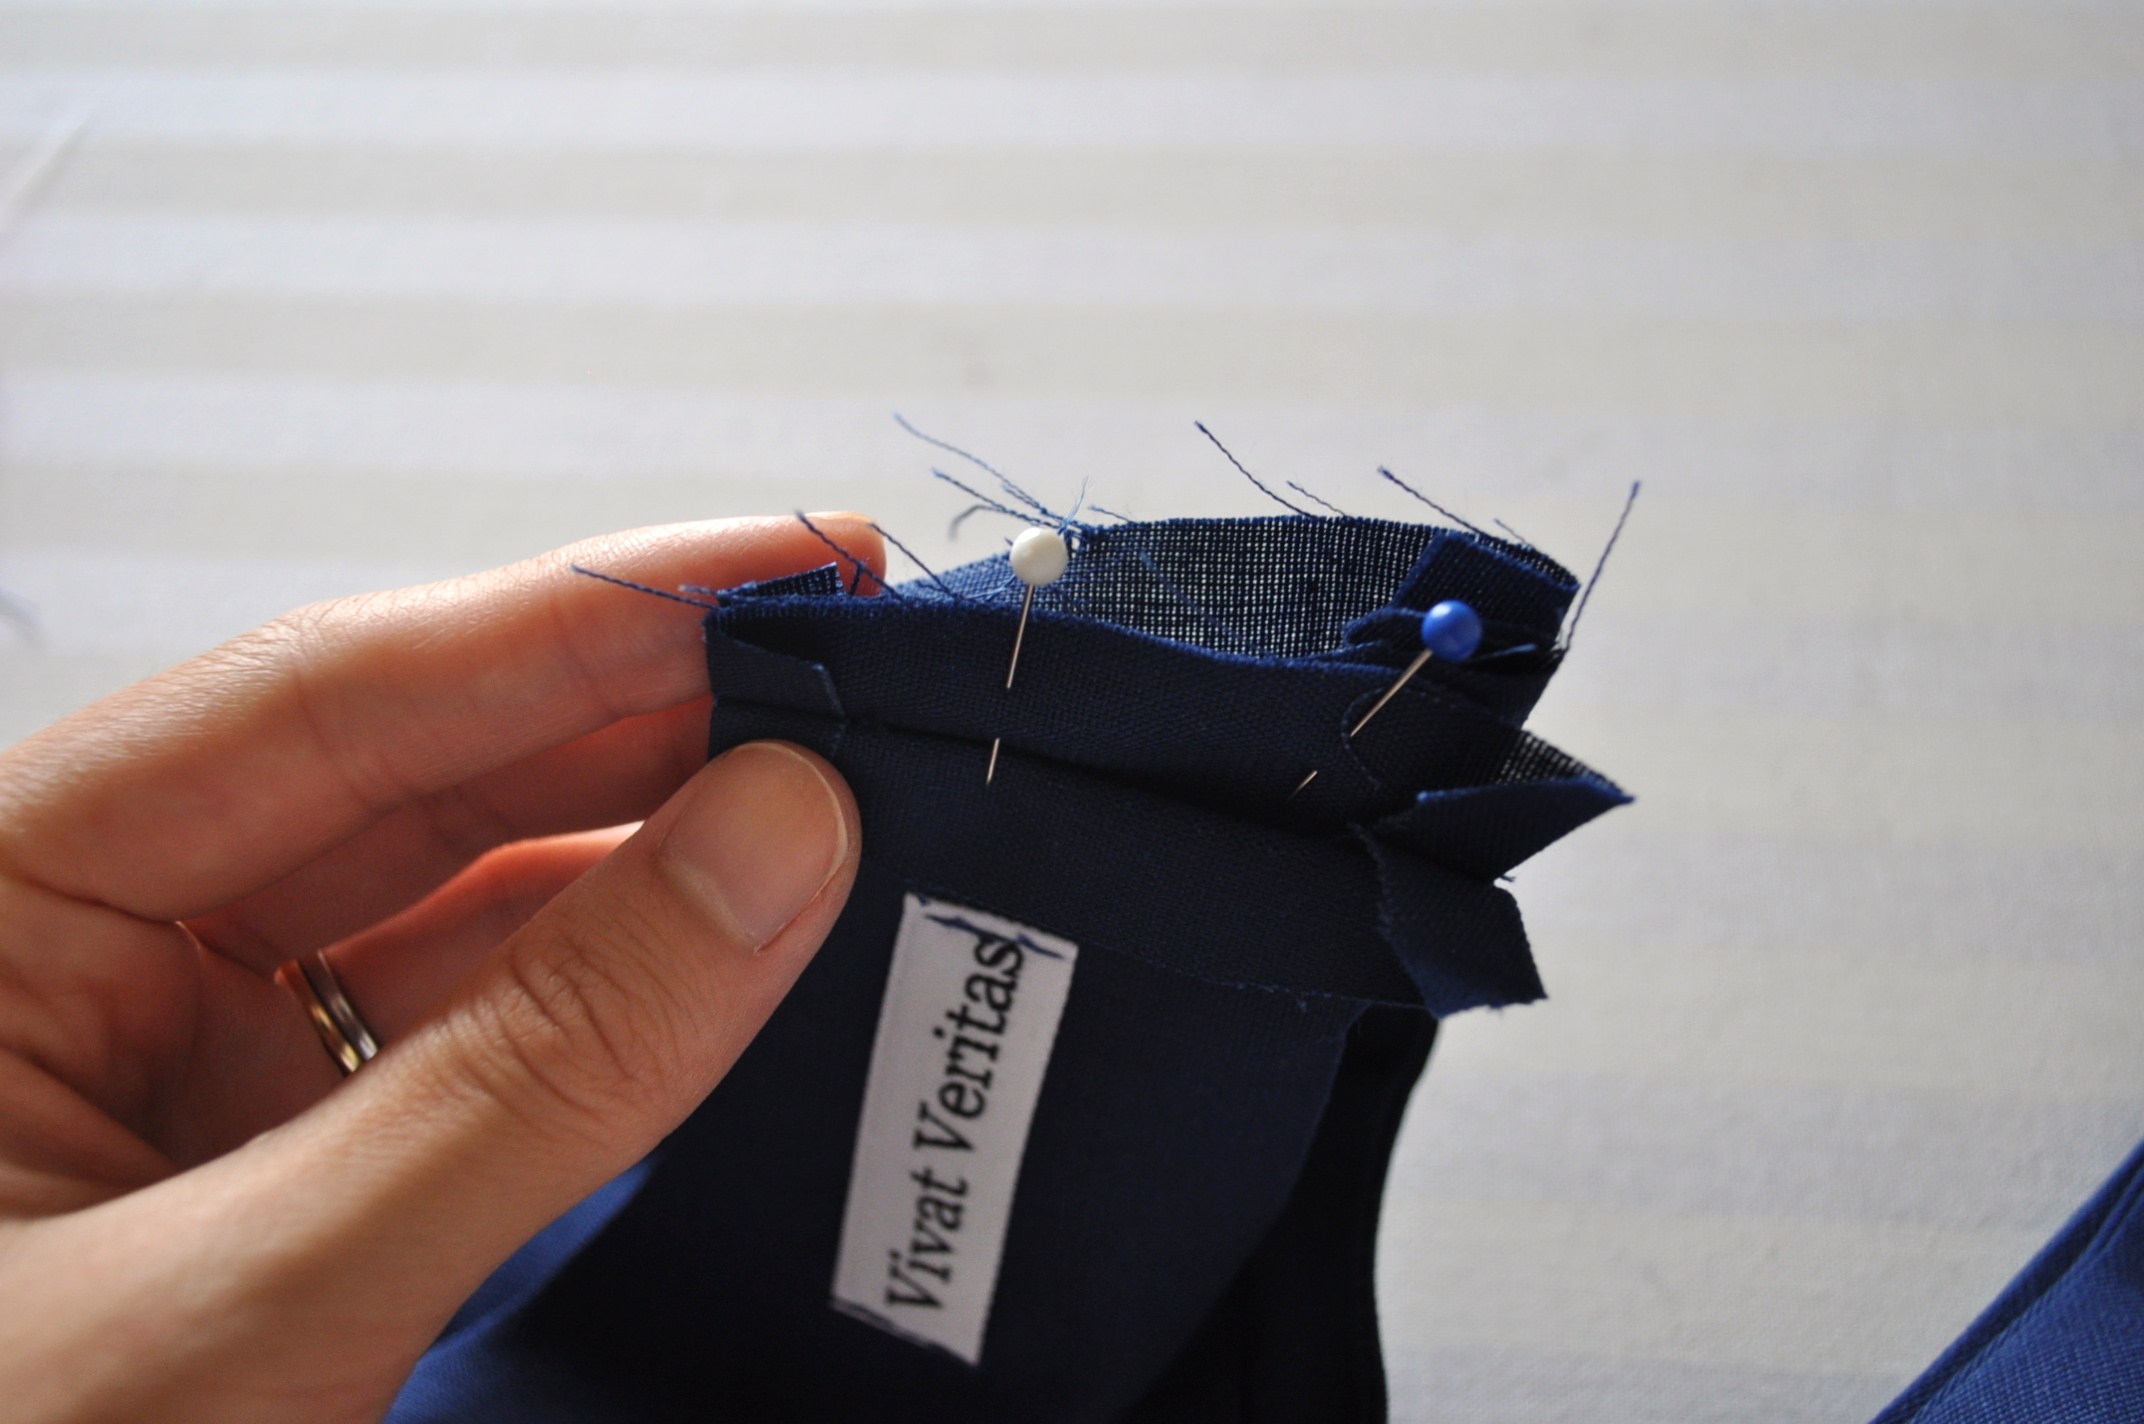
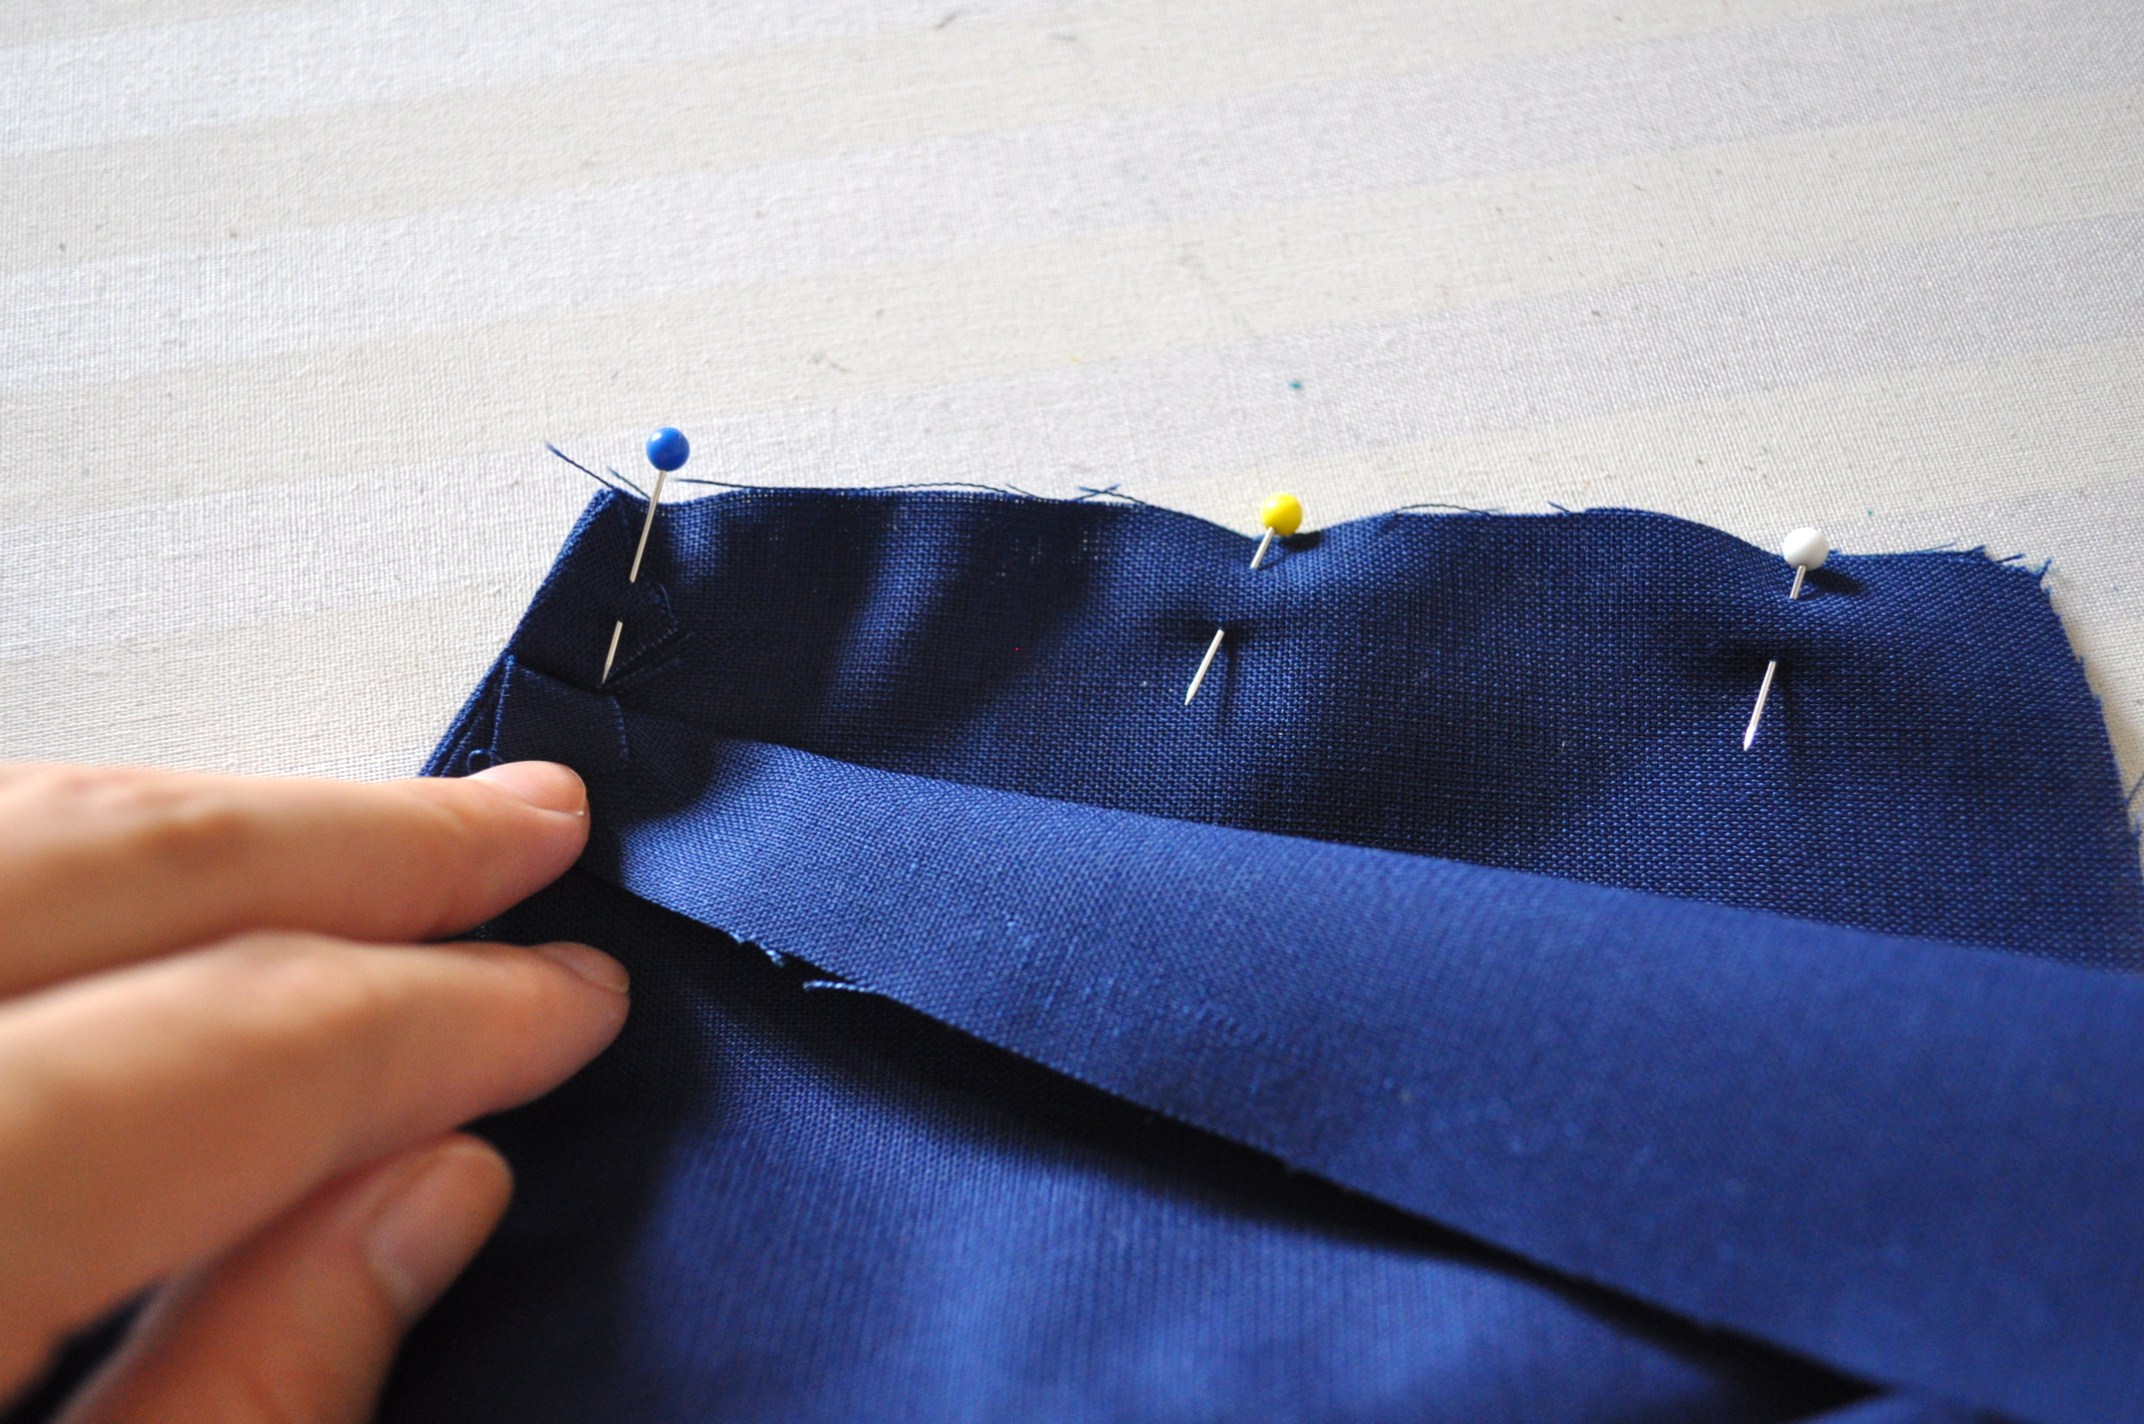
9. Now we connect the heart pieces together. With right sides of the outer pieces facing, pin the right sides of the seam allowances you left in step 6. Top picture shows the seam allowances above the heart and the bottom picture shows the seam allowances bottom of the heart shape.
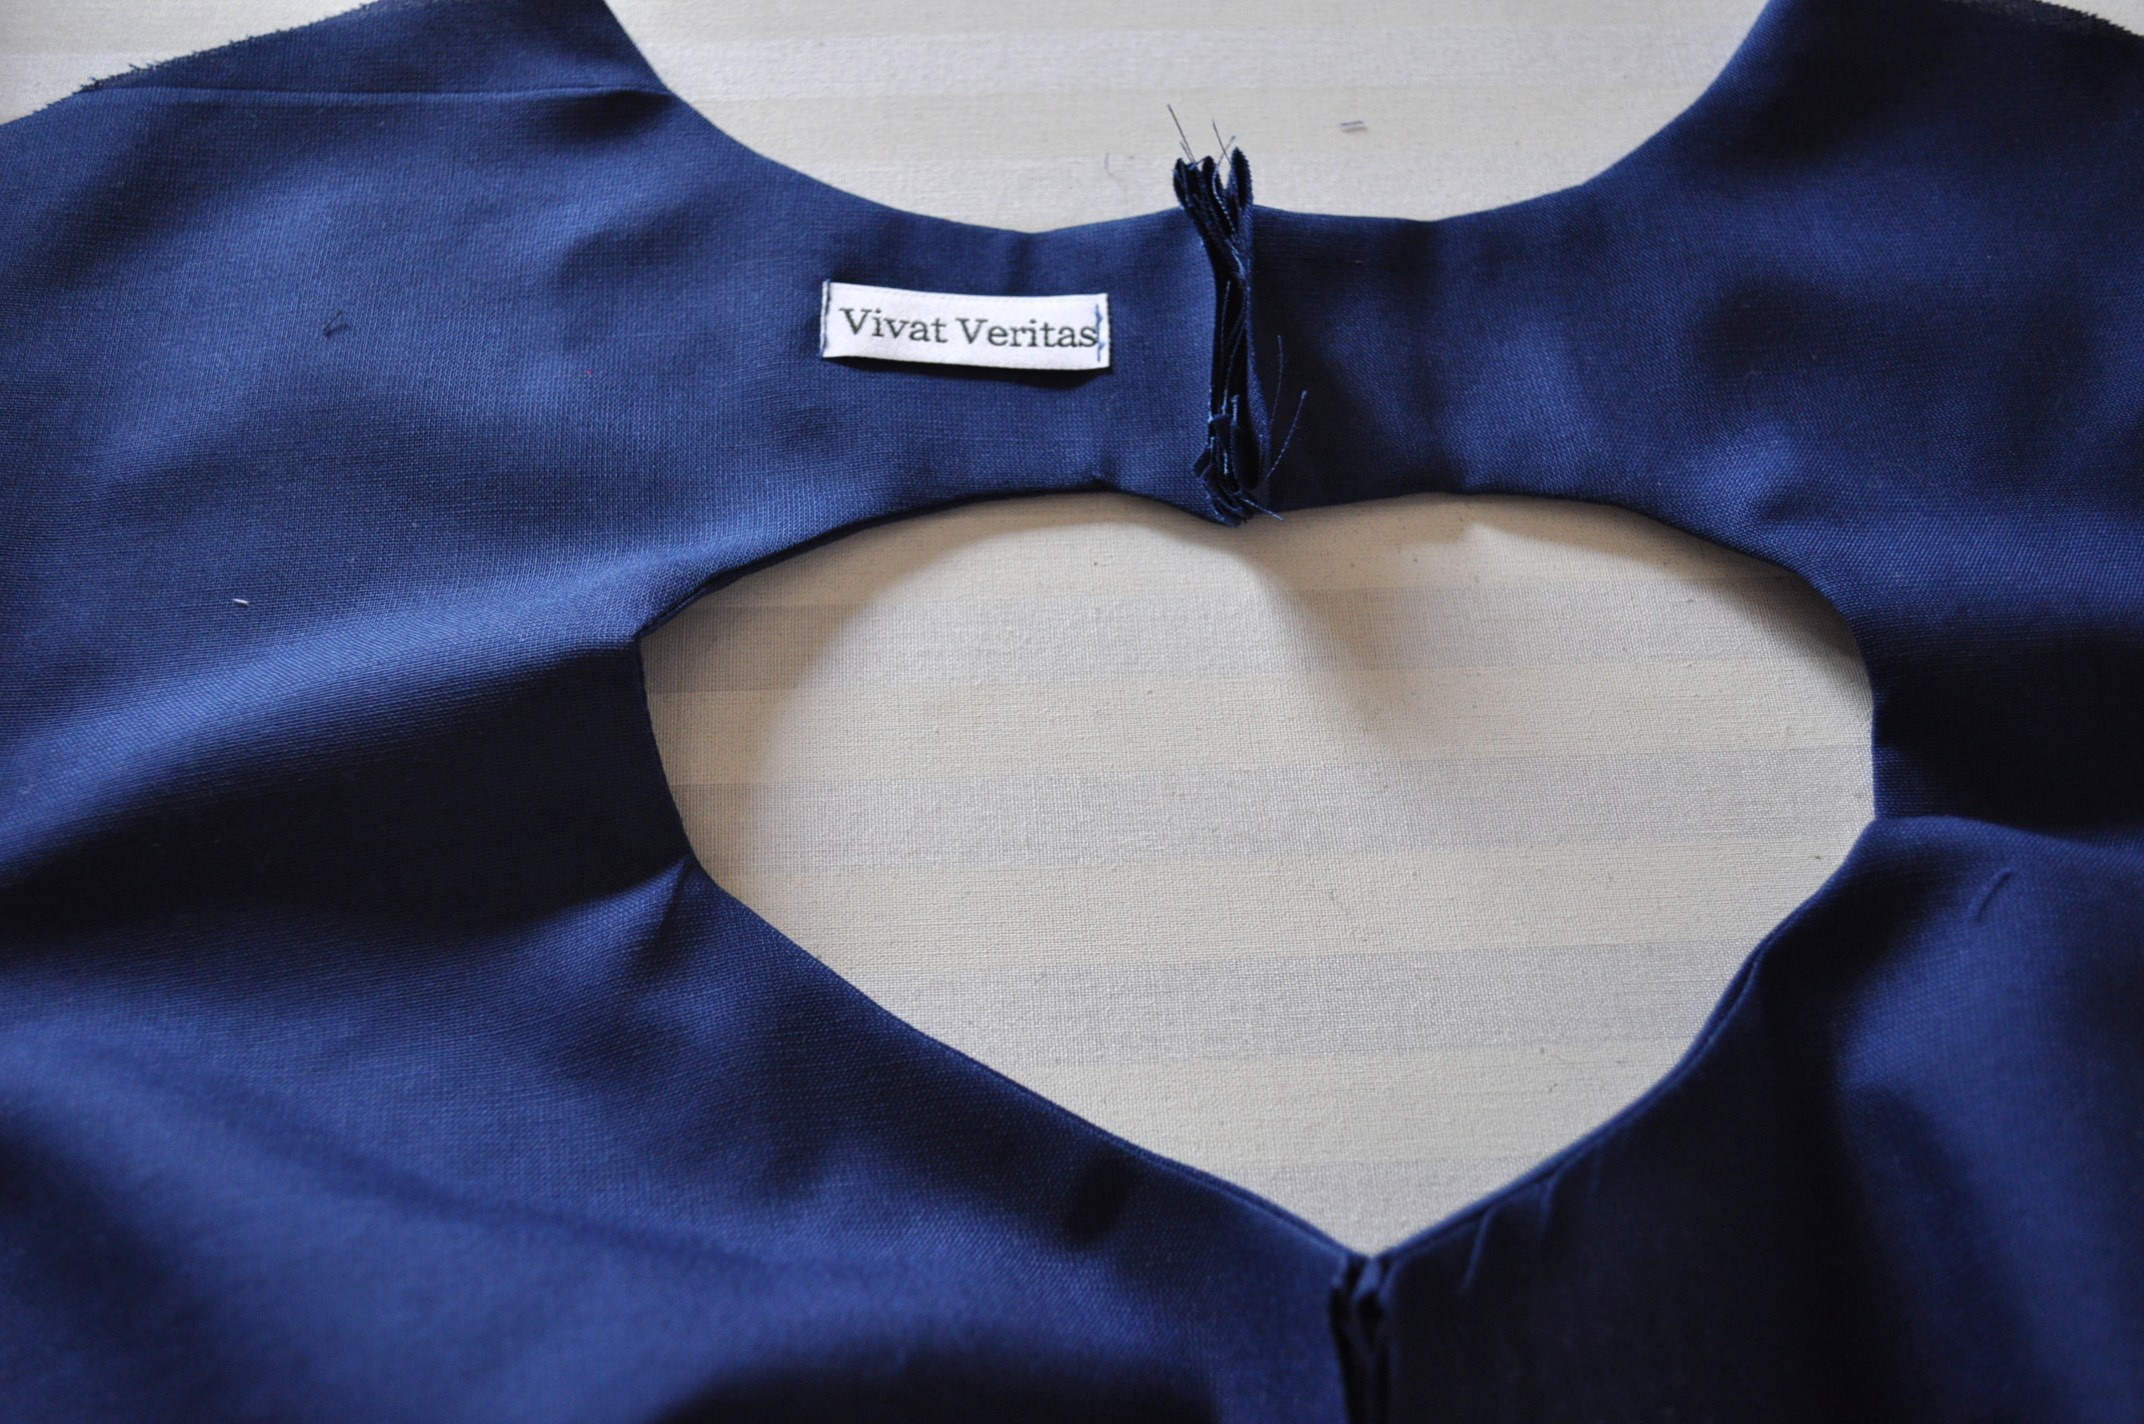
10. Sew the outer back pieces together as you pinned in step 9. You are only sewing the outer side of the fabrics together, leaving the seam allowances of inner or lining fabrics open.
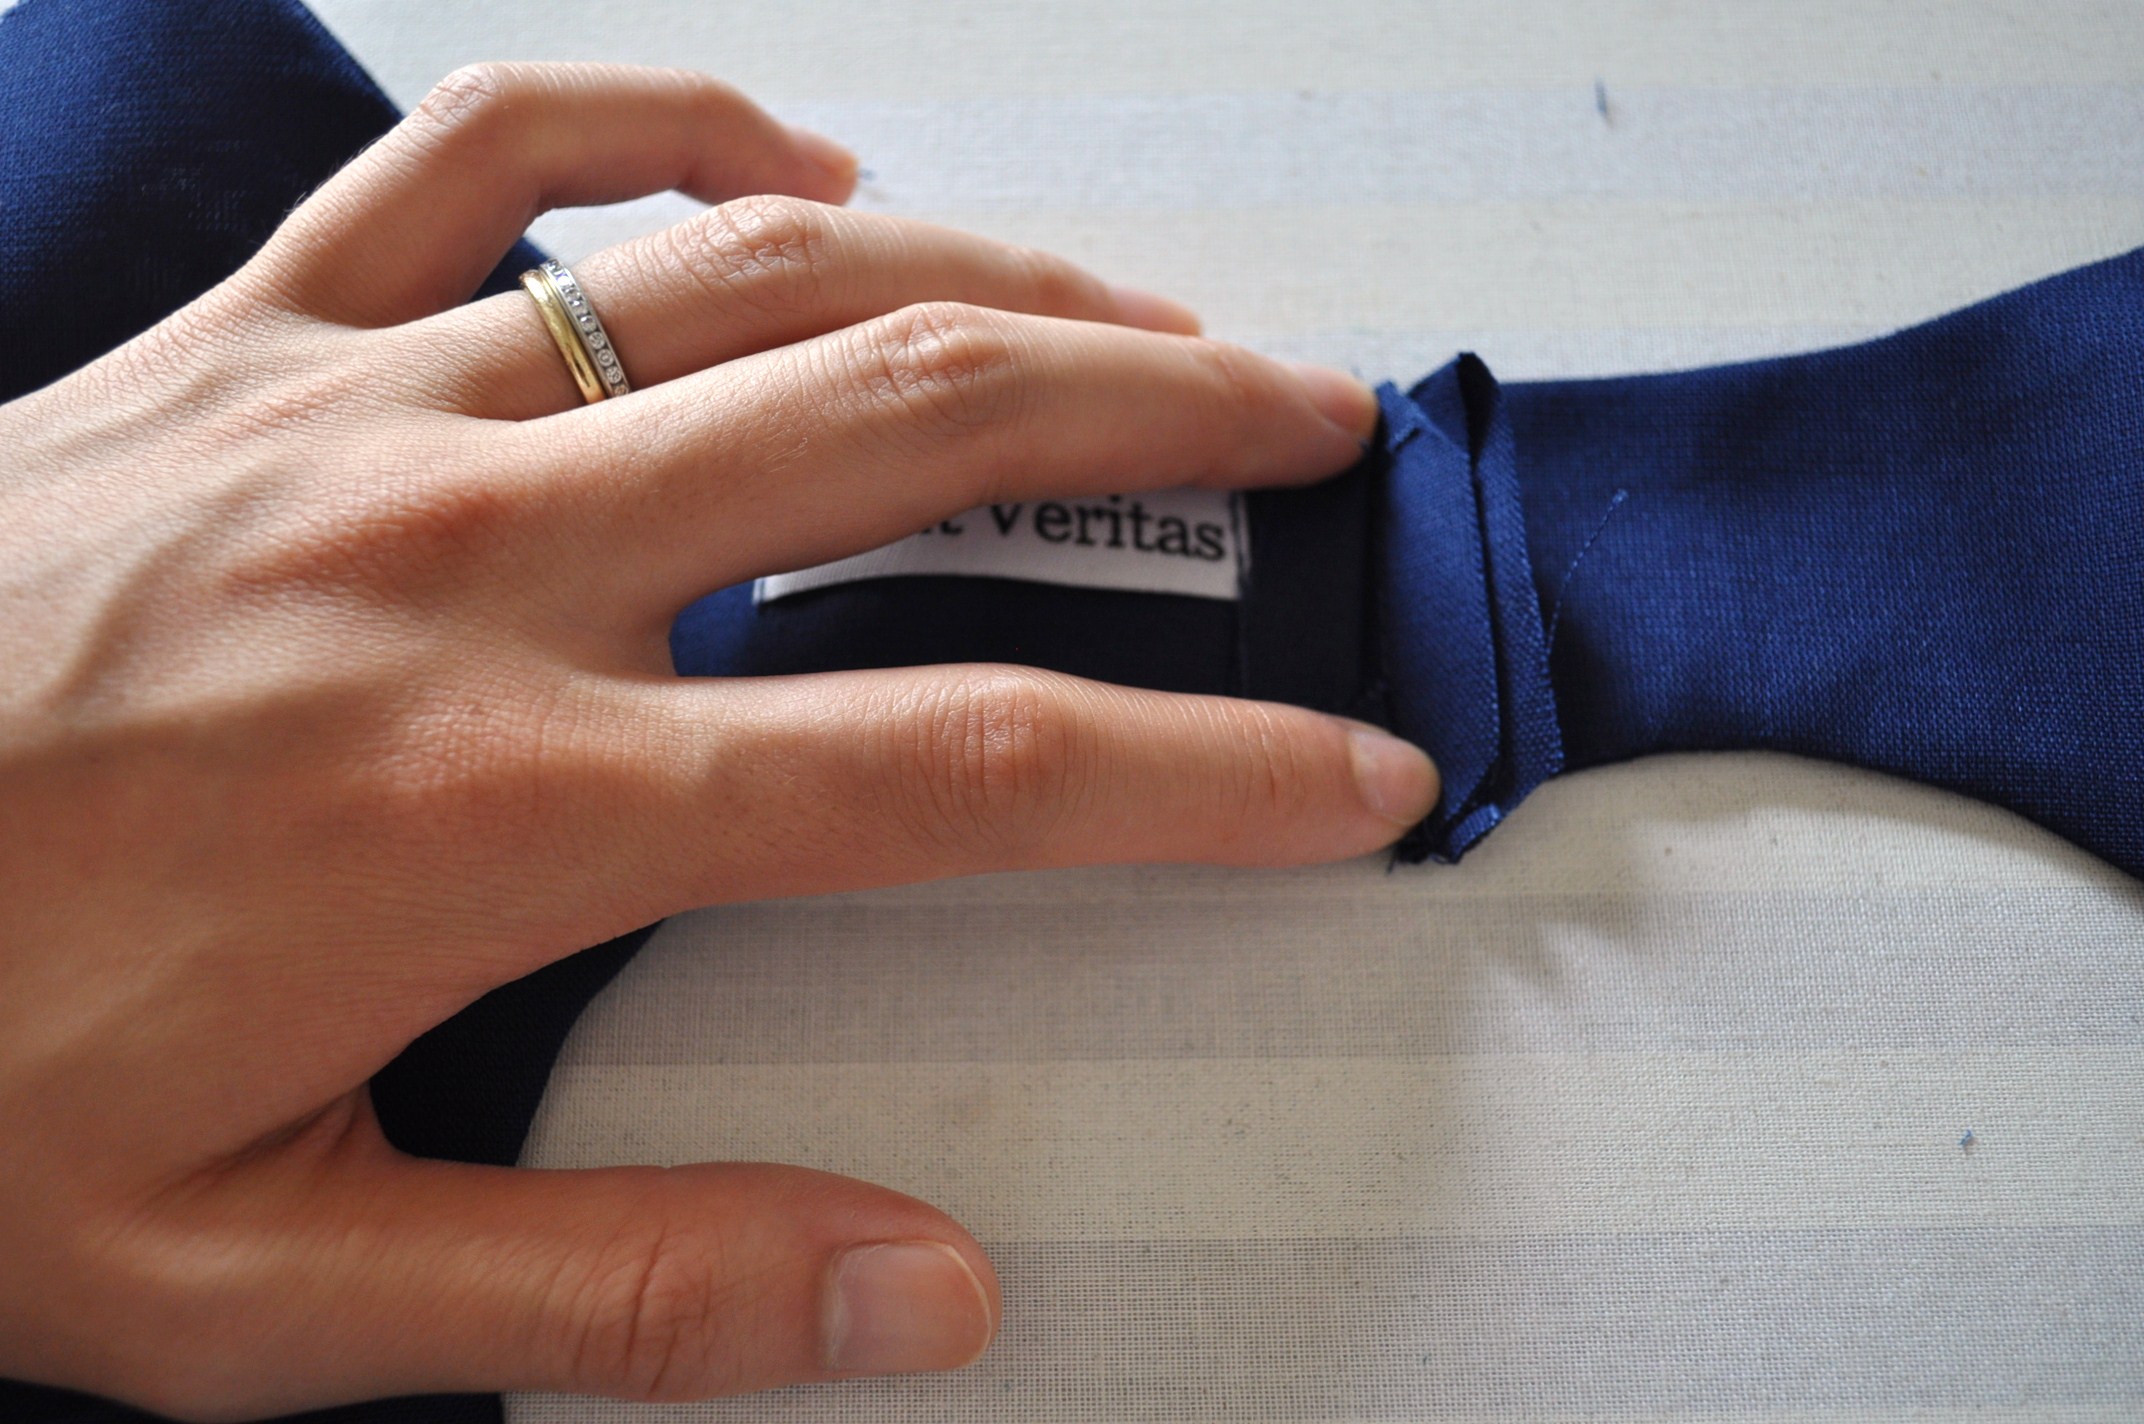
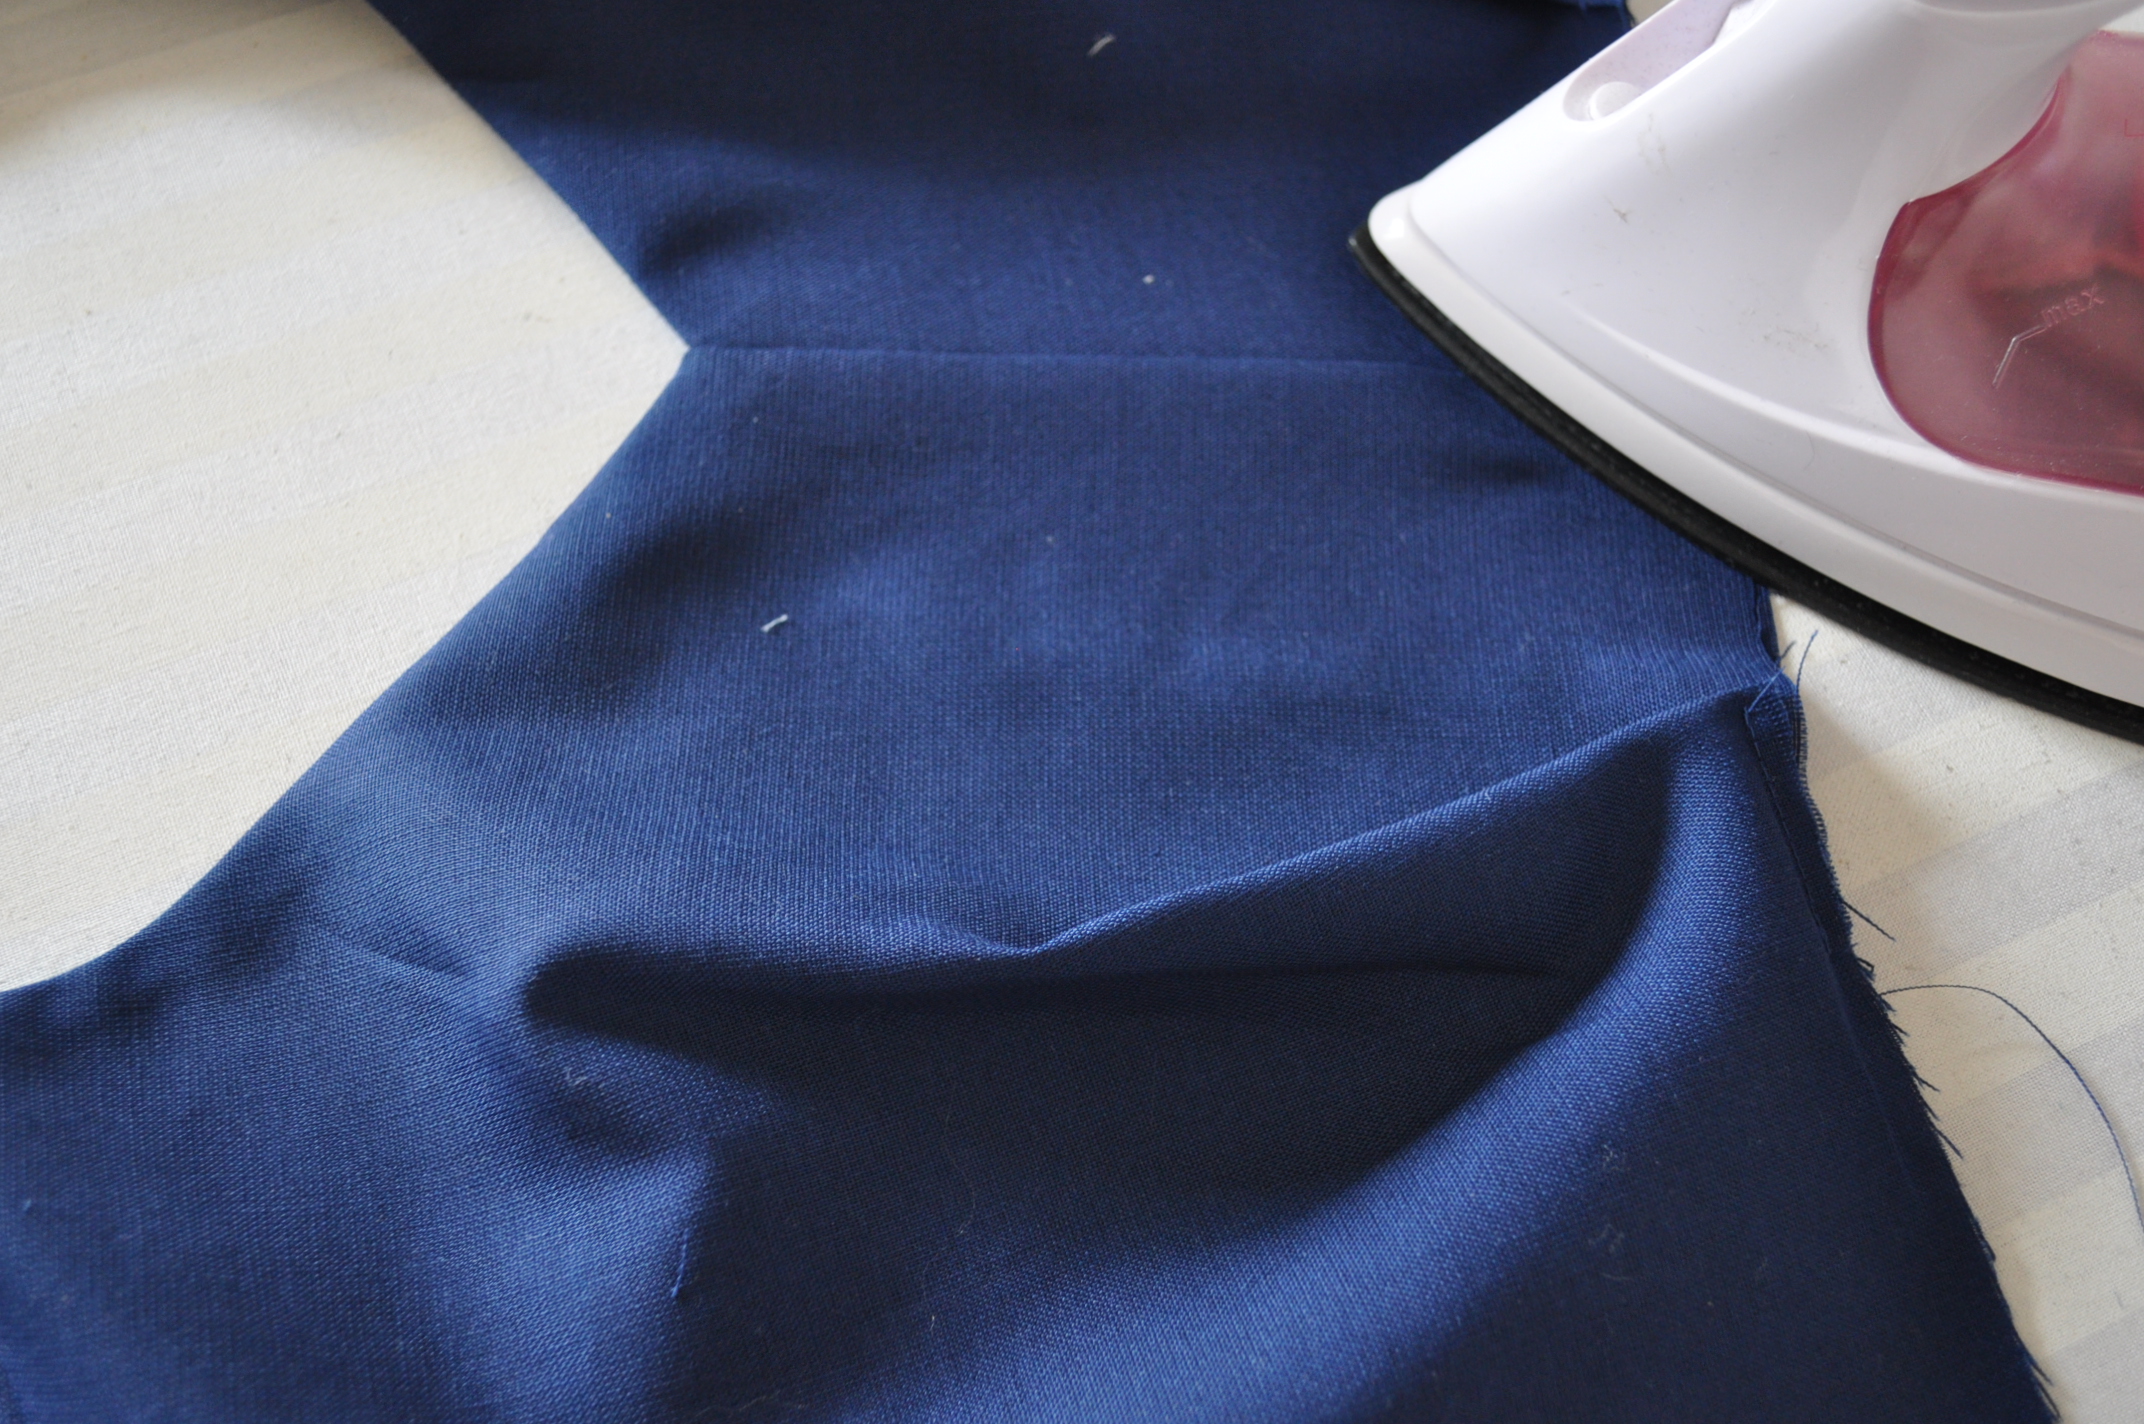
11. Iron, openning the seam allowances of the outer back bodice pieces you just sewed. Then you iron the seam allowances of the lining back bodice pieces so that the lining covers the seam allowances of the outer back bodice pieces.
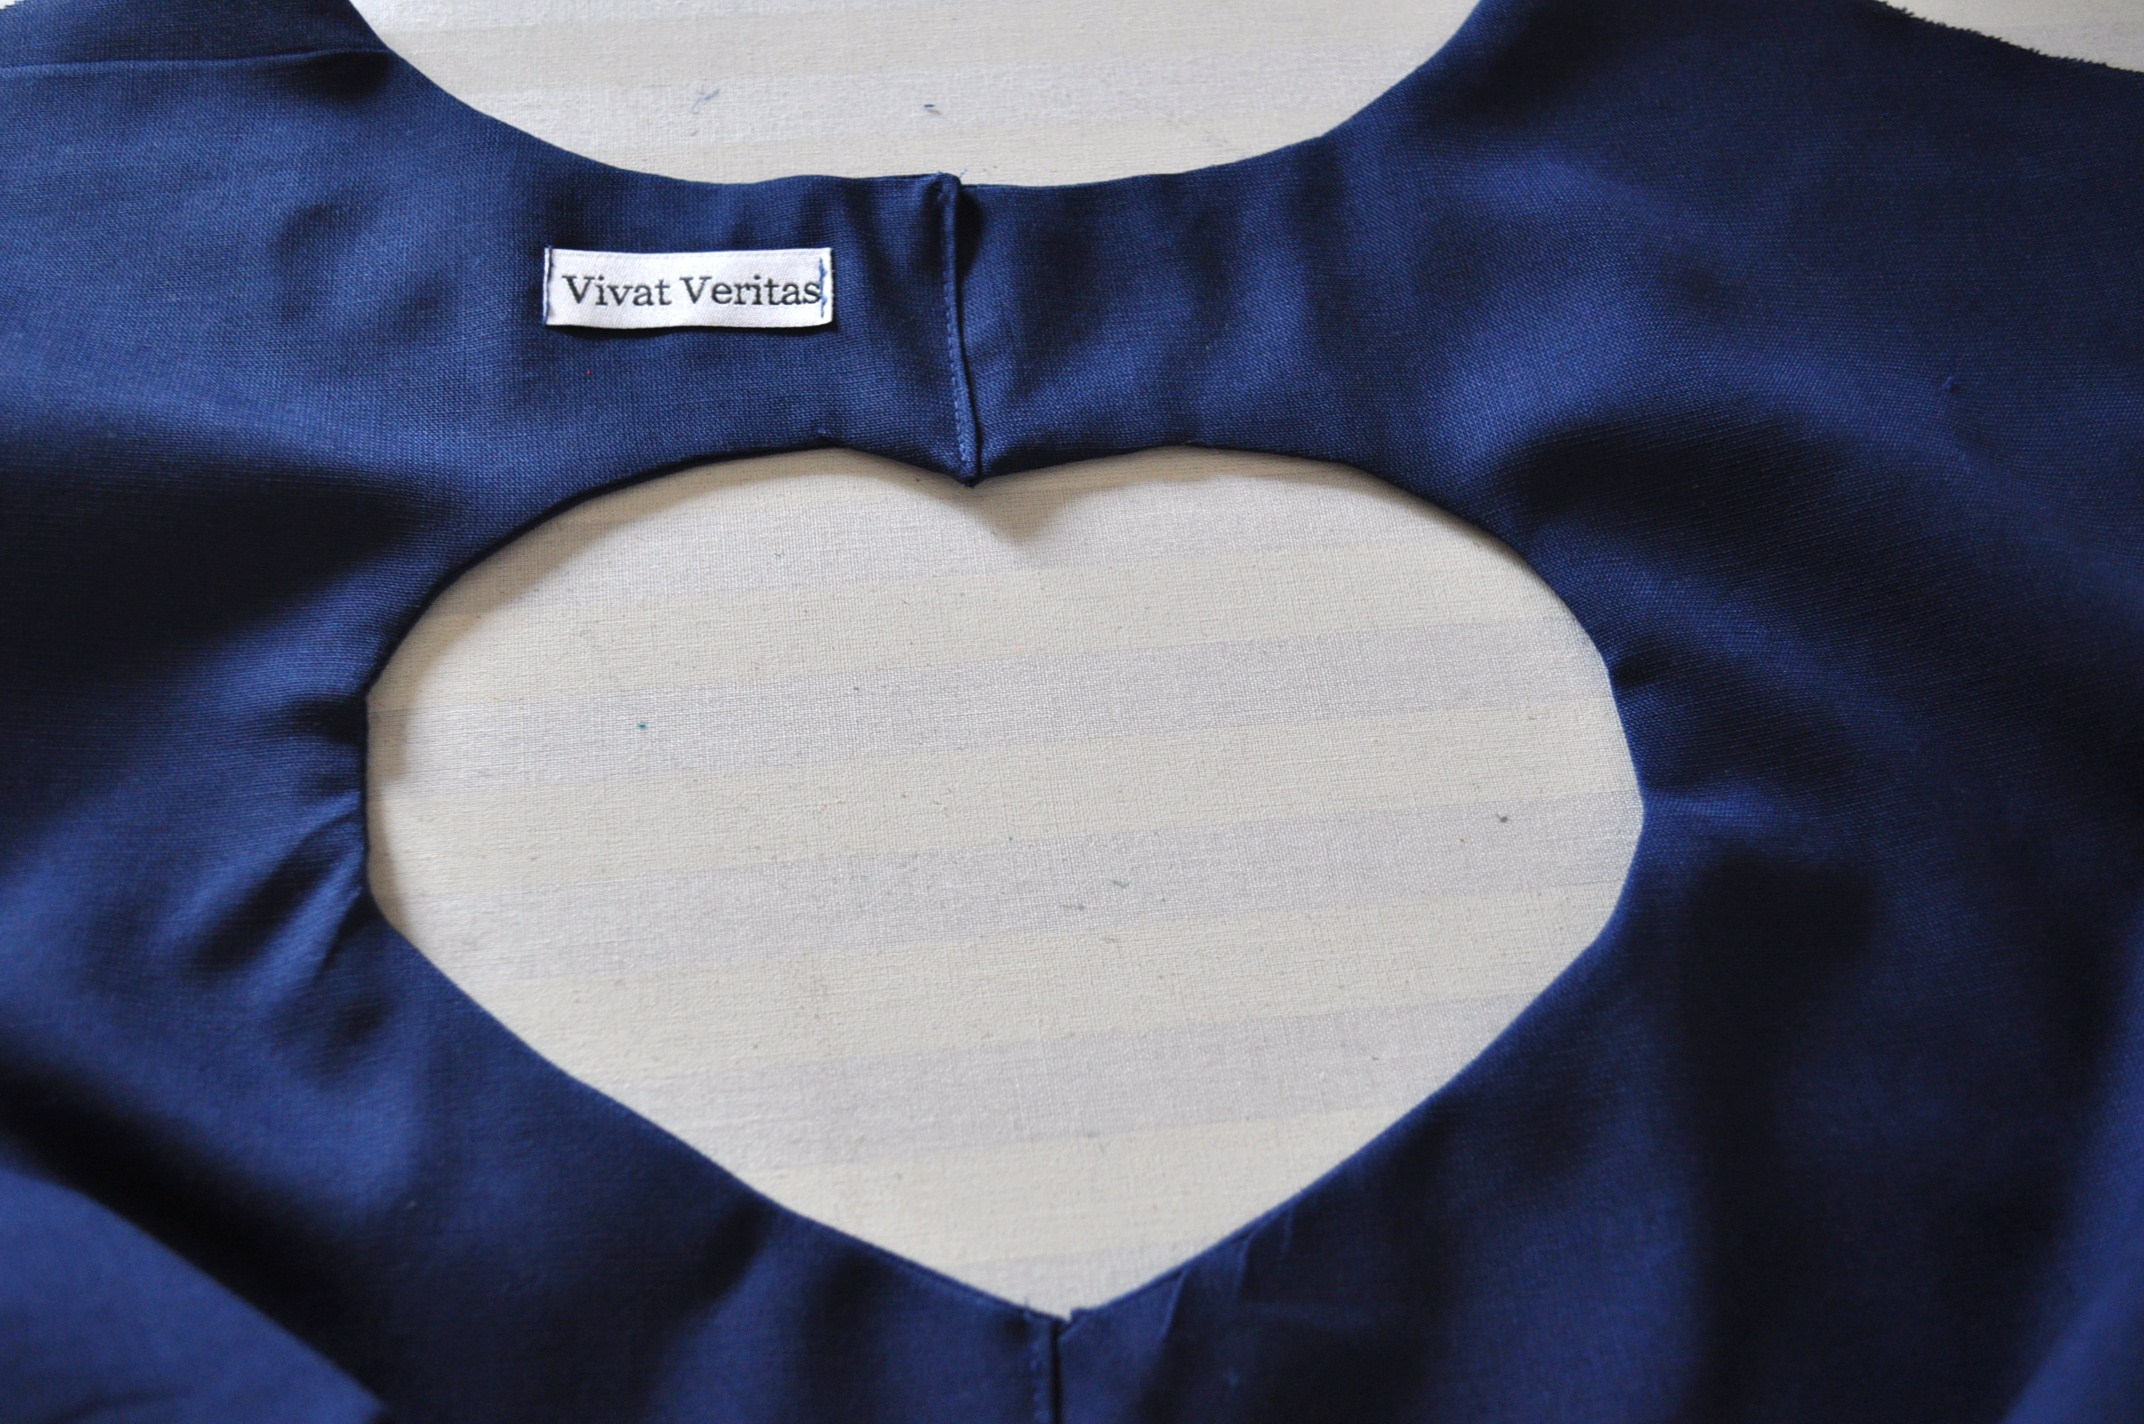
12. You can either hand stitch the center seam in the back bodice pieces, or sew it with sewing machine. As you can see, I used my sewing machine to finish the seam.

You are done! Enjoy adding different shaped cut outs to your back:)

Related Posts

  • Seasons Greetings!
  • Last Minute Baby Gift | Bear Knit Hat
  • Inspiration: New Sewing Books
  • My Bombshell Dress

Filed Under: blog, blogs, DIY

Reader Interactions

Previous: Heart Cut Out Dresses
Next: Orient Watch Giveaway! – CLOSED

Comments

  1. Forgotten Fancies says

    July 11, 2011 at 12:09 pm

    Thanks for the tutorial! I’ll definitely try it out in my next sewing project.

    • Chie says

      July 13, 2011 at 11:07 am

      i’m excited to see your variation! xo

  2. Paunnet says

    July 11, 2011 at 3:38 pm

    So sweet! Thanks for tutorial, Chie!

  3. Sunni says

    July 11, 2011 at 4:05 pm

    So darling! Lovely idea and super sweet! Thank you Chie!

  4. Caroline says

    July 11, 2011 at 8:03 pm

    Thanks for the tutorial! I have been meaning to make a cut-out back dress for ages. I am moving to Japan in 3 weeks so I need some clothes for the heat! I will have to ask your advice on fabric shopping in Japan 🙂

    • Chie says

      July 13, 2011 at 11:08 am

      hi caroline, oh wow that’s a big move! will you be working here? i can answer questions about fabric shopping in japan! feel free to email me:)

      • Caroline says

        July 13, 2011 at 8:10 pm

        Yes, I’m so excited! I’ve got a job in Yuasa, so hoping to find lots of great shops in Osaka and Wakayama!

  5. Ai says

    July 11, 2011 at 9:00 pm

    thank’s for sharing your expertise again chie 😀

  6. Eimma Miah says

    July 11, 2011 at 9:58 pm

    Ah thank you for this helpful tutorial, not only did you show me how to do the heart but also how to get a pro finish for the neck lines and armholes (I’m a begginer sewer) Your explaining was fine!

    • Chie says

      July 13, 2011 at 11:08 am

      hi eimma, im glad to hear that my explanation made sense:)

  7. Casey says

    July 12, 2011 at 11:54 am

    Lovely!!!! 😀 I’m going to include this in my weekly links, if that’s alright! 😉

    • Chie says

      July 13, 2011 at 11:09 am

      of course! thank you casey!

  8. nette says

    July 12, 2011 at 1:03 pm

    Love this Chie! 🙂 Reminds me on one fashion line of Luella in the past. I think they had similar heart shapes on the front decollete. I always wanted to try something like that, so your tutorial is just perfect right at the moment! Thanks for sharing!!!

    • Chie says

      July 13, 2011 at 11:10 am

      hi nette, i do remember the luella dress! it was a heart shaped cut out in the front, and some kind of print fabric in yellow! i love luella. so sad that they don’t come out with new collections anymore..

  9. Tilly says

    July 17, 2011 at 12:21 pm

    So cute! I’m adding this post to my sewing inspiration bookmarks. Might try to make a mini heart at some point… although those curves could be tricky if it’s too small, I guess…

    • Chie says

      July 17, 2011 at 10:24 pm

      aw thank you so much tilly!

  10. Ruth says

    February 15, 2012 at 8:52 am

    Thanks for sharing this!! Im a beginner at sewing so all the help is welcome!! This will be my next project!!
    Love your site/blog/shop!!!

    • Chie says

      February 16, 2012 at 8:22 pm

      aw thank you so much ruth!

  11. Casey says

    August 25, 2015 at 7:16 am

    Hi!
    I’ve been working on a blouse with a diamond shaped cut out in the front bust region, and I’m having trouble with the facing. It doesn’t stay put and the top part falls down through the diamond. Do you have any suggestions on what I should do to stabilize it so it doesn’t do that? I was thinking of attaching it to the neckline and/or armhole seams, but was wondering if there are other ways to do this to minimize the bulkiness, or if that’s the only option!
    Thanks!

    • Chie says

      August 26, 2015 at 6:49 am

      Hi Casey! Thank you for your comment. I don’t know what your blouse looks like, so I can’t say for sure, but I’m thinking maybe below can be the cause:
      1. Is the blouse loose fitting of tight fitting. I recommend to insert a cutout in pretty fitted design to really show off the cutout!
      2. Perhaps the fabric is light weight like cotton lawn? It might work better with fabric with some body.
      Hope this helps!

Trackbacks

  1. Bouquet Party Blog says:
    July 11, 2011 at 7:43 pm

    This Heart Shaped…

    […] bove the heart and the bottom picture shows the seam allowances bottom of the he […]…

  2. Wedding Blog says:
    July 12, 2011 at 10:42 am

    Heart Shaped Dress…

    […] in step 6. Top picture shows the seam allowances above the heart and the bottom […]…

  3. Les trouvailles de la semaine #78 - Le blog thread&needles says:
    July 17, 2011 at 8:17 am

    […] – Blouse, par Adey | 2 – Découpe en coeur, par Vivat Veritas | 3 – Robe, par lil blue boo | 4 – Robe rétro, par Elegant Musings […]

  4. Cut a Piece of My Heart Out | Gingham Girl Cut a Piece of My Heart Out | Crafting Cute Cats :3 says:
    August 9, 2011 at 2:51 am

    […] A lot. One might even say I ‘love’ them . So when I saw Chie of the blog Vivat Veritas’s tutorial on adding a heart cut out to a dress I couldn’t wait to try […]

  5. Tutorials says:
    January 19, 2012 at 6:52 pm

    […] Tutorial: Heart Cut Out Dress […]

  6. Valentine’s Day Dress | zilredloh.com says:
    February 27, 2012 at 8:32 am

    […] used a combination of tutorials, the first I referenced was Vivat Vertias’ Heart Cut Out Dress Tutorial which gave me the general idea of how to do a cutout.  But the main tutorial I used was from […]

  7. Decote de coração nas costas | Assuntos variados para você. says:
    March 15, 2012 at 6:55 pm

    […] TUTORIAL 3 https://www.vivatveritas.com/2011/07/tutorial-heart-cut-out-dress/ […]

  8. Heart Dress « lovepearltears says:
    May 30, 2012 at 5:25 pm

    […] https://www.vivatveritas.com/2011/07/tutorial-heart-cut-out-dress/ Share this:TwitterFacebookLike this:LikeBe the first to like this post. […]

  9. Sewing Tutorials | Etsy Addict says:
    October 9, 2012 at 6:33 pm

    […] Heart Cut Out Dress This tutorial is by Vitas Veritas and is very on trend. I love the little heart cut out at the back of the dress, you can incorporate the cut out trend but still wear a bra. […]

  10. Decote de coração nas costas | Belle Diva says:
    January 15, 2013 at 9:36 pm

    […] TUTORIAL 3 https://www.vivatveritas.com/2011/07/tutorial-heart-cut-out-dress/ […]

  11. Duvet dresses! | Here's one I started earlier says:
    March 2, 2013 at 7:20 pm

    […] If/when I get designing, I’m tempted to try a cut out shape in the back as shown here and here…not sure if it’ll look too busy with the birds though. […]

  12. Sewing Tutorials | says:
    September 13, 2014 at 4:23 pm

    […] Heart Cut Out Dress This tutorial is by Vitas Veritas and is very on trend. I love the little heart cut out at the back of the dress, you can incorporate the cut out trend but still wear a bra. […]

  13. New dressmaking project: cut out back dress! | Life of a DIY Shopaholic says:
    July 22, 2015 at 9:22 pm

    […] are also free tutorials from Create/Enjoy, Viva Veritas and Cation if you prefer to DIY and make your own cut out […]

Primary Sidebar

JOIN MY EMAIL LIST

You can read a sample newsletter here, including my latest edition.

Recent Posts

  • UNPLAN shinjuku Pop Up
  • Japanese Iconic Pop Up & Mini Fashion Show 
  • Responsible Marché Vol.8 — A Day to Discover the Stories Behind Clothes
  • Seplumo Nihonbashi POP UP
  • Coaster Aobadai X VIVAT VERITAS POP UP

Categories

Follow me

  • Email
  • Facebook
  • Instagram
  • Pinterest
  • Twitter
  • YouTube

♥ Blog Archives

  • Etsy
  • Creema

Footer

ABOUT ME

My name is Chie. I design and make custom wedding dresses in Tokyo, Japan. Read More…

GET UPDATES!

Get monthly updates including new items in the shop, favorite links and more!

CONTACT

Feel free to send a message if you have any comment:

chie@vivatveritas.com

LET´S GET IN TOUCH

  • Email
  • Facebook
  • Instagram
  • Pinterest
  • Twitter
  • YouTube
大正から昭和初期、若い女性たちの間で流行した銘仙。 かすりの技法を用いた平織りの絹織物で、さらりと 大正から昭和初期、若い女性たちの間で流行した銘仙。

かすりの技法を用いた平織りの絹織物で、さらりとした軽い着心地と、鮮やかな色柄・大胆なデザインが特徴です。

境界がにじんだような風合いと、鮮やかで大胆な色使い🌈

独特のにじみは、たて糸とよこ糸をわずかにずらして織ることで生まれます。

自分の一枚を自由に楽しむために生まれた、女性たちの心意気そのもののような布。その大胆さをそのままに、クロップ丈のキャミソールとまとうラップパンツで、今の暮らしにも映える一枚へ仕立て直しました。

Photographer @capturetokyo
Model @yaos.aisai 
Make up and hair @mami_hmua

Meisen — the kimono fabric that swept through fashion among young women in 1912 to the early 1930s.

A plain-weave silk textured with a kasuri (ikat) technique, prized for its light, breezy feel and its bold colors and daring patterns.

That soft, blurred-edge quality comes together with vivid, fearless color combinations 🌈

The signature blur comes from weaving the warp and weft threads slightly offset from one another.

This fabric was born from women’s desire to wear something entirely their own — it carries their spirit of freedom in every thread. Keeping that same boldness intact, I’ve remade it into a cropped camisole and wrap pants that drape and move with you — a piece that fits naturally into everyday life today🧚

 #KimonoUpcycled #MeisenSilk #VintageJapan #着物リメイク #銘仙
和のかたちを、新しい日常へ。 一本の帯を丁寧にほどき、普段づかいできるワンショルダーバッグへと仕立 和のかたちを、新しい日常へ。

一本の帯を丁寧にほどき、普段づかいできるワンショルダーバッグへと仕立て直しました🌸

見た目からは想像できないほどの収容力。ハサミや糸、リッパー、ペンチ…制作道具もすっぽりまとまって収まります✂️✨入れるのは私だけだと思うけど😆

内側の裏地も可愛い♡

一本の帯が、誰かの日々をまとう相棒に生まれ変わりますように。

From tradition, into everyday life.

One obi, carefully unstitched and reborn as a one-shoulder bag for daily wear🌸

It holds far more than it looks — scissors, thread, a seam ripper, pliers… all my sewing tools tucked neatly inside✂️✨ Though I’m probably the only one who’d pack it like this😆

The lining inside is a little secret I’m quite fond of♡

#帯リメイク #着物リメイク #DIY #アップサイクル #制作動画
金色に輝く森は元は着物の羽織でした👘 漆黒の地に、金彩の木立が幾重にも連なって
夜の神秘的な森を歩 金色に輝く森は元は着物の羽織でした👘

漆黒の地に、金彩の木立が幾重にも連なって
夜の神秘的な森を歩いているような、静かで奥行きのある一枚🌳

水着の上に羽織れば、そのまま街へ歩き出せるビーチカバーアップにも。

お揃いのキャミソールは既に素敵なお客様の元にお嫁に行きました👰‍♀️
 
Photographer @capturetokyo
Model @kumabeeesan
Make up and hair @mami_hmua

A forest of gold, once a kimono jacket👘
L
ayer upon layer of gilded trees on jet-black silk. A quiet, deep piece, like walking through a mystical night forest🌳

Wear it over a swimsuit and go straight from the beach into the city as an effortless cover-up🖤

The matching camisole has already found its way to a wonderful new home👰‍♀️

#着物リメイク #ラップパンツ #kimonoremake
Furisode — the long-sleeved kimono young women tra Furisode — the long-sleeved kimono young women traditionally wear once in their lives, for their Coming of Age Day ceremony (Seijin Shiki) at 20 — often gets worn just that one time. I actually wore my cousin’s furisode for mine, so hers got a second life. But most don’t. They live for one single day, then disappear into the back of a drawer, unseen for decades 😴

But beautiful silk doesn’t have to end there.
From a once-in-a-lifetime ceremonial robe to something you can wear again and again. This piece — butterflies mid-flight, flowers in bloom — deserved a new season. So I remade it into an i line dress.

振袖は、生涯でたった一度しか袖を通さないことが多いです。

私自身は従姉妹の振袖を着たのでその振袖は二度人に着られたけど、成人式の日だけを生きて、あとはタンスの奥で眠り続ける😴誰にも見られないまま、何十年も。

でも良い生地には、終わりがないんです。

一度きりの晴れ着から、何度でもまとえる一着へ。蝶が舞い、花が咲くこの1着に、新しい季節を与えたくて、マーメイドラインのドレスに仕立て直しました。

#kimonoremake #振袖リメイク #upcycledsilk
オーストラリアからのお客様がオンラインで着物を選び、オーダーしてくださいました✂️ まずは仮縫いを オーストラリアからのお客様がオンラインで着物を選び、オーダーしてくださいました✂️

まずは仮縫いを郵送でお届けし、Zoomの画面越しに丈や身幅を確認しながら、少しずつドレスは形になっていきました。

桜の下で、鳥居の朱色の中で笑う二人の写真が届いたとき、 遠く離れた場所からでも、確かにこの手で紡いだものが誰かの人生の一部になったのだと感じて嬉しかったです♡

A customer from Australia chose her kimono online and placed an order✂️

I first mailed a mock-up, and little by little, checking the length and width over Zoom, the dress took shape.

When the photos arrived of the two of them smiling under the cherry blossoms, in the vermillion red of the torii gate — even from far away, I felt so happy knowing that something woven by my hands had truly become part of someone's life♡

📷@whoshotthephotographer
👰‍♀️@cscambary 

#KimonoUpcycled #MadeToOrder #BridalCouture
#着物リメイク #国際オーダー
このシルクの軽さ、暑い季節にちょうどいい🫠 一枚の着物から、ワイドパンツを作りました✂️薄手のシル このシルクの軽さ、暑い季節にちょうどいい🫠

一枚の着物から、ワイドパンツを作りました✂️薄手のシルクは風を通して、歩くたびに裾がふわりと揺れます♪

後ろ姿には、着物の袖だった部分を使っていてお尻の部分の花柄が上下逆さまになっています👻最初は迷ったけれど、これはこれで面白いなと思ってそのまま残しました🫶🏻

一点ものなので、この一本だけ。気になる方はプロフィールのリンクから見てみてください♡

This silk is so light, perfect for the hot season 🫠

I made these wide-leg pants from a kimono✂️ The thin silk lets the breeze through, and the hem sways softly with every step ♪

The back is made from what used to be the kimono sleeves, so the floral pattern on the hips ends up upside down👻 I wasn’t sure at first, but honestly it grew on me, so I left it as is 🫶🏻

One of a kind, just this one pair. If you’re curious, the link is in my profile ♡

#着物リメイク #kimonoremake #正絹 #一点もの #和柄 夏の装い ワイドパンツ
数年前に制作したシルクのドレス。 今回「Released. Reimagined.」というコンセプ 数年前に制作したシルクのドレス。

今回「Released. Reimagined.」というコンセプトに合わせて、@redyeingproject さんに黒染めをお願いしました。

Helen x Vivat Veritasのイベントにベンダーとして出展してくださったご縁から生まれたコラボレーションです。

「服を捨てる前に、黒染めという選択肢を。」
色あせた服を、グラム単位の染め直しで蘇らせる——そんなコンセプトに強く共感しました。

天然素材のシルクスカート部分は深く美しい黒へ。
シャンティレースの部分は、少し緑がかった表情のある色に変化しました。

一着を長く着続けるための、小さな選択。
Before / Afterの写真、ぜひご覧ください🩷🖤

A silk dress I made a few years ago.

For this ""Released. Reimagined."" concept, I asked @redyeingproject to dye it black.

This collaboration grew out of a connection made when he joined the Helen x Vivat Veritas event as a vendor.

""Before you throw it away, consider black dyeing.""
His concept — reviving faded clothes through by-the-gram redyeing — really resonated with me.

The silk skirt, a natural fiber, transformed into a deep, beautiful black.
The chantilly lace took on a subtly greenish tone.

A small choice, in service of wearing one piece for longer.
Take a look at the before/after photos🩷🖤

黒染め
@redyeingproject

Photographers
@nothing_special_88
@japanphotographer_

Model
@sienna.christinaaa

Jewelry
@viviange

Hair
@angh0
@sho_kanaida
@iam__little__boy

Make up and videos
@glam_by_jyoti

#黒染め #RedyeingProject #ReleasedReimagined #着物リメイク #サステナブルファッション
実はこのお洋服、今回のショーに入れるか自分では迷っていました。結構前に作った作品だったので。でもヘレ 実はこのお洋服、今回のショーに入れるか自分では迷っていました。結構前に作った作品だったので。でもヘレンと話す中で、これも一緒に見せようと決めました。

ヘレンと3週間近く一緒に準備を進める中で、コレクションの作り方、見る人を楽しませる魅せ方、ルック全体の組み立て方など、本当にたくさんのことを学びました。自分一人だったらこのルックスを入れる決断はしなかったと思う。誰かと一緒に作ることで見えてくるものがあるんだなと、改めて実感しました。
ヘレン、ありがとう♡

Honestly, I wasn't sure whether to include this piece in this show. It was something I'd made a while back. But talking it through with Helen, we decided to show it together after all.

Working with Helen for almost three weeks to prepare for the show, I learned so much — how to build a collection, how to style looks that engage an audience, how to put together a look as a whole. I don't think I would have made the decision to include this piece if I'd been on my own. Creating something together with someone else really opens your eyes to things you wouldn't see alone.

thank you Helen @designerhelen♡

Model @izumi_nishida

Photographer 
@nothing_special_88 

Jewelry
@viviange

Hair 
@angh0
@sho_kanaida
@iam__little__boy

Make up
@glam_by_jyoti

#KimonoUpcycled #SustainableFashion #DesignerCollab #着物リメイク #ものづくり
Follow me on Instagram

Copyright © 2026 · vivien theme by Lovely Confetti DMCA.com Protection Status

Copyright © 2026 Vivat Veritas