• Skip to primary navigation
  • Skip to main content
  • Skip to primary sidebar
  • Skip to footer

Looking for something?

Get in touch

  • Email
  • Facebook
  • Instagram
  • Pinterest
  • Twitter
  • YouTube

Vivat Veritas

Custom Wedding Dress & Kimono Upcycled Clothes | オーダーメイドウェディングドレス&着物ドレス

  • Home
  • About
    • Press
    • Collaborations
  • Blog
  • Bridal
    • Lovely Words
    • Price List
  • Sewing Class
  • Kimono Dress
    • MADE-TO-ORDER BUSTIERS
  • Contact
  • Location
  • 日本語
/ Archives for tutorial

tutorial

Tutorials

January 19, 2012 By Chie

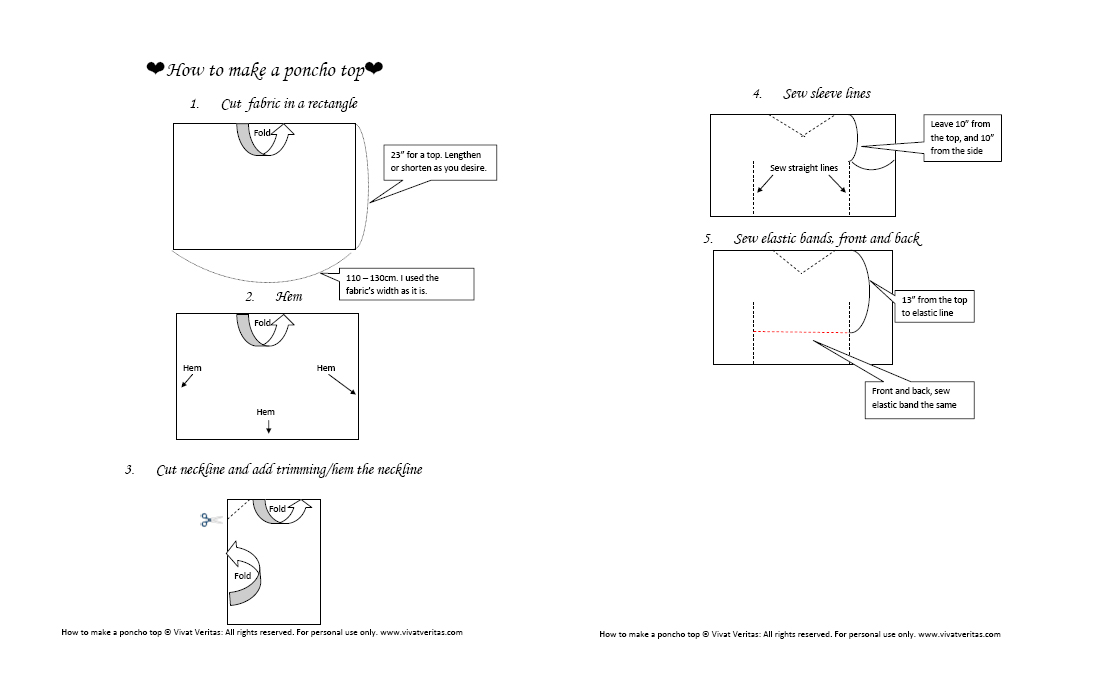
❤ Here is a round up of tutorials that I and guest bloggers wrote in the past! Hope you find it useful 🙂 Click on the icon below to see each tutorial.


❤ Tutorials from my creative friends

❤ Visit Sophia’s blog

❤ Visit Nette’s blog

❤ Visit Paunette’s blog

❤ Hair tutorials

Filed Under: blog, blogs, DIY Tagged With: diy, tutorial

Tutorial | How to Make a Poncho Top

May 10, 2011 By Chie

Hi! As I promised, here is the tutorial on how to make a poncho top from a rectangle fabric! 

how to make a poncho top diagram

I made some diagrams to show how to cut the fabric and where to sew. You can click the image above to enlarge.

Material needed:
❤ 1-2 yards or fabric, depending on the length of the top/dress. I recommend fabrics that flows well, and avoid stiff fabrics, such as denim, 100% cotton, linen or wool. I used very light weight polyester fabrics for my top and dress. I recommend light weight poly or rayon blend. Fabric that drapes well would work well.
❤ Thread
❤ Elastic band. This is what you use to cinch the waist part. Cut two pieces of elastic bands, in length that’s half of your waist. For instance, if your waist measurement is 28″ around, cut two 14″ elastic bands.

If you have any questions, please leave a comment! I will try to answer as much as I can.
Hope you enjoy this and please do share some photos if you make one! (Instagram: @vivatveritas)

View More

Did you like this tutorial?

Check out my other tutorial on how to make a sack dress!

Filed Under: Tutorial Tagged With: creation, top, tutorial

Tutorial | MN1003 Wrap Around Maternity Top Variation

March 17, 2011 By Chie

Transform Megan Nielsen Wrap Around Maternity Top to a Dress

I’m 35 week pregnant this week! I can’t believe how fast my whole pregnancy has gone. I only have 5 more weeks (or less) before baby Kiko will be born. By the way, I plan to avoid the subject of earthquakes and the nuclear power plant situation in this blog.  I’m not a news reporter (although my major in college was Broadcast Journalism..I’m such a bad writer!) and constantly dwelling on the whole situation makes me really nervous. So back to the good stuff, sewing and fashion, and the bright side of life here in Japan.

This week, I finally made myself the Meg Nielsen Maternity top variation. The original top looks like this. I think the top is great for the third trimester pregnant body.  So, I decided to do a Chie remix of the dress for a couple of reasons.  First I do not have jeans that fit me comfortably any longer so I needed to find a way to cover my bottom half. Also I wanted to make it a bit dressier because I planned on wearing this on my baby shower, which had to be canceled….because of the earthquake (I guess I couldn’t completely avoid the topic). So using Meg’s pattern, I made some alteration and turned it into a dress. 

I used two-way stretch jersey in peach color. After finding out that I’m pregnant with a baby girl, I find myself wearing more pink – Not sure why, but I want to feel girly in pink and peach and all that pretty colors of Spring.


I love how the dress turned out, and I’ve already worn it once. It’s so comfortable! I think the criss cross front might work well for nursing as well.

When I wore this dress, Andy made a confession – he said one of the most unflattering pieces of clothing I own is a pair of black opaque tights. I was shocked. That’s my uniform! Since I barely wear pants, I wear black opaque tights almost every day. I had no idea he thought they were ugly. So I decided to switch to half sheer gray tights to pair with my new dress.


Here is a tutorial on how I turned Megan Nielson wrap around maternity top into a maternity dress!
There are 3 pattern pieces to her original top: Front, Back and Sleeves.

1. Alteration on front pattern piece:  

2. Alteration on back pattern piece:

3. Alteration on sleeve pattern piece:
This step is not necessary, I lengthened the sleeve just because I wanted the dress to have long sleeves, but if you prefer the elbow length sleeves, you can just use the original sleeve pattern piece.

4. In addition to front, back and sleeve pattern pieces, you will need to draft an I-line skirt pattern yourself.
I used the pattern I drafted for the front cross dress from my Spring collection, and added 3 inches to the top to give it a high-waisted look. Perhaps you can try this tutorial to draft your I line skirt pattern, and omit the darts, because if you use stretchy fabric, you won’t need darts.

I cut 4 pieces for the skirt: 2 for front and 2 for back. The reason for this is to layer (or line) the skirt because the fabric I used was rather thin, and I was afraid that it might be sheer.

I would love to see your version of the dress! I think this is a great addition to a wardrobe even if you are not pregnant. I’m already planning on making another one for myself…but only if I can finish the 12+ custom orders I have to waiting before Kiko comes!

Sign me up!

Want more post like this? 

Get it in your inbox, once a month. Check out my previous newsletters to see if you would like one.

Filed Under: pregnancy series, Tutorial Tagged With: creation, pregnancy, tutorial

« Previous Page
Next Page »

Primary Sidebar

JOIN MY EMAIL LIST

You can read a sample newsletter here, including my latest edition.

Recent Posts

  • UNPLAN shinjuku Pop Up
  • Japanese Iconic Pop Up & Mini Fashion Show 
  • Responsible Marché Vol.8 — A Day to Discover the Stories Behind Clothes
  • Seplumo Nihonbashi POP UP
  • Coaster Aobadai X VIVAT VERITAS POP UP

Categories

Follow me

  • Email
  • Facebook
  • Instagram
  • Pinterest
  • Twitter
  • YouTube

♥ Blog Archives

  • Etsy
  • Creema

Footer

ABOUT ME

My name is Chie. I design and make custom wedding dresses in Tokyo, Japan. Read More…

GET UPDATES!

Get monthly updates including new items in the shop, favorite links and more!

CONTACT

Feel free to send a message if you have any comment:

chie@vivatveritas.com

LET´S GET IN TOUCH

  • Email
  • Facebook
  • Instagram
  • Pinterest
  • Twitter
  • YouTube
1月末に行われたコレクティブファッションショーのルックスをご紹介💫 伝統的な生地の美しさを現代のス 1月末に行われたコレクティブファッションショーのルックスをご紹介💫

伝統的な生地の美しさを現代のスタイルへと落とし込めるように意識してデザインしました。

• 帯の巻きスカート
• 銘仙(めいせん)の風合いを活かした遊び心あるロンパース
• 袖のシルエットが際立つ、一枚仕立てのジャケット 

など🧚 

Introducing the looks from the Collective Fashion Show held at the end of January💫

In designing these pieces, my focus was on translating the timeless beauty of traditional Japanese textiles into contemporary, wearable styles.

• The Obi wrap skirt, reimagined for the modern wardrobe.
• The playful Meisen rompers, breathing new life into vintage silk.
• The unlined statement jacket, featuring a striking sleeve silhouette.

Photo credit:
Photographer @maiemilie 
Models @naka_kanar  @anna012945 @mae.suzu.ki @kotoha_mu @_kasumi.y @lei_seans
Event organizer @naka_kanar 

#コレクティブファッションショー #着物リメイク #銘仙 #帯リメイク #一点物 JapaneseTextiles KimonoStyle UpcycledFashion SustainableFashion ModernKimono
今回のオーダーはアメリカから🇺🇸 着物をツーピースにリメイクしました。 この繊細な刺繍、ずっと眺めて 今回のオーダーはアメリカから🇺🇸
着物をツーピースにリメイクしました。
この繊細な刺繍、ずっと眺めていられるくらい綺麗…😍
シルクの肌触りがとにかく柔らかくて、着心地も最高です。
ポケット付きなのも、地味に嬉しいポイント💡
しばらく関税の関係でアメリカに発送出来なかったのですが、UGXが使えるようになったので発送再開しました!

New custom order for a client in the USA! 🇺🇸✨

From vintage kimono to a chic two-piece set. Just look at that embroidery... absolutely stunning! 😍 The silk texture is pure luxury and so comfortable to wear. And yes, it has pockets! 🙌

📢 Shipping update: US shipping is officially BACK via UGX! Thank you for your patience.

#着物リメイク #アップサイクル #サステナブルファッション #着物コーディネート #kimonoremake upcycledfashion handmade
【Pop-up at UNPLAN Shinjuku】 I’ll be setting up a s 【Pop-up at UNPLAN Shinjuku】
I’ll be setting up a shop at UNPLAN Shinjuku @unplan_shinjuku from Feb 28 to March 6. If you’re in the area, come by and check out the pieces in person💕

When I’ll be there:
 * Feb 28 (Sat): 5 PM – 11 PM
 * March 6 (Friday): 5 PM – 11 PM

📍UNPLAN Shinjuku
Address: 5-chōme-3-15 Shinjuku, Shinjuku City, Tokyo 160-0022

Hope to see you there🫶🏻

【UNPLAN Shinjuku でポップアップします】
2月28日から3月6日まで、UNPLAN Shinjuku でポップアップを開催することになりました。
帯ビスチェや着物で作ったMA1などを直接手に取って頂ける機会なので、ぜひ遊びに来てください♡

在廊日(直接お会いできる日):
 * 2月28日(土): 17:00 – 23:00
 * 3月6日(金): 17:00 – 23:00

3月1日〜5日の期間中も、会場にアイテムを展示、販売しています。ふらっと立ち寄ってもらえると嬉しいです。

📍 UNPLAN Shinjuku(新宿)
160-0022 東京都新宿区新宿5-3-15

Photo credit:
Photographer @maiemilie 
Model @rima_a0905
Event organizer @naka_kanar 

#UNPLANShinjuku #東京ファッション #ポップアップ #TokyoFashion #PopUp
お客様の帯でリュックを作りました🪡 こだわりポイントは… ✔︎縁起の良い「青海波」の柄を活かしたデ お客様の帯でリュックを作りました🪡
こだわりポイントは…

✔︎縁起の良い「青海波」の柄を活かしたデザイン
✔︎荷物がたっぷり入る13cmのマチ
✔︎普段着に合わせやすい絶妙なネイビー

動画の最後で実際に背負ってみましたが、サイズ感もちょうど良く、デイリーユースにぴったりです!通勤でお使い頂けると聞いて嬉しい🥹🫶🏻

I remade a customer’s Obi belt into a backpack🪡✨

Here are the details:
✔︎ A design featuring the ""Seigaiha"" (wave) pattern—a symbol of good luck and peace.
✔︎ A spacious 13cm depth for plenty of storage.
✔︎ A beautiful navy that blends perfectly with everyday outfits.

As you can see in the video, the size is just right and it's perfect for daily use. I’m so glad to hear that she’ll be using it for work🥹🫶🏻

#帯リメイク #アップサイクル #ハンドメイドバッグ  #青海波
Paint the world collection ミニファッションショーから🎨 受け継がれてきた Paint the world collection ミニファッションショーから🎨
受け継がれてきた着物の美しさを、今の空気感に閉じ込めたMA-1。
さりげなく裏地も素敵💓

A glimpse from the "paint the world” collection mini fashion show.
Vintage kimono silk reimagined into a modern bomber jacket.
The vivid red lining tells a story of its own💕

▶︎ Online Shopにて販売中
詳細はプロフィール@vivatveritasのURLをチェック✔︎

Photographer @maiemilie 
Model @ppotatodesu
Event organized by @naka_kanar

#kimonoremake #fashioncollection #着物リメイク#upcycledfashion #kimonostyle tokyofashion
オーストラリアのお客様からオーダーいただいた、着物リメイクのドレスとバッグ。 海を越えてお届けしま オーストラリアのお客様からオーダーいただいた、着物リメイクのドレスとバッグ。

海を越えてお届けしました🌊

桜の柄がスカートの裾と袖🌸

お揃いの巾着バッグも🫶🏻

遠く離れた地で、このドレスが特別な時間を彩りますように💫

A custom-made kimono remake dress and matching bag for my client in Australia🇦🇺

Sent with love across the ocean🌊

The beautiful cherry blossom patterns bloom elegantly along the hem and sleeves🌸

I also crafted a matching drawstring bag to complete the look🫶🏻

#着物リメイク #着物ドレス #オーダーメイド #サステナブルファッション #桜 Kimonoremake Kimonodress UpcycledKimono Custommade Japanesestyle
視線を奪う、孔雀さん🦚💙 正絹の艶やかさを活かした、バックレスデザインのロングドレスです。 チョー 視線を奪う、孔雀さん🦚💙

正絹の艶やかさを活かした、バックレスデザインのロングドレスです。
チョーカー風のホルターネックが顔周りを華やかに見せてくれます。

特別な日は、特別なドレスで👗

▶︎ Online Shopにて販売中
詳細はプロフィール@vivatveritasのURLをチェック✔︎

Eyes on the peacock🦚✨

This backless gown is made from genuine silk kimono fabric. Featuring a chic choker-style halter neck, it’s designed to make an entrance at your next party or resort getaway.

Special days deserve a special dress👗

▶︎ Shop online now
Link in bio: @vivatveritas ✔︎

Photographer @maiemilie 
Model @ganguro_egg
Headband and jewelry @catwalk_bijoux
Event organized by @naka_kanar

#KimonoRemake #SustainableFashion #SlowFashion #Peacock #VivatVeritas
着物ドレス リメイクファッション リゾートコーデ 孔雀 ハンドメイドドレス
様々な表情をしてる唐子さんが可愛すぎる着物羽織を発見したので👀カジュアルに着れるMA 1にしてみまし 様々な表情をしてる唐子さんが可愛すぎる着物羽織を発見したので👀カジュアルに着れるMA 1にしてみました🍎

もちろんポケット付きで機能性アップ+リブの袖口とネックラインで気易く✨

Found this stunning vintage kimono fabric featuring ""Karako"" (children) with so many adorable facial expressions! 👀 I’ve transformed it into a casual MA-1 bomber jacket🍎

I’ve added pockets for extra functionality, and the ribbed cuffs and neckline make it super easy and comfortable to wear✨

Model @naka_kanar

#着物リメイク #着物アップサイクル #MA1 #唐子 
#KimonoRemake UpcycledFashion
Follow me on Instagram

Copyright © 2026 · vivien theme by Lovely Confetti DMCA.com Protection Status

Copyright © 2026 Vivat Veritas